
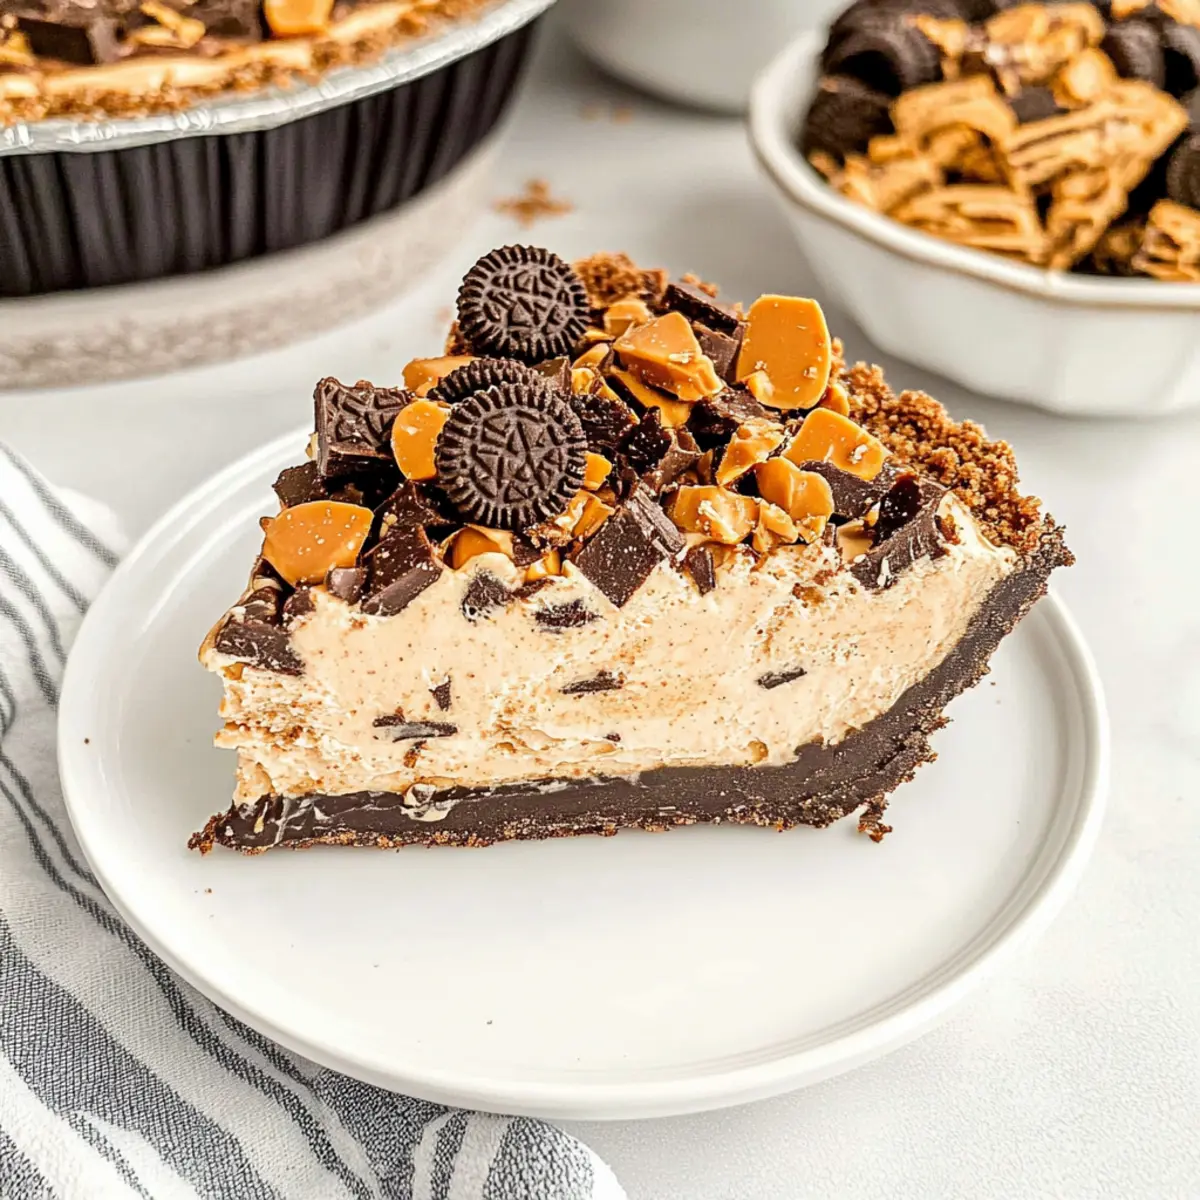
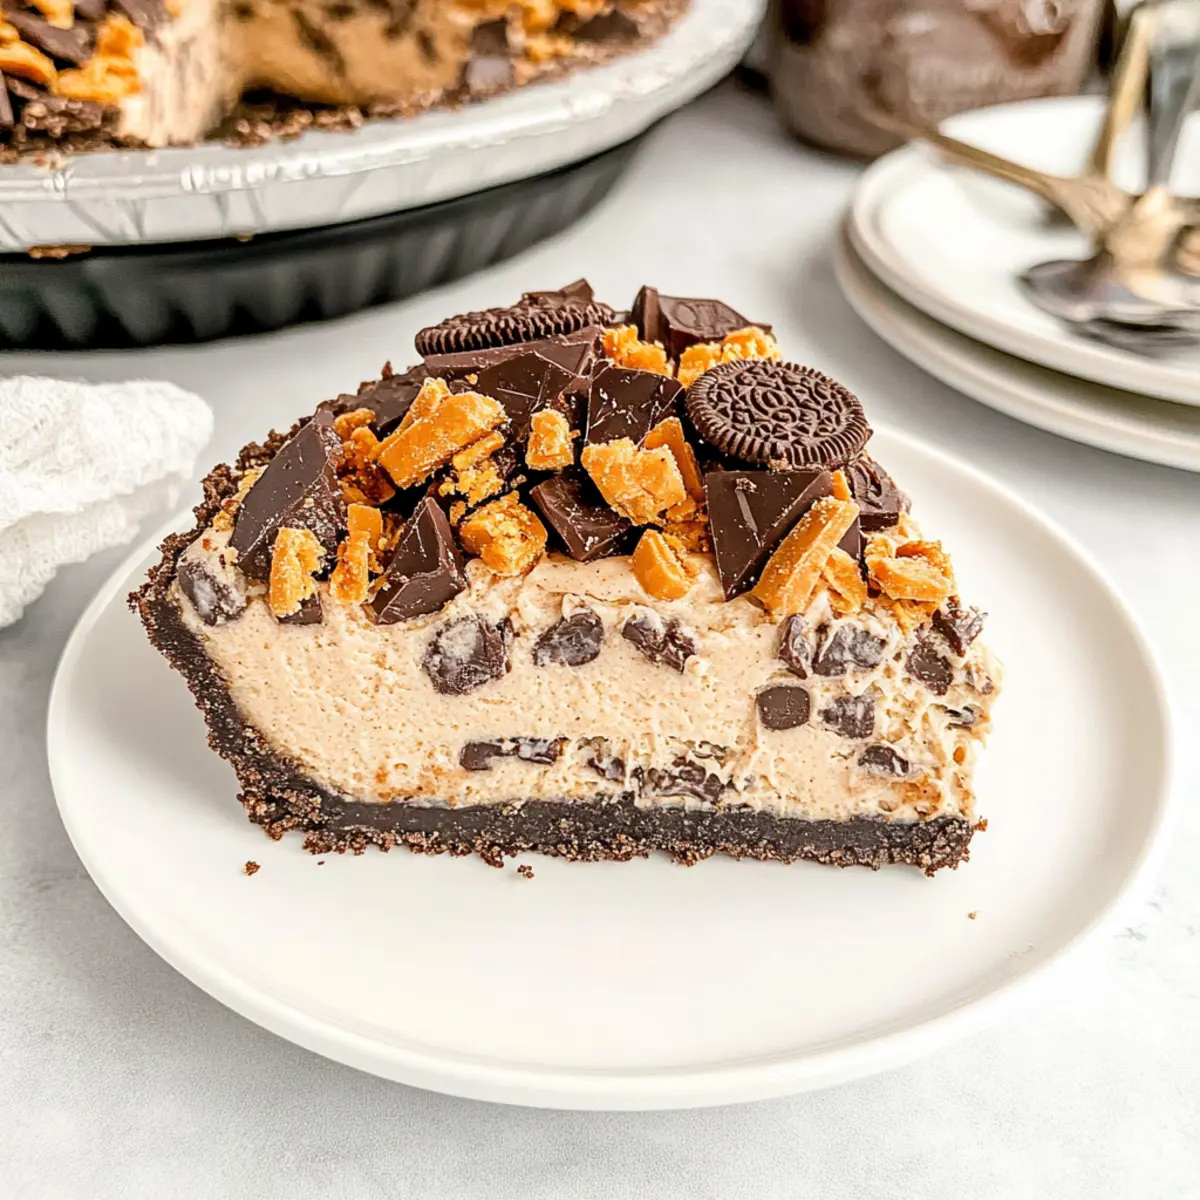
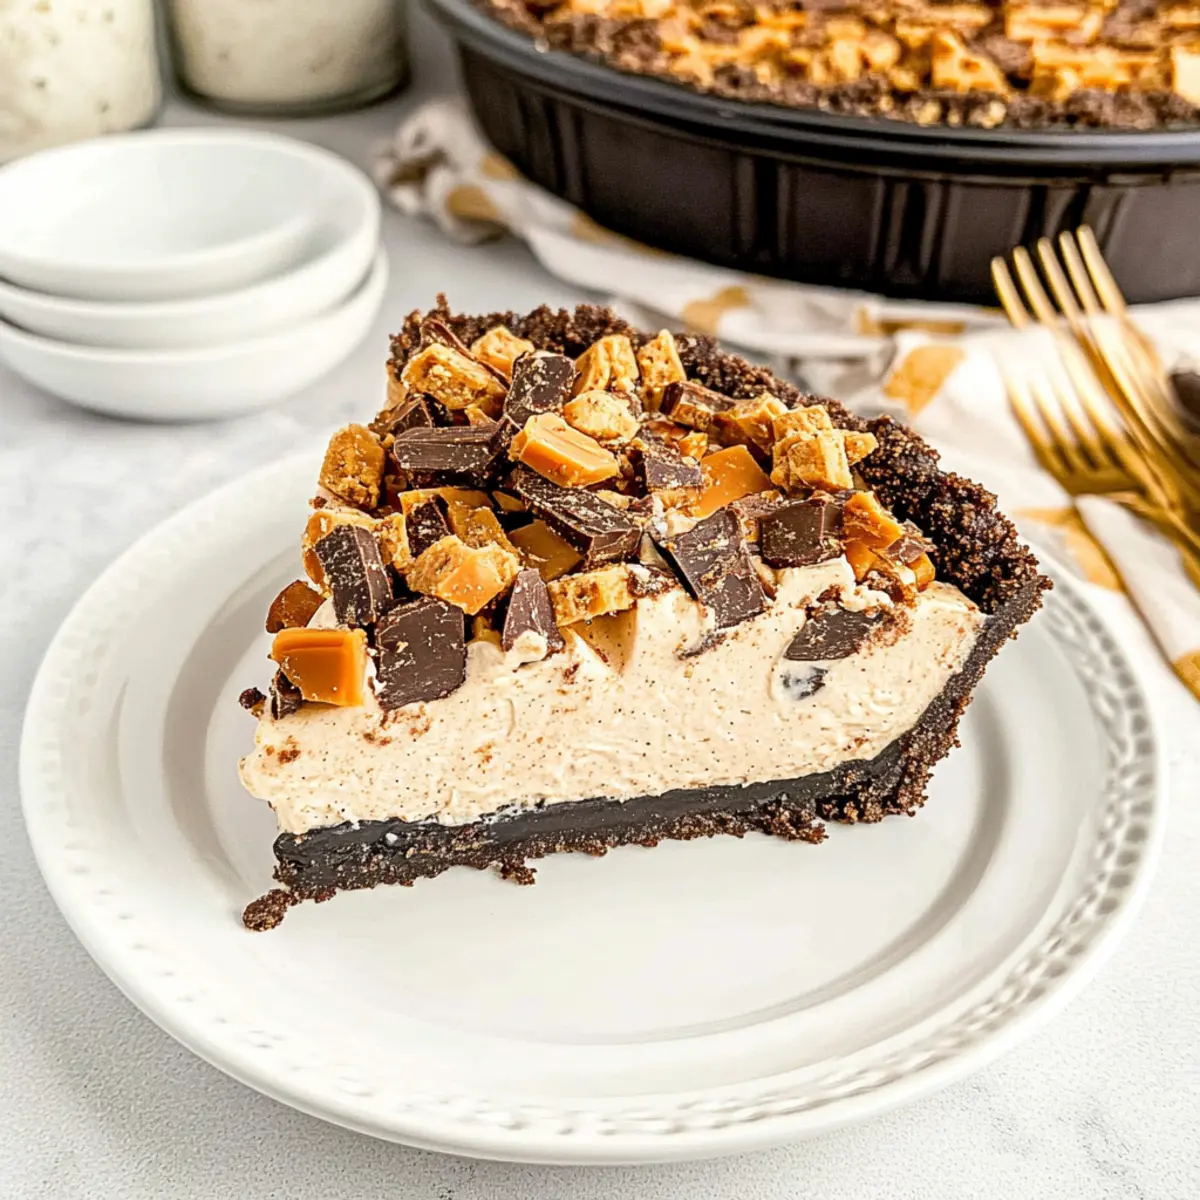
Picture a sunny afternoon, the kind that calls for something cool and delicious. That’s when I whip up my No Bake Butterfinger Pie, a dessert that fuses rich chocolate and creamy peanut butter into a sweet symphony. What I love most about this quick-prep treat is that it requires just 20 minutes of your time, making it the perfect solution for last-minute gatherings or simply a way to sweeten up a weeknight. With a satisfyingly crispy Oreo crust and layers of fluffy creamy goodness studded with crunchy Butterfinger pieces, this pie doesn’t just taste divine—it’s also kid-friendly and will have everyone asking for seconds! Ready to indulge in a no-bake wonder that will become your new favorite dessert? Let’s get started!
Why is Butterfinger Pie a Must-Try?
Decadent Indulgence: Every slice of this No Bake Butterfinger Pie is a celebration of rich chocolate and creamy peanut butter, offering an unforgettable flavor experience.
Quick and Easy: With only 20 minutes of prep time, this dessert is ideal for those busy days when you crave something sweet without the fuss.
Kid-Friendly Delight: Kids and adults alike will love the combination of crunchy Butterfinger pieces mixed with a silky cream filling—it’s sure to be a hit!
Versatile Customization: Feel free to switch up the Oreo crust with graham crackers or even Nutter Butters for a unique twist.
Whether paired with fresh berries or simply served chilled, this pie is destined to impress your guests. For more delightful treats, check out my Pumpkin Pie Stuffed recipe for a fall-inspired dessert!
Butterfinger Pie Ingredients
For the Crust
• Oreo Cookie Crumbs – Serves as the crunchy base; swap with graham cracker crumbs for a different flavor.
• Unsalted Butter – Binds the crust; ensure it’s melted but slightly cooled to incorporate well with crumbs.
• Salt – Just a pinch enhances sweetness and balances the flavors.
For the Filling
• Cream Cheese – Adds a rich and creamy element; opt for full-fat for best texture.
• Creamy Peanut Butter – Provides flavor and body; JIF or Skippy recommended for consistency.
• Powdered Sugar – Sweetens and smoothens the filling.
• Chopped Butterfingers – Essential for that signature flavor and crunch; consider swapping with Reese’s for a twist.
• Cool Whip – Creates a light, airy texture; remember to thaw before using.
For the Chocolate Layer
• Chocolate Fudge Pudding Mix – Delivers a rich chocolatey layer; you can try other pudding flavors if desired.
• Whole Milk – Necessary for preparing the pudding, ensuring it mixes smoothly.
For Toppings
• Semi-sweet Chocolate Chips – Adds a delightful texture and extra sweetness on top.
• Chocolate Syrup – Perfect for drizzling, it enhances the overall chocolaty goodness of the Butterfinger Pie.
Step‑by‑Step Instructions for Butterfinger Pie
Step 1: Prepare the Crust
In a mixing bowl, combine 1 ½ cups of Oreo cookie crumbs, ½ cup of melted but slightly cooled unsalted butter, and a pinch of salt. Mix thoroughly until the crumbs are well-coated with butter. Firmly press this mixture into a greased 9-inch pie pan, creating an even layer. Chill the crust in the refrigerator for at least 15 minutes to help it set and hold its shape.
Step 2: Make the Peanut Butter Layer
In a large bowl, using an electric mixer, beat 8 ounces of softened cream cheese, 1 cup of creamy peanut butter, and 1 cup of powdered sugar until the mixture is smooth and creamy, about 2-3 minutes. Gently fold in 1 cup of chopped Butterfinger pieces and 1 cup of thawed Cool Whip until evenly distributed. Spread this rich peanut butter filling over the chilled Oreo crust in an even layer.
Step 3: Prepare the Pudding Layer
In a separate bowl, whisk together 3.9 ounces of chocolate fudge pudding mix and 2 cups of cold whole milk until it thickens, about 2 minutes. Ensure there are no lumps and the mixture is smooth. Once thickened, carefully pour this chocolate layer over the peanut butter filling, spreading it evenly to create a delicious contrast.
Step 4: Top with Cool Whip
Spread the remaining 2 cups of Cool Whip gently over the chocolate pudding layer, ensuring a smooth finish. For a decorative touch, sprinkle additional chopped Butterfingers and ½ cup of semi-sweet chocolate chips on top. Drizzle with chocolate syrup for added sweetness and flair, making your Butterfinger Pie look irresistible.
Step 5: Chill
Cover the pie with plastic wrap or a lid and refrigerate for at least 4 hours, allowing all layers to set and flavors to meld beautifully. For an even better taste experience, consider chilling the pie overnight. When ready to serve, slice into that delicious, chilled Butterfinger Pie and enjoy each decadent bite!
Expert Tips for Butterfinger Pie
-
Chill the Crust: Ensure the crust is well-chilled before adding layers; this helps the pie hold its shape and stay firm for serving.
-
Full-Fat Ingredients: Use full-fat cream cheese and Cool Whip for the best texture and creaminess. Low-fat versions can lead to a watery filling.
-
Overnight Chill: For enhanced flavor, refrigerate the pie overnight. This allows the layers to meld together beautifully and intensifies the taste.
-
Mix Peanut Butter Well: If using natural peanut butter, stir thoroughly before measuring to avoid excess oil, ensuring a creamy filling throughout your Butterfinger Pie.
-
Experiment with Toppings: Feel free to customize the toppings with different candy bars or nuts; try adding crushed peanuts for an extra crunch!
What to Serve with No Bake Butterfinger Pie
Picture an unforgettable gathering filled with laughter and sweet delights; complement your pie with perfect pairings!
-
Fresh Berries: Juicy strawberries, blueberries, or raspberries brighten the plate and provide a delightful contrast to the rich flavors. Their tartness cuts through the sweetness and adds a refreshing burst.
-
Whipped Cream: Light and airy, a dollop of homemade or store-bought whipped cream enhances the creamy texture of the pie and adds an inviting touch.
-
Chocolate Ice Cream: A scoop alongside your Butterfinger Pie intensifies the chocolate flavor and transforms this dessert into an indulgent treat that will leave everyone enchanted.
-
Peanut Butter Cookies: Serve these crunchy treats on the side for a fantastic dessert duo. The peanut butter echoes the filling’s creamy richness, creating a wonderful harmony of flavors.
-
Coffee or Espresso: A warm cup of coffee balances the sweet, rich pie perfectly. The bitter notes complement the chocolate and peanut butter, enhancing your tasting experience.
-
Chocolate Drizzle: Drizzle a bit of additional chocolate syrup over each serving for an elegant touch. It ties the flavors together beautifully and adds an extra layer of decadence.
-
Milkshakes: A creamy milkshake, whether chocolate or vanilla, pairs wonderfully with the pie, offering a fun and nostalgic element that everyone will enjoy during warm months.
-
Nutty Toppings: Consider serving crushed nuts, like pecans or walnuts, for an added crunch that provides contrasting textures to the creamy pie.
Butterfinger Pie Variations & Substitutions
Customize your Butterfinger Pie to suit your cravings and dietary preferences, and experience a delightful twist in every bite!
- Graham Cracker Crust: Swap the Oreo crust for a graham cracker base for a lighter, slightly sweeter flavor. This flexible change adds a fun twist to the overall taste.
- Nutter Butter Crust: Want more peanut butter? Use Nutter Butter cookies for the crust. This adds a delightful layer of flavor, harmonizing beautifully with the creamy filling.
- Natural Peanut Butter: For a healthier option, replace creamy peanut butter with natural peanut butter. Just ensure it’s well-mixed to avoid separation in your filling.
- Chocolate Variations: Incorporate chocolate pudding mix instead of the chocolate fudge mix for an even richer chocolate experience. The flavor contrast heightens the overall indulgence.
- Candy Bar Swaps: Feel adventurous? Try using chopped Reese’s Peanut Butter Cups or Snickers for a deliciously different texture and flavor burst. This opens up an exciting path of new taste.
- Add Some Heat: If you enjoy spicy flavors, a pinch of cayenne pepper in the creamy filling can provide an exciting kick. It’s a wonderful way to surprise your palate!
- Nutty Crunch: Top your pie with crushed peanuts or pecans for an added crunch and a hint of nuttiness. This variation elevates the texture and flavor profile.
- Vegan Option: Substitute dairy ingredients with plant-based alternatives, like cashew cream and coconut whipped topping, for a delicious vegan-friendly Butterfinger Pie. It’s amazing how delicious these swaps can taste!
For more delightful ideas, don’t forget to check out my Toasted Pumpkin Pie recipe or the luscious Pumpkin Pie Stuffed baked apples. Each offers unique flavors that might inspire your next creation!
How to Store and Freeze Butterfinger Pie
Fridge: Store leftovers tightly wrapped in plastic wrap or in an airtight container for up to 3-5 days. This keeps the pie fresh and delicious, perfect for second helpings!
Freezer: If you wish to keep your Butterfinger Pie longer, freeze it for up to one month. Wrap the pie well in plastic wrap and aluminum foil to prevent freezer burn, then thaw in the fridge before serving.
Serving: Enjoy the pie chilled straight from the fridge, or serve it partially frozen for a refreshing treat on warm days. The creamy layers will remain delightful either way.
Reheating: There’s no need to reheat this no-bake dessert, but if you enjoy it slightly softened, let it sit at room temperature for about 10-15 minutes before serving.
Make Ahead Options
These No Bake Butterfinger Pie options are perfect for busy home cooks looking to save time during the week! You can prepare the crust and peanut butter layer up to 24 hours in advance by pressing the crust into the pie pan and refrigerating it, while the filling can be made and stored in the fridge. Just keep it in an airtight container to maintain its creamy texture. When you’re ready to serve this delicious Butterfinger Pie, simply layer the chilled peanut butter mixture over the crust, prepare the chocolate layer, and chill for an additional 4 hours before serving. This method ensures that every slice will be just as delightful as freshly made!
Butterfinger Pie Recipe FAQs
How do I choose the right ripeness for the ingredients?
Absolutely! For this No Bake Butterfinger Pie, you want your cream cheese to be soft and at room temperature. This makes it easier to blend smoothly into the filling. The peanut butter should be at a creamy consistency—opt for JIF or Skippy to avoid separation. While the butter doesn’t need ripening, ensure it’s melted and slightly cooled to make mixing easier.
How should I store Butterfinger Pie, and how long will it last?
Very! Store your leftovers tightly wrapped in plastic wrap or in an airtight container in the refrigerator for up to 3-5 days. This keeps the pie fresh and delightful for second helpings. If you want to extend its life, you can freeze it for up to one month. Just remember to wrap it well in plastic wrap and aluminum foil to prevent freezer burn!
Can I freeze Butterfinger Pie, and how will it affect the texture?
Certainly! To freeze your Butterfinger Pie, carefully wrap it in plastic wrap and then in aluminum foil. This layering protects it during freezing. Thaw the pie in the refrigerator for several hours or overnight before serving. Expect a slightly different texture upon thawing; the layers will remain creamy, and the flavors will still be fantastic!
What should I do if my pie doesn’t set properly?
If your Butterfinger Pie isn’t setting as expected, there might be a few reasons. Ensure you chilled the crust adequately before layering; this is essential. Additionally, incorporating the right amount of powdered sugar helps stabilize the filling. If using natural peanut butter, ensure it’s well-mixed to avoid excessive oil that may prevent setting. You can also chill the pie for longer if needed—up to overnight for best results!
Are there any allergies I should be aware of with this recipe?
Absolutely! This No Bake Butterfinger Pie contains common allergens like dairy (cream cheese and Cool Whip), gluten (Oreo crust), peanuts (peanut butter and Butterfingers), and processed sugars. Be cautious if you’re serving guests; consider using alternatives for those with allergies, like gluten-free cookies for the crust or sunbutter for a nut-free version!
Can I substitute any of the ingredients in the Butterfinger Pie?
Certainly! Feel free to swap out the Oreo crust for a graham cracker or Nutter Butter crust for a different flavor. If you want to change the candy aspect, using chopped Reese’s Peanut Butter Cups instead of Butterfingers adds a nice twist. You can even mix different pudding flavors, such as chocolate and peanut butter, to create layers of excitement!

Irresistible Butterfinger Pie You Can Whip Up in 20 Minutes
Ingredients
Equipment
Method
- Prepare the crust by combining Oreo cookie crumbs, melted butter, and salt. Press into a greased 9-inch pie pan and chill for 15 minutes.
- Make the peanut butter layer by beating cream cheese, peanut butter, and powdered sugar together. Fold in Butterfinger pieces and Cool Whip, spreading over the crust.
- Prepare the pudding layer by whisking chocolate fudge pudding mix with cold milk until thickened, then spread over the peanut butter layer.
- Top with remaining Cool Whip and sprinkle with chopped Butterfingers and chocolate chips. Drizzle with chocolate syrup.
- Chill the pie covered for at least 4 hours before serving.
Leave a Reply