
As the summer sun warms up, there’s nothing quite like a chilling dessert to cool us down. Enter the Easy No-Bake Oreo Ice Cream Cake—a delightful concoction that will not only satisfy your sweet tooth but also impress your friends and family at gatherings. This gem features a crunchy Oreo crust, creamy ice cream, and a drizzle of rich fudge, making it the ultimate no-bake treat for those sweltering days. The best part? Its simplicity allows you to whip it up in no time, and the customizable flavors mean you can tailor it to suit every taste bud. Curious about how to bring this show-stopping dessert to life? Let’s dive in!
Why is this Oreo Ice Cream Cake special?
Irresistibly Easy: With no baking required, this cake is perfect for those busy days when you crave something sweet with minimal effort.
Layered Delight: The harmonious layers of crunchy Oreo crust, creamy ice cream, and luscious fudge sauce create a dessert that dazzles both the eyes and the taste buds.
Customizable Fun: No need to stick to vanilla! Feel free to experiment with flavors—try mint chocolate chip or cookies and cream for a delightful twist.
Perfect Crowd-Pleaser: Whether it’s a summer BBQ or a casual family dinner, this cake is sure to impress guests of all ages, just like my Pumpkin Cream Cheese Cinnamon Rolls.
Make-Ahead Convenience: Prepare it in advance and keep it in the freezer, allowing you to spend more time with your loved ones instead of in the kitchen.
With these standout features, your Oreo Ice Cream Cake will be a hit at any gathering!
Oreo Ice Cream Cake Ingredients
For the Crust
- Oreo Cookies – Provides the crunchy base and can be substituted with any chocolate sandwich cookies.
- Butter – Binds the cookie crumbs for the crust; margarine works as a non-dairy option.
For the Ice Cream Layers
- Vanilla Ice Cream – Acts as the main creamy layer; feel free to swap with chocolate or any preferred flavor for a unique twist.
- Hot Fudge Ice Cream Topping – Adds a rich chocolate layer; caramel or other dessert sauces make for tasty alternatives.
For the Whipped Topping
- Frozen Whipped Topping – Provides a light, airy finish; for a homemade touch, opt for freshly whipped cream instead.
With these ingredients, you’re well on your way to creating a delightful Oreo Ice Cream Cake that’s perfect for hot summer days or any celebration!
Step‑by‑Step Instructions for Oreo Ice Cream Cake
Step 1: Prepare the Crust
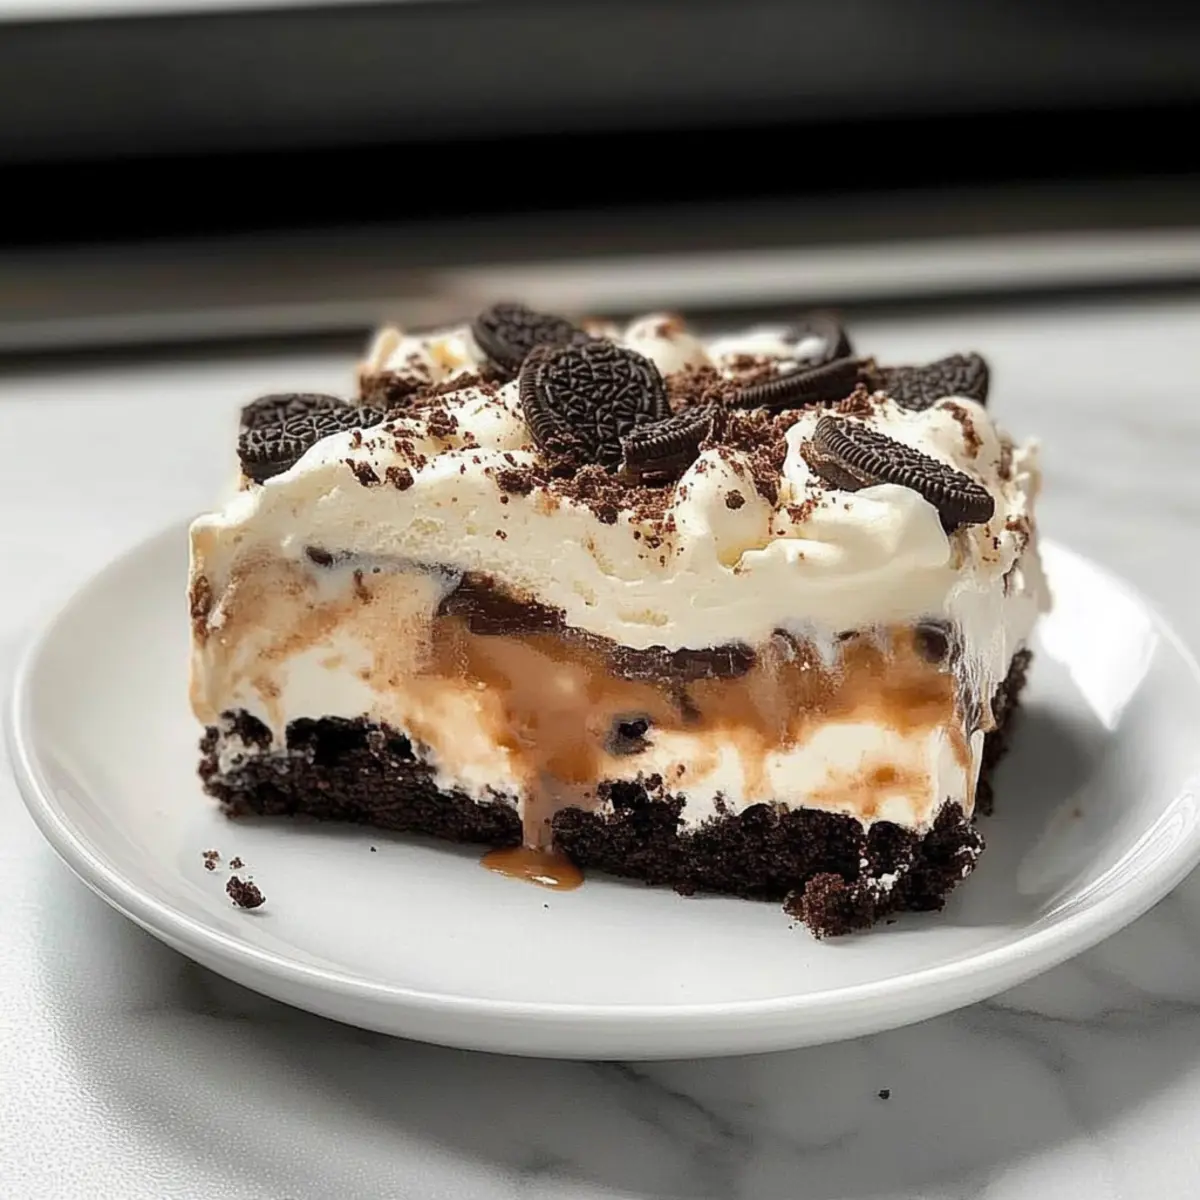
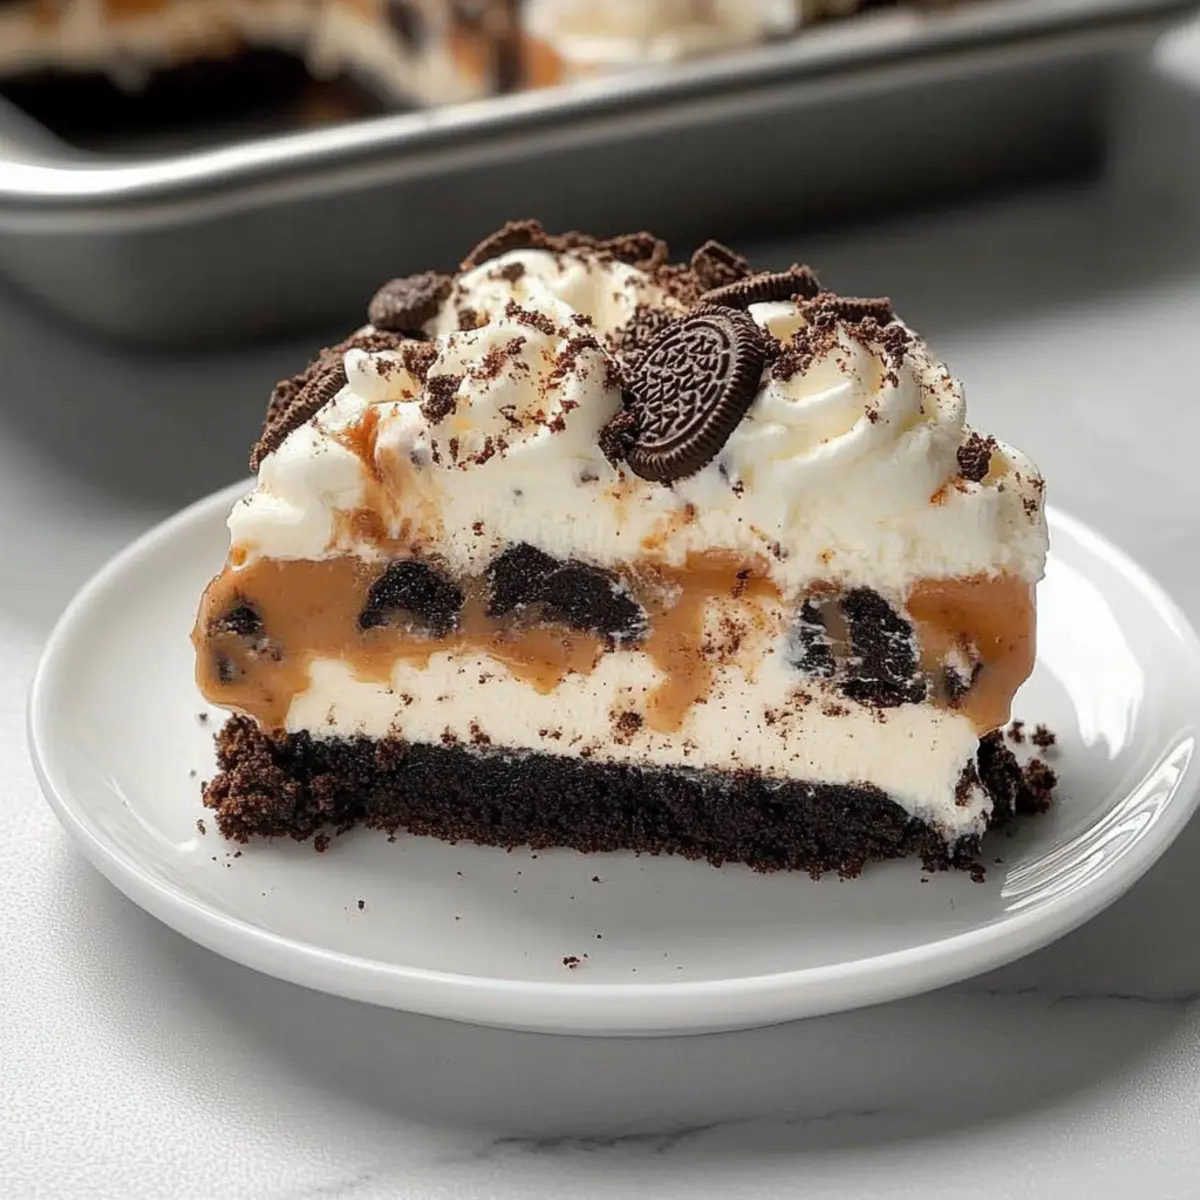
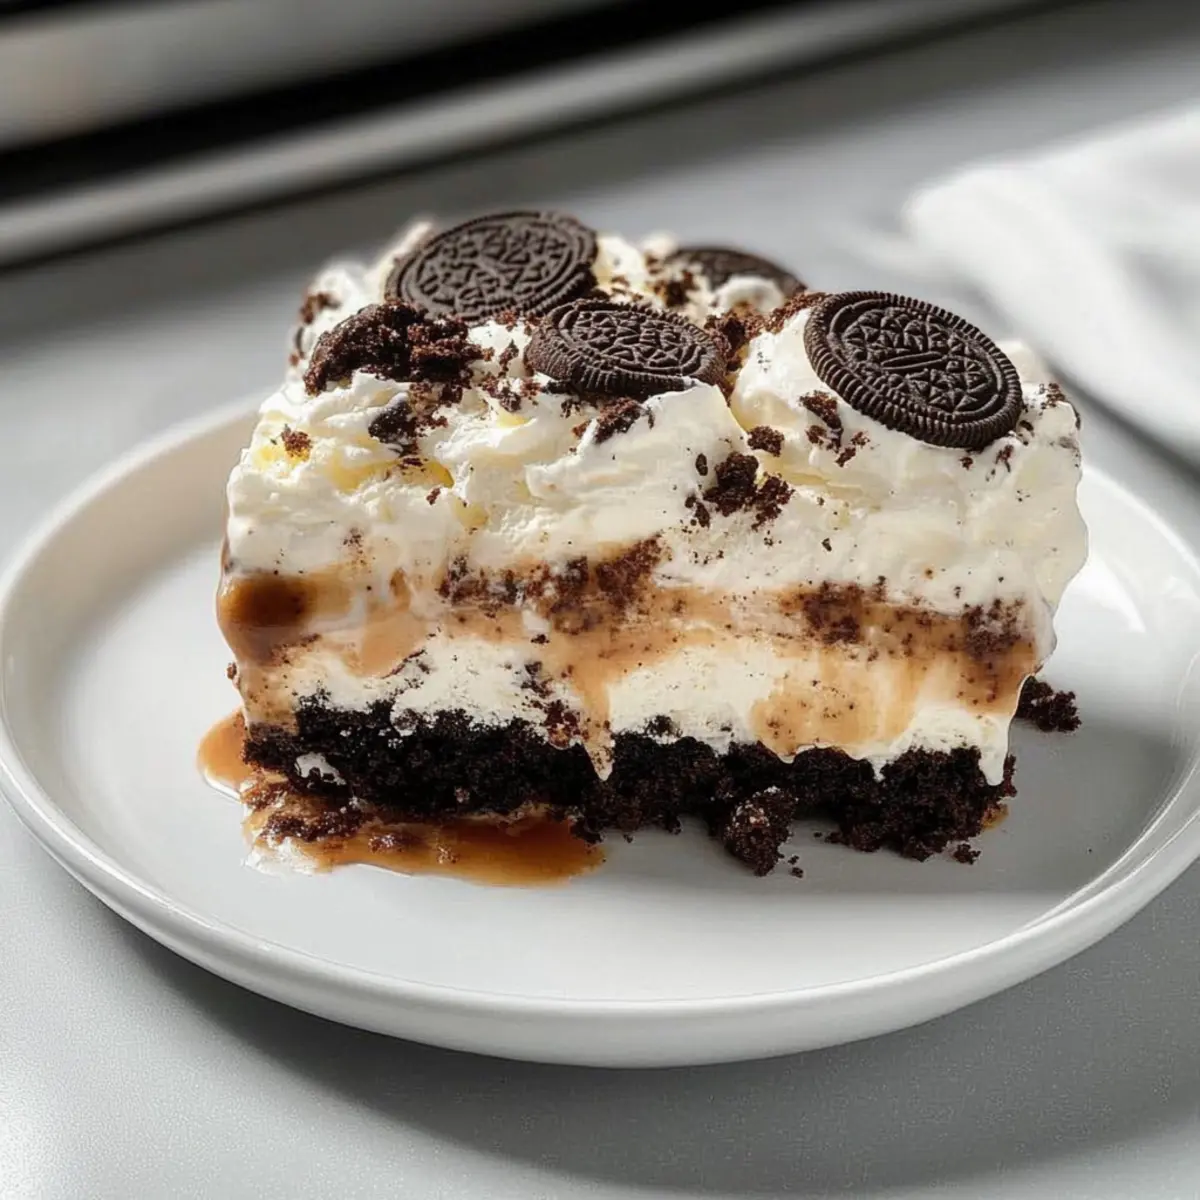
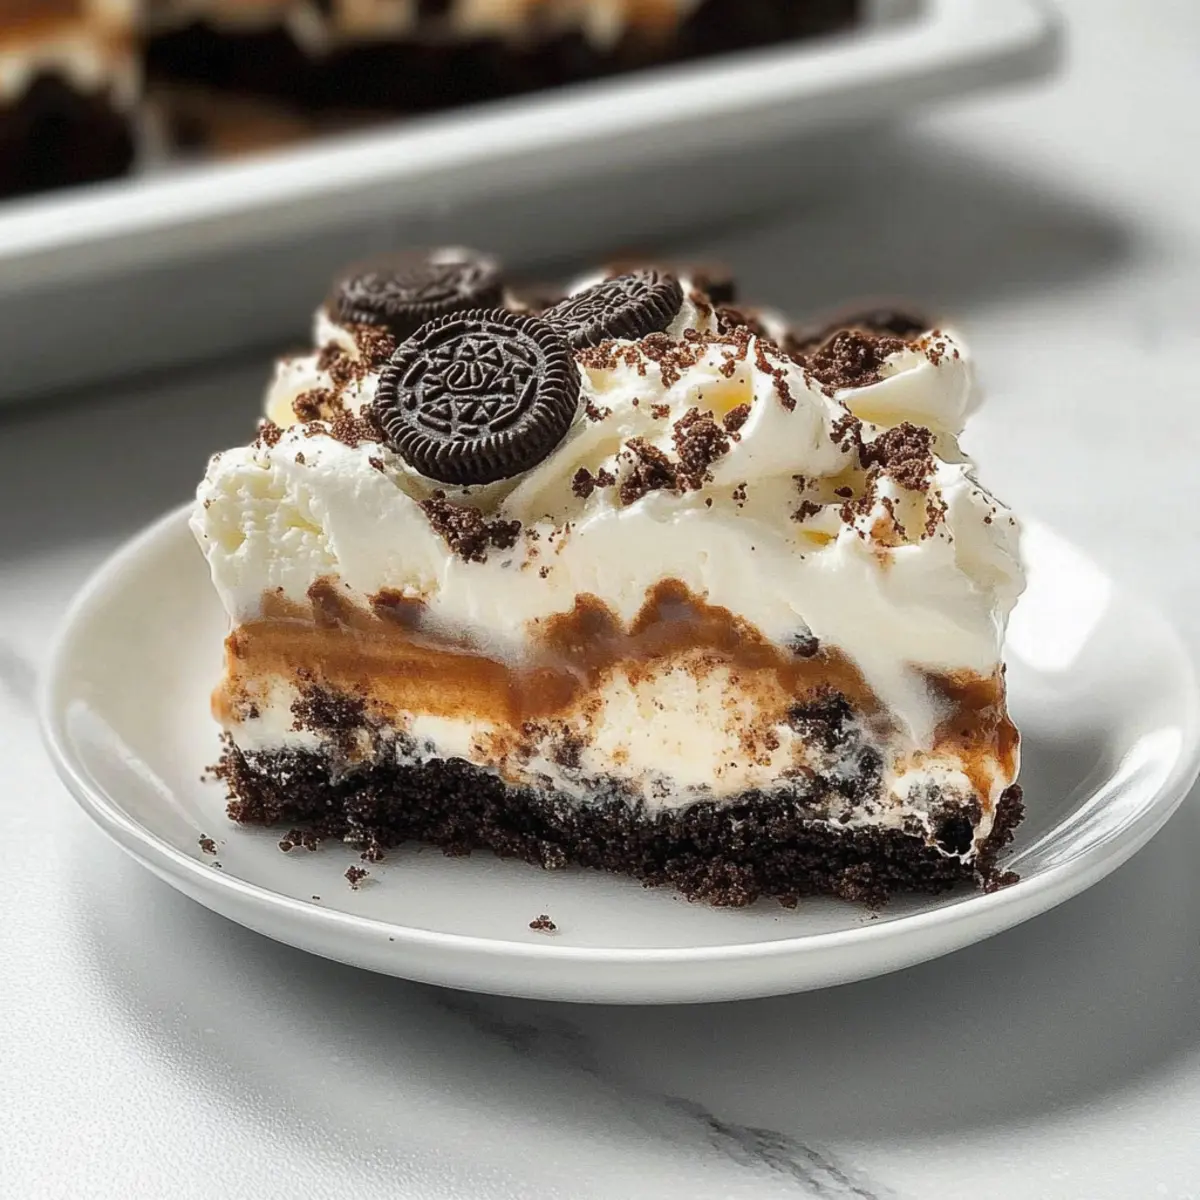
In a large mixing bowl, combine 3 cups of crushed Oreo cookies and ½ cup of melted butter. Stir until the crumbs are fully coated. Pour the mixture into a greased 13×9-inch dish, pressing it firmly into an even layer. Ensure it’s compact and smooth. Place the crust in the freezer for about 10 minutes to set while you prepare the ice cream layer.
Step 2: Add the Ice Cream Layer
Once the crust is set, take 4 cups of softened vanilla ice cream and spread it evenly over the chilled Oreo crust. Use a spatula to ensure a smooth and even layer, reaching all corners of the dish. Return the cake to the freezer for at least 30 minutes, or until the ice cream layer is firm to the touch, making it easier to add the fudge layer.
Step 3: Drizzle the Fudge Layer
After the ice cream has set, warm 1 cup of hot fudge topping in the microwave for about 15-20 seconds until pourable. Carefully drizzle the fudge over the ice cream layer, allowing it to flow to the edges for that luscious finish. Place the cake back in the freezer for another 30 minutes to ensure the fudge sets nicely as a rich layer.
Step 4: Top with Whipped Topping
Once the fudge layer is firm, take 2 cups of thawed whipped topping and spread it over the fudge layer. Use a spatula to create an even, fluffy layer, and sprinkle the remaining crushed Oreo cookies on top for added crunch. Return the dessert to the freezer, covering it with plastic wrap, and allow it to sit for at least 2 hours or until fully set.
Step 5: Serve the Cake
When ready to serve, remove the Oreo Ice Cream Cake from the freezer. Let it sit for about 10 minutes at room temperature to soften slightly for easier slicing. Use a sharp knife, rinsed under hot water for clean cuts, and slice into squares. Serve immediately, and be prepared for a delightful chorus of “wow!” from your guests.
What to Serve with Oreo Ice Cream Cake
Elevate your dessert experience by pairing this creamy delight with delicious, complementary sides and drinks.
-
Fresh Berries: Juicy strawberries, raspberries, or blueberries add a refreshing burst of flavor, balancing the sweetness of the cake. Their vibrant colors also create an inviting presentation.
-
Chocolate Drizzle: A drizzle of melted chocolate sauce enhances the cake’s indulgence. Pour it over each slice for a decadent touch that chocolate lovers will adore.
-
Vanilla Ice Cream: Serve a scoop of classic vanilla ice cream alongside for an extra layer of creaminess, creating a delightful contrast with the crunchy layers of the cake.
-
Minty Fruit Salad: A fruity combination with fresh mint provides a burst of freshness that cuts through the creaminess, making each bite of cake even more enjoyable.
-
Crispy Waffle Cones: Serve small waffle cones on the side, perfect for scooping up any cake remnants and adding extra crunch to each mouthful.
-
Iced Coffee: A chilled glass of iced coffee pairs wonderfully with the rich flavors of the cake, providing a delightful caffeine kick to round off your dessert experience.
-
Chocolate Milkshake: For a truly indulgent treat, blend up a chocolate milkshake to accompany your cake. Its creaminess meshes well with the textures of the dessert, making a nostalgic combination.
-
Caramel Sauce: Drizzle warm caramel sauce over your slice or serve it on the side for an extra sweet complement that raises the decadence factor.
-
Sliced Bananas: Add fresh banana slices to your dessert platter for a pleasing mix of flavors and textures. Their natural sweetness complements the Oreo Ice Cream Cake beautifully.
-
Sparkling Water: Finally, ensure guests stay refreshed with a glass of sparkling water. Its bubbly, crisp nature cleanses the palate, keeping the focus on the gorgeous layers of the cake.
Make Ahead Options
This Easy No-Bake Oreo Ice Cream Cake is a fantastic choice for meal prep, allowing you to save time on busy days! You can prepare the crust and layer the ice cream up to 24 hours in advance. Simply make the crust and set it in the freezer as instructed, then add the ice cream layer. After that, cover the cake tightly to prevent any freezer burn and store it for up to 3 days before adding the fudge and whipped topping. When you’re ready to impress your guests, simply drizzle the warmed fudge topping and spread the thawed whipped topping over the cake before serving. This will ensure the cake remains just as delicious and refreshing as when you first made it!
Oreo Ice Cream Cake: Sweet Customization Ideas
Feel free to explore your creativity and customize this delicious dessert to match your cravings.
-
Dairy-Free: Substitute vanilla ice cream with non-dairy varieties like coconut or almond milk ice cream for a delightful twist. You won’t sacrifice flavor but gain an inclusive dessert option.
-
Mint Chocolate Chip: Switch out vanilla ice cream for mint chocolate chip to give your cake a refreshing, cool flavor that pairs wonderfully with Oreo’s chocolatey goodness.
-
Fruity Burst: Top with fresh berries or banana slices for a pop of color and delicious contrast. The natural sweetness of fruit adds a lovely brightness to the rich flavors of the cake!
-
Nutty Crunch: Sprinkle some crushed nuts, like walnuts or pecans, between layers for an unexpected crunch. The nutty flavor pairs delightfully with creaminess, taking the cake to another level.
-
Caramel Drizzle: Instead of hot fudge, try a layer of caramel topping for a different luscious experience. Its buttery sweetness complements the Oreo crust perfectly.
-
Cookies and Cream Twist: Combine half vanilla and half cookies and cream ice cream for a fun and rich flavor explosion. Each bite offers a creamy deliciousness that fans of Oreos will adore!
-
Spicy Heat: For the brave, add a sprinkle of cayenne or use a spicy chocolate fudge sauce over the layer to kick things up a notch. It’s an adventurous blend of sweet and heat!
-
Cheesecake Layer: Blend in cream cheese with your whipped topping for a cheesecake-infused layer that adds depth and tanginess—perfect for cheesecake lovers.
Feel free to indulge your imagination! And if you enjoy these variations, don’t forget to check out my favorite recipes like Cookies Cream Peanut Butter Cookies or Pistachio Raspberry Cake for more delightful inspirations.
Expert Tips for Oreo Ice Cream Cake
-
Keep It Cold: Always assemble the Oreo Ice Cream Cake with cold ingredients to prevent melting, ensuring clean layers and a beautiful presentation.
-
Melted Butter Check: Make sure your butter is fully melted before mixing with cookie crumbs. Undermixed butter can lead to a crumbly crust that won’t hold together.
-
Variations Galore: Don’t be shy to customize flavors! Try using mint chocolate chip ice cream or add toppings like nuts for extra crunch and appeal.
-
Slice with Precision: Rinse your knife under hot water between cuts for cleaner, more precise slices, making that layered look shine.
-
Make Ahead: This easy dessert can be made up to a week in advance. Just keep it well-covered in the freezer to maintain freshness.
By following these tips, your Oreo Ice Cream Cake will be an unforgettable sweet escape for family and friends!
Storage Tips for Oreo Ice Cream Cake
Fridge: Store covered in the refrigerator for up to 3 days if you prefer it slightly softer; however, the best texture is kept in the freezer.
Freezer: Keep the cake tightly wrapped in plastic wrap for up to 1 week in the freezer without losing quality. Avoid prolonged storage to prevent ice crystals from forming.
Reheating: There’s no need to reheat; simply let the Oreo Ice Cream Cake sit out for about 10 minutes at room temperature before slicing for the best results.
Serving Tip: For a refreshing dessert experience, serve chilled directly from the freezer, but allow it to soften slightly for easier cutting and enhanced flavor.
Oreo Ice Cream Cake Recipe FAQs
What type of Oreo cookies should I use for the crust?
Absolutely! Regular Oreo cookies work perfectly for the crust, but feel free to experiment with any store-bought chocolate sandwich cookies if you want to switch it up. The key is to ensure they are crunchy enough to hold the structure.
How long can I store the Oreo Ice Cream Cake in the freezer?
I recommend storing your Oreo Ice Cream Cake wrapped in plastic wrap in the freezer for up to 1 week. This will help maintain the cake’s creamy texture and prevent ice crystals from forming. Just remember to keep it covered tightly!
Can I freeze leftover Oreo Ice Cream Cake?
Yes! You can freeze the leftover cakes by first covering the pan with plastic wrap and then aluminum foil for extra protection. It can be stored for up to 3 months. When ready to enjoy, simply thaw in the fridge overnight or at room temperature for about 30 minutes before serving.
What should I do if the layers are melting during assembly?
Keeping everything cold is key! If you notice the layers starting to melt, it’s wise to work quickly. You can also chill your mixing bowls and utensils in the freezer for a few minutes before starting. If it gets too warm, pop the assembled cake in the freezer for 10-15 minutes before continuing.
Is this dessert suitable for those with dairy allergies?
If you’re accommodating dietary restrictions, you can make dairy-free choices! Substitute the ice cream with non-dairy ice cream and replace the whipped topping with coconut cream or a vegan whipped topping. Just check the ingredients on all components to ensure they’re dairy-free.
How can I customize the flavors of this Oreo Ice Cream Cake?
Very! You can easily swap the vanilla ice cream for flavors like chocolate, mint chocolate chip, or cookies and cream. Additionally, you can top it with different sauces, like caramel or strawberry sauce, and sprinkle nuts or fresh fruit over the whipped topping for added texture.
Oreo Ice Cream Cake: Your No-Bake Sweet Escape
Ingredients
Equipment
Method
- In a large mixing bowl, combine 3 cups of crushed Oreo cookies and ½ cup of melted butter. Stir until fully coated. Press into a greased 13x9-inch dish and freeze for 10 minutes.
- Spread 4 cups of softened vanilla ice cream evenly over the chilled Oreo crust. Return to the freezer for at least 30 minutes.
- Warm 1 cup of hot fudge topping in the microwave for 15-20 seconds until pourable. Drizzle over the ice cream layer and freeze for another 30 minutes.
- Spread 2 cups of thawed whipped topping over the fudge layer and sprinkle with remaining crushed Oreo cookies. Cover with plastic wrap and freeze for at least 2 hours.
- Let the Oreo Ice Cream Cake sit out for about 10 minutes before slicing into squares. Serve immediately.
Leave a Reply