
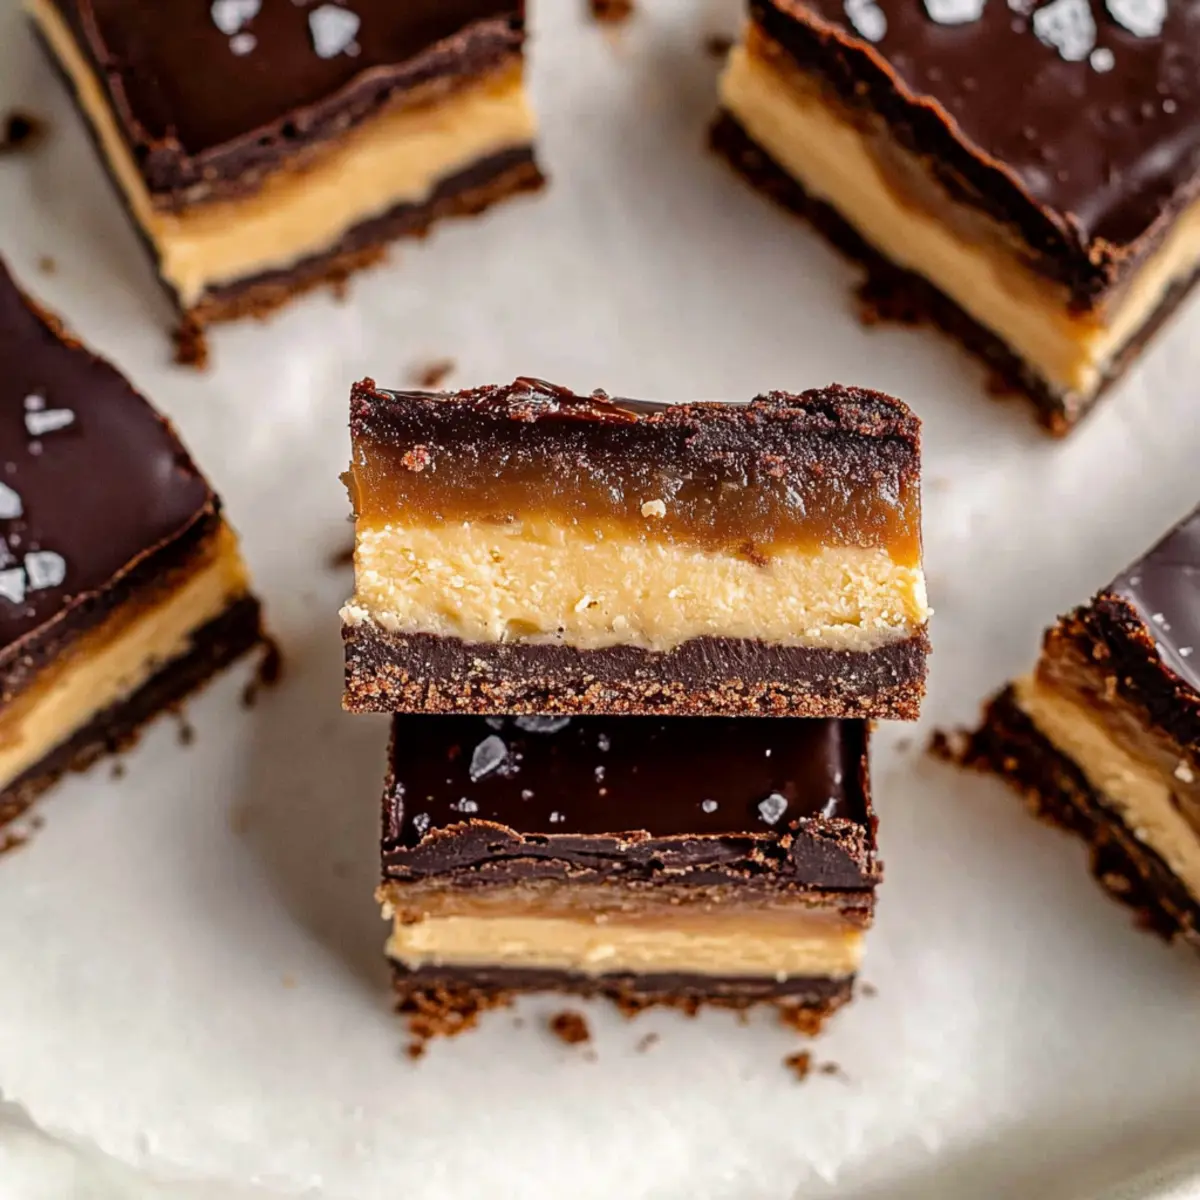
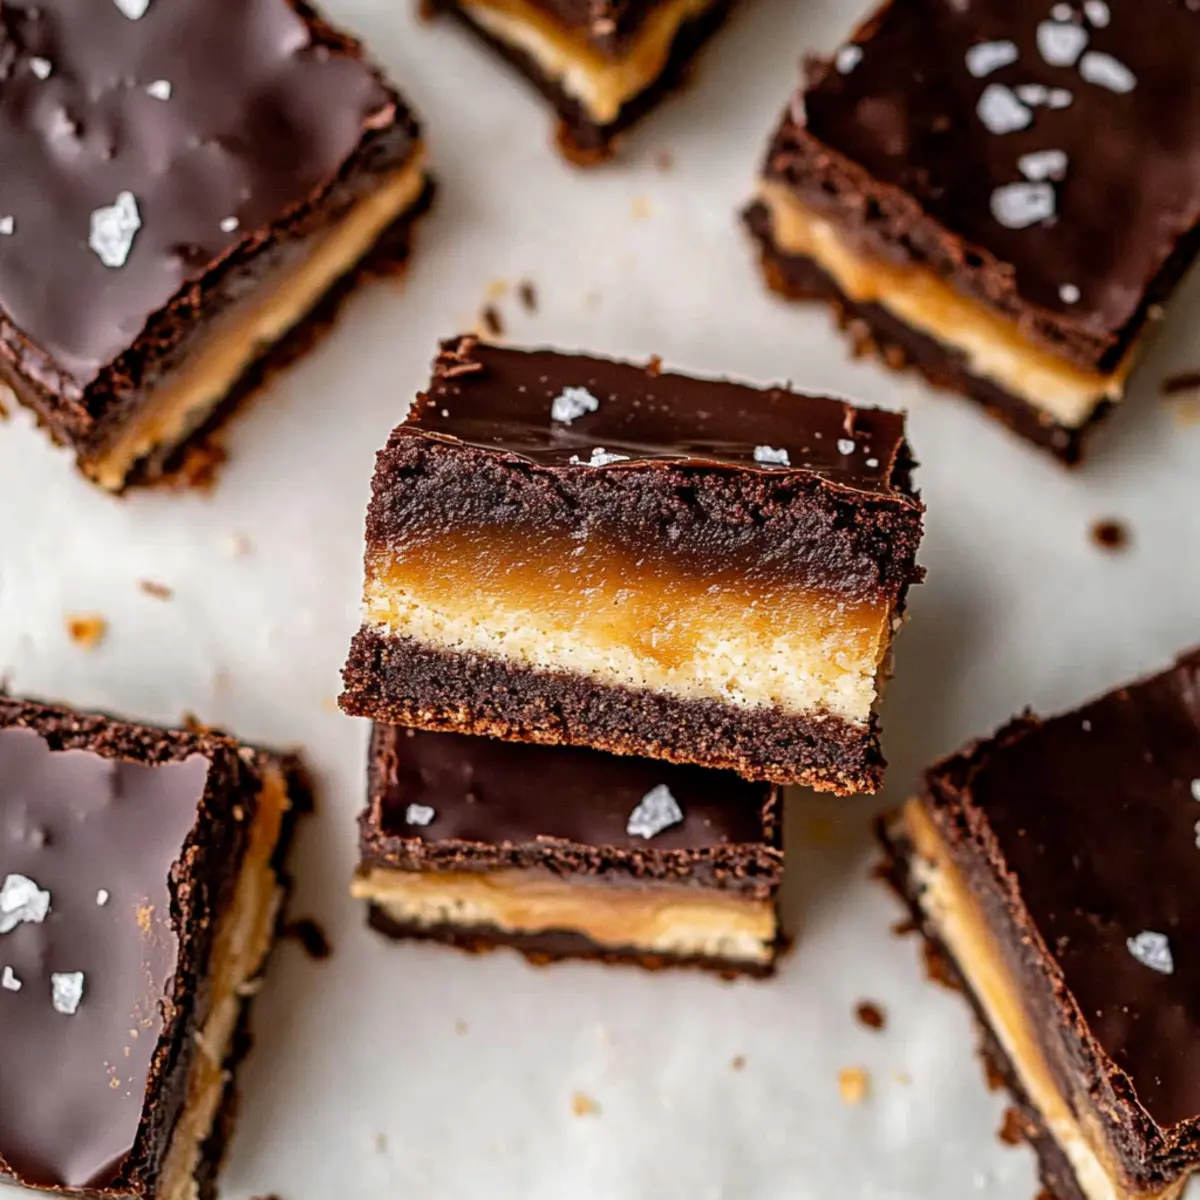
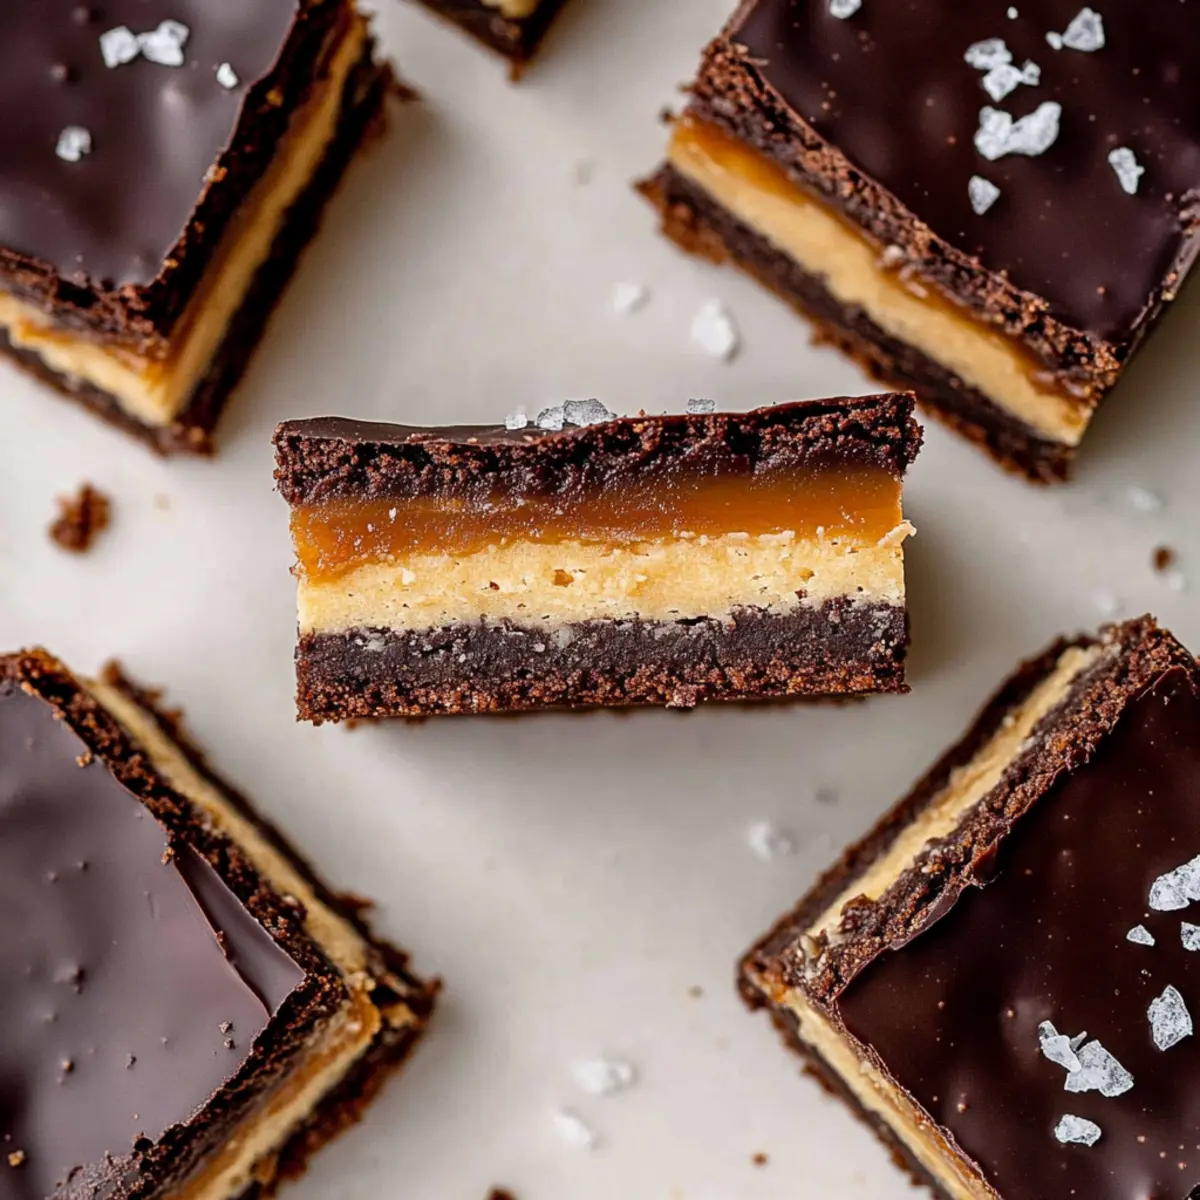
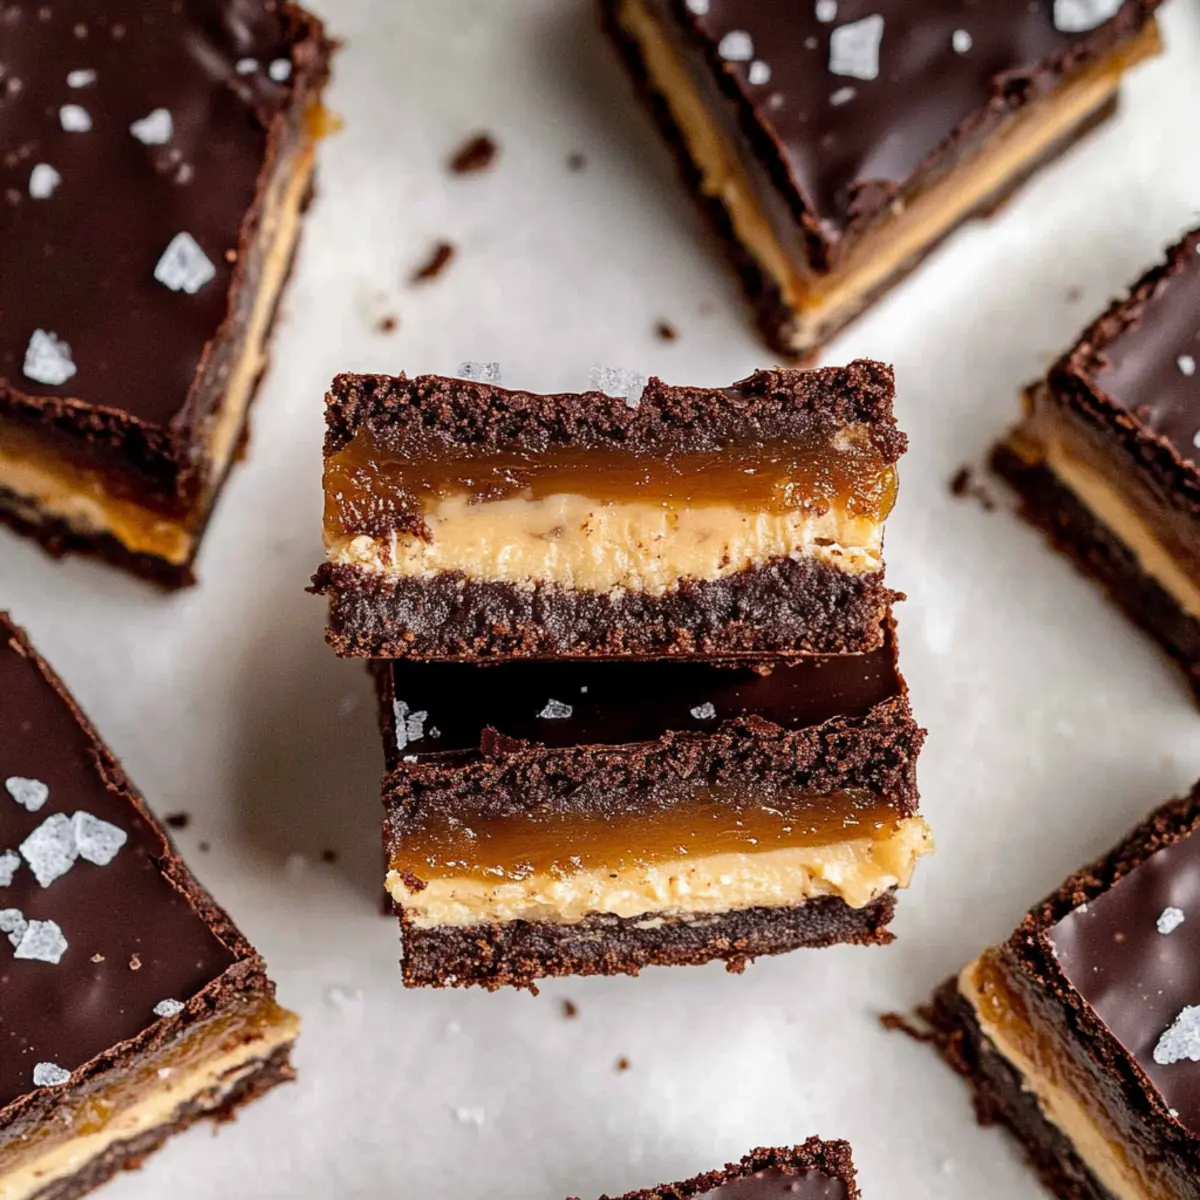
As I stood in my kitchen the other day, I caught a whiff of chocolate mingling with the subtle aroma of caramel, instantly transporting me back to my childhood. It was the perfect inspiration for crafting my Salted Caramel Crunch Brownie Bars, a delightful four-layer treat that harmonizes fudgy brownies, crispy caramel crunch, creamy nougat, and smooth chocolate ganache. Not only are these bars a visual feast, but they also offer a heavenly mix of textures and flavors, making them an irresistible crowd-pleaser for any occasion. Plus, with a quick prep time and the option to make them gluten-free, they’re as flexible as they are delicious. Curious to find out how to whip up this decadent dessert? Let’s dive in!
Why are these brownie bars irresistible?
Decadent Layers: Each layer brings a unique taste and texture, from fudgy brownies to crunchy salted caramel.
Quick to Prepare: With only a few simple steps, you’ll have an impressive treat ready to share in no time!
Flexible Ingredients: Easily adapt the recipe to suit dietary needs, such as using gluten-free flour for a delightful twist.
Crowd Pleaser: These bars are sure to impress guests at gatherings, making them the perfect dessert to wow your friends and family.
Looking for more sweet ideas? Don’t miss my Salted Caramel Cracker Bites or a rich Caramel Brownie Cheesecake for your next celebration!
Salted Caramel Crunch Brownie Bars Ingredients
• Here’s everything you need to create these delicious brownie bars!
For the Brownie Base
- All-Purpose Flour – Provides structure for the brownie layer; substitute with gluten-free flour blend for a gluten-free version.
- Baking Soda – Aids in leavening, ensuring a soft texture.
- Fine Sea Salt – Enhances flavor in all layers; use sparingly for balanced taste.
- Bittersweet Chocolate – Forms the base of the brownie; can be substituted with semi-sweet chocolate.
- Unsalted Butter – Adds moisture and richness; use salted butter if unsalted is not available.
- Granulated Sugar – Sweetens both the brownie and nougat layers.
- Large Egg – Binds ingredients in the brownie layer for the right texture.
- Pure Vanilla Extract – Adds depth of flavor; can be omitted if using vanilla-flavored chocolate.
For the Salted Caramel Crunch Layer
- Chewy Caramels – Main component of the caramel layer; homemade caramel can also be used.
- Evaporated Milk – Combines with caramels for consistency; can be replaced with equal parts heavy cream and water.
- Crispy Rice Cereal – Provides a delightful crunch; swap for gluten-free crispy cereal options.
- Flaky Sea Salt – A finishing touch to enhance the flavors of the sweet layers.
For the Nougat Layer
- Marshmallow Fluff – Gives a chewy texture; can be substituted with homemade marshmallows.
- Peanut Butter – Adds a creamy texture; swap for almond or sunflower seed butter for a different flavor.
For the Ganache Topping
- Espresso Powder – Intensifies the chocolate flavor in the ganache; optional but highly recommended.
- Heavy Cream – Creates a rich ganache; can use half and half for a lighter version.
- Flaky Salt – Sprinkle over the ganache for that irresistible finishing touch.
Now that you have your ingredients ready, let’s bring magic to your kitchen with these Salted Caramel Crunch Brownie Bars!
Step‑by‑Step Instructions for Salted Caramel Crunch Brownie Bars
Step 1: Prepare Brownie Layer
Preheat your oven to 350°F (175°C). In a mixing bowl, whisk together the all-purpose flour, baking soda, and fine sea salt. Melt the bittersweet chocolate and unsalted butter together over low heat until smooth, then remove from heat and mix in the granulated sugar, egg, and pure vanilla extract. Combine this mixture with the dry ingredients, then pour it into a lined 8×8-inch pan, spreading it evenly. Bake the brownie layer for 13–15 minutes or until just set, then let it cool completely.
Step 2: Make Salted Caramel Crunch Layer
While the brownie base cools, prepare the salted caramel crunch layer. In a microwave-safe bowl, melt the chewy caramels combined with evaporated milk and a splash of water in 30-second intervals, stirring until smooth. Once melted, gently fold in the crispy rice cereal and a pinch of flaky sea salt until evenly coated. Spread this mixture over the cooled brownie layer, pressing down lightly, then place it in the freezer for about 30 minutes to firm up.
Step 3: Create Nougat Layer
For the nougat layer, take a saucepan and combine butter, granulated sugar, and evaporated milk over medium heat. Stir constantly until the mixture reaches a gentle boil and sugar is dissolved. Remove from heat and mix in the peanut butter and marshmallow fluff until entirely smooth. Pour this nougat mixture over the salted caramel crunch layer, ensuring an even spread, then return the pan to the freezer for another 30 minutes.
Step 4: Prepare Ganache Layer
Next, prepare the chocolate ganache by melting together bittersweet chocolate, espresso powder (if using), butter, and heavy cream in a small saucepan over low heat. Stir continuously until fully melted and smooth. Once your nougat layer is firm, pour the ganache evenly over the top, smoothing it out with a spatula. Chill in the refrigerator for about 2 hours or until the ganache has set.
Step 5: Cut and Serve
To serve your Salted Caramel Crunch Brownie Bars, carefully remove the entire dessert from the pan using the parchment paper edges. Use a sharp knife to cut them into squares, wiping the knife clean after each cut for neat edges. Finally, sprinkle flaky salt on top for that extra touch, then enjoy these decadent bars with friends and family!
Expert Tips for Salted Caramel Crunch Brownie Bars
-
Perfect Layering: To keep layers distinct, allow each layer to cool completely before adding the next. This prevents mixing and maintains their unique textures.
-
Fudgy Brownies: Avoid overmixing the brownie batter after adding the flour—overmixing can lead to tough bars instead of fudgy ones.
-
Cutting Guide: For perfectly cut squares, use a sharp knife and warm it slightly under hot water. Wipe between cuts for clean edges.
-
Gluten-Free Option: Substitute all-purpose flour with a gluten-free flour blend to enjoy these delicious salted caramel crunch brownie bars without the gluten.
-
Flavor Boost: Enhance the chocolate ganache by adding a teaspoon of your favorite flavored extract, such as almond or orange, for an exciting twist.
Storage Tips for Salted Caramel Crunch Brownie Bars
-
Room Temperature: Keep the bars wrapped in plastic wrap or stored in an airtight container at room temperature for up to 3 days to maintain freshness without becoming too soft.
-
Fridge: For extended freshness, store the salted caramel crunch brownie bars in an airtight container in the refrigerator for up to 1 week. This helps preserve their delicious layers while keeping them cool and firm.
-
Freezer: To enjoy these bars later, freeze them with parchment paper between layers in an airtight container for up to 1 month. Allow to thaw at room temperature before serving.
-
Reheating: If desired, gently microwave individual pieces for about 10-15 seconds to warm them slightly, enhancing the gooey texture of the chocolate ganache.
What to Serve with Salted Caramel Crunch Brownie Bars
Indulging in these delightful treats opens the door to a mouthwatering ensemble of flavors and textures that elevate any gathering.
-
Vanilla Ice Cream: A classic pairing that adds a creamy contrast to the rich brownie bars, making each bite a little more luxurious. A scoop of ice cream melts beautifully alongside the fudgy texture.
-
Fresh Berries: Bright red raspberries or sweet strawberries offer a tangy freshness that cuts through the sweetness of the bars. Their vibrant colors also make for a stunning presentation.
-
Whipped Cream: Light and fluffy, whipped cream adds a delightful airiness, balancing the density of the brownies. A dollop on the side invites extra indulgence.
-
Espresso or Coffee: A warm cup of your favorite brew enhances the deep chocolate flavors. The bitterness of coffee complements the sweetness perfectly, making for a sophisticated dessert experience.
-
Chocolate Milkshake: For the ultimate treat, serve alongside a decadent chocolate milkshake. The rich, cold drink pairs perfectly, creating a delightful contrast of temperatures.
-
Caramel Sauce: Drizzling warm caramel enhances the sweet, salty layers of the brownie bars, tying all the flavors together. It’s an extra indulgent touch that will please any sweet tooth.
Enjoy these Salted Caramel Crunch Brownie Bars with any of these pairings for an unforgettable dessert experience!
Make Ahead Options
These Salted Caramel Crunch Brownie Bars are perfect for busy home cooks looking to save time! You can prepare the brownie layer and store it in an airtight container in the refrigerator for up to 3 days. Additionally, the salted caramel crunch layer can be made ahead and frozen for up to 1 month; just ensure it’s tightly wrapped in plastic wrap or placed in an airtight container to prevent freezer burn. When you’re ready to serve, layer the nougat and ganache, allowing them to set in the fridge for about 2 hours. This way, you maintain the delicious textures and flavors while having a fabulous dessert on hand with minimal effort!
Salted Caramel Crunch Brownie Bars Variations
Feel free to put your own spin on these luscious brownie bars, and let your creativity shine in the kitchen!
- Gluten-Free: Use a gluten-free flour blend instead of all-purpose flour to make this recipe accessible for everyone!
- Nut-Free: Substitute peanut butter with sunflower seed butter to create a nut-free nougat layer without losing that creamy texture.
- Flavor Twist: Use flavored chocolate, like milk chocolate or dark chocolate, in the ganache for a delightful twist on the classic taste.
- Nutty Addition: Fold in crushed walnuts or pecans into the nougat layer for an extra layer of crunch and flavor contrast that elevates the experience.
- Fruit Infusion: Add a layer of raspberry or strawberry jam between the brownie and salted caramel layers for a fruity and tangy contrast.
- Extra Decadent: Drizzle some espresso or coffee syrup on top before cutting for an additional caffeine boost that enhances the chocolate depth.
- Chewy Caramel: For a thicker caramel layer, make homemade caramel from scratch to create a chewier, gooier texture that sticks to the brownie beautifully.
- Spicy Kick: Incorporate a pinch of cayenne pepper or chili powder in the ganache for those who love chocolate with a kick.
If you’re looking for more scrumptious treats, check out my delightful Salted Caramel Cracker Bites or indulge in a rich slice of Caramel Brownie Cheesecake for your next gathering!
Salted Caramel Crunch Brownie Bars Recipe FAQs
How do I choose the right chocolate for my brownies?
Absolutely! I recommend using bittersweet chocolate for a deep, rich flavor, but semi-sweet chocolate works just as well if it’s what you have on hand. If you’re looking for a sweeter brownie, go with the semi-sweet variety; otherwise, bittersweet will give you that classic chocolate intensity.
What is the best way to store leftover brownie bars?
I suggest storing your salted caramel crunch brownie bars in an airtight container in the refrigerator for up to a week. They can also be kept at room temperature for 3 days, but refrigeration helps maintain their texture and freshness. Just make sure they are well wrapped to avoid drying out!
Can I freeze these brownie bars for later?
Absolutely! To freeze your salted caramel crunch brownie bars, first, cut them into squares and place parchment paper between layers in an airtight container. They can be stored in the freezer for up to 1 month. When you’re ready to enjoy, thaw them at room temperature for about an hour or pop them in the microwave for 10-15 seconds for a gooey treat!
What if I accidentally overcooked my brownies?
Very! If your brownies turn out too dry, don’t worry! Try adding a scoop of vanilla ice cream or a spoonful of warm caramel sauce on top when serving. Another trick is to heat them slightly in the microwave for about 10 seconds; this will help soften them up. Remember to keep a close eye on the baking time next time for the perfect fudgy texture!
Are there any allergies I should be aware of with this recipe?
Certainly! The salted caramel crunch brownie bars contain common allergens such as gluten (from flour), peanuts (if using peanut butter), and dairy (from butter and cream). To accommodate allergies, consider substituting with a gluten-free flour blend, almond or sunflower seed butter, and dairy alternatives like coconut or almond milk in the ganache.
How can I make these brownie bars gluten-free?
The more the merrier! To make your salted caramel crunch brownie bars gluten-free, simply replace the all-purpose flour with a gluten-free flour blend that works as a 1:1 substitute. I also recommend checking labels to ensure all other ingredients, like the crispy rice cereal and caramels, are gluten-free. Enjoy while crafting these decadent treats safe for everyone!
Irresistible Salted Caramel Crunch Brownie Bars Recipe
Ingredients
Equipment
Method
- Preheat your oven to 350°F (175°C). In a mixing bowl, whisk together the all-purpose flour, baking soda, and fine sea salt. Melt the bittersweet chocolate and unsalted butter together over low heat until smooth, then remove from heat and mix in the granulated sugar, egg, and pure vanilla extract. Combine this mixture with the dry ingredients, then pour it into a lined 8x8-inch pan, spreading it evenly. Bake for 13–15 minutes or until just set, then let it cool completely.
- In a microwave-safe bowl, melt the chewy caramels combined with evaporated milk and a splash of water in 30-second intervals, stirring until smooth. Once melted, gently fold in the crispy rice cereal and a pinch of flaky sea salt. Spread this mixture over the cooled brownie layer, pressing down lightly, then place it in the freezer for about 30 minutes to firm up.
- Combine butter, granulated sugar, and evaporated milk over medium heat. Stir constantly until the mixture reaches a gentle boil and sugar is dissolved. Remove from heat and mix in the peanut butter and marshmallow fluff until entirely smooth. Pour this nougat mixture over the salted caramel crunch layer, ensuring an even spread, then return the pan to the freezer for another 30 minutes.
- Melt together bittersweet chocolate, espresso powder (if using), butter, and heavy cream in a small saucepan over low heat, stirring continuously until fully melted and smooth. Pour the ganache evenly over the top, smoothing it out with a spatula. Chill in the refrigerator for about 2 hours or until the ganache has set.
- Carefully remove the dessert from the pan using the parchment paper edges. Use a sharp knife to cut into squares, wiping the knife clean after each cut for neat edges. Sprinkle flaky salt on top for that extra touch, then enjoy!
Leave a Reply