
As I stood in my kitchen, the aroma of toasty bread wafting through the air took me back to lazy afternoons, savoring a simple yet delightful meal. Today, I’m excited to share my take on the classic Open Faced Tuna Melts, a dish that brings together rich, creamy tuna salad heaped onto crispy bread, then finished with a layer of gooey, melted cheese. This recipe is a true lifesaver—perfect for busy weeknights or when you crave a comforting lunch without the fuss. Plus, it’s ready in just 15 minutes, making it your go-to for quick bites. Whether you choose to broil or bake, the satisfying crunch combined with an explosion of flavor is bound to win over even the pickiest eaters. Curious about how to whip up this nostalgic favorite? Let’s dive into the deliciousness!
Why Are Open Faced Tuna Melts So Great?
Simplicity: This recipe is a breeze to prepare, requiring only a few ingredients and minimal kitchen skills. Perfect for beginners or seasoned chefs alike!
Rich, Comforting Flavor: The delightful combination of savory tuna salad and gooey melted cheese creates an irresistible taste that leaves you wanting more.
Versatile Options: Feel free to customize with different cheeses or add-ins like avocado or jalapeños to create your own twist on this classic.
Quick Preparation: Ready in just 15 minutes, it’s an ideal meal for busy weeknights or those craving a speedy lunch that doesn’t skimp on flavor.
Crowd-Pleasing Appeal: Whether at family dinners or cozy gatherings, Open Faced Tuna Melts are sure to satisfy everyone’s taste buds. Pair with your favorite sides for a complete meal!
Open Faced Tuna Melt Ingredients
For the Tuna Salad
- Tuna – Packed with protein, choose tuna in water for a lighter option that pairs beautifully with the other additions.
- Celery – Adds a delightful crunch to your salad; while it’s optional, it’s highly recommended for texture.
- Red Onion – Offers a sharp bite that balances the creaminess of the mayo; substitute with green onions for a milder taste if desired.
- Flat-leaf Parsley – This fresh herb brightens the flavors and adds a pop of color to your mix.
- Mayonnaise – Binds everything together; for a lighter version, swap it for yogurt.
- Dijon Mustard – Introduces some tang; leaving it out might make your salad a bit less flavorful.
- Fresh Lemon Juice – A splash of acidity that enhances the other flavors; vinegar works well as a substitute, too.
- Salt and Black Pepper – Essential for adjusting flavor; be sure to taste as you go for the best results.
For the Sandwich
- Bread – The foundation of your melt! Opt for hearty choices like sourdough or ciabatta that will hold the filling without getting soggy.
- Cheese – Melts beautifully on top; Havarti, mozzarella, or cheddar are great options. Use dairy-free cheese to cater to dietary preferences.
- Butter (optional) – For toasting the bread for extra flavor and crispiness; you can skip this if you prefer a lighter version.
With these ingredients on hand, you’re well on your way to making scrumptious Open Faced Tuna Melts! Enjoy the process and feel free to make it your own.
Step‑by‑Step Instructions for Open Faced Tuna Melts
Step 1: Prepare the Tuna Salad
In a medium bowl, combine the drained tuna with finely chopped celery, red onion, and fresh parsley. Add mayonnaise, Dijon mustard, and lemon juice, seasoning with salt and pepper to taste. Mix well until all ingredients are fully integrated. This creamy tuna salad will form the hearty base for your Open Faced Tuna Melts.
Step 2: Prep Bread
For the broiled version, preheat your broiler to high. If you prefer baking, set the oven temperature to 400°F. For broiling, place your bread slices on a baking sheet and toast each side until golden brown, about 2-3 minutes per side. If baking, spread butter on one side of each slice and place them butter-side up on the sheet before toasting for around 5-7 minutes.
Step 3: Assemble the Sandwich
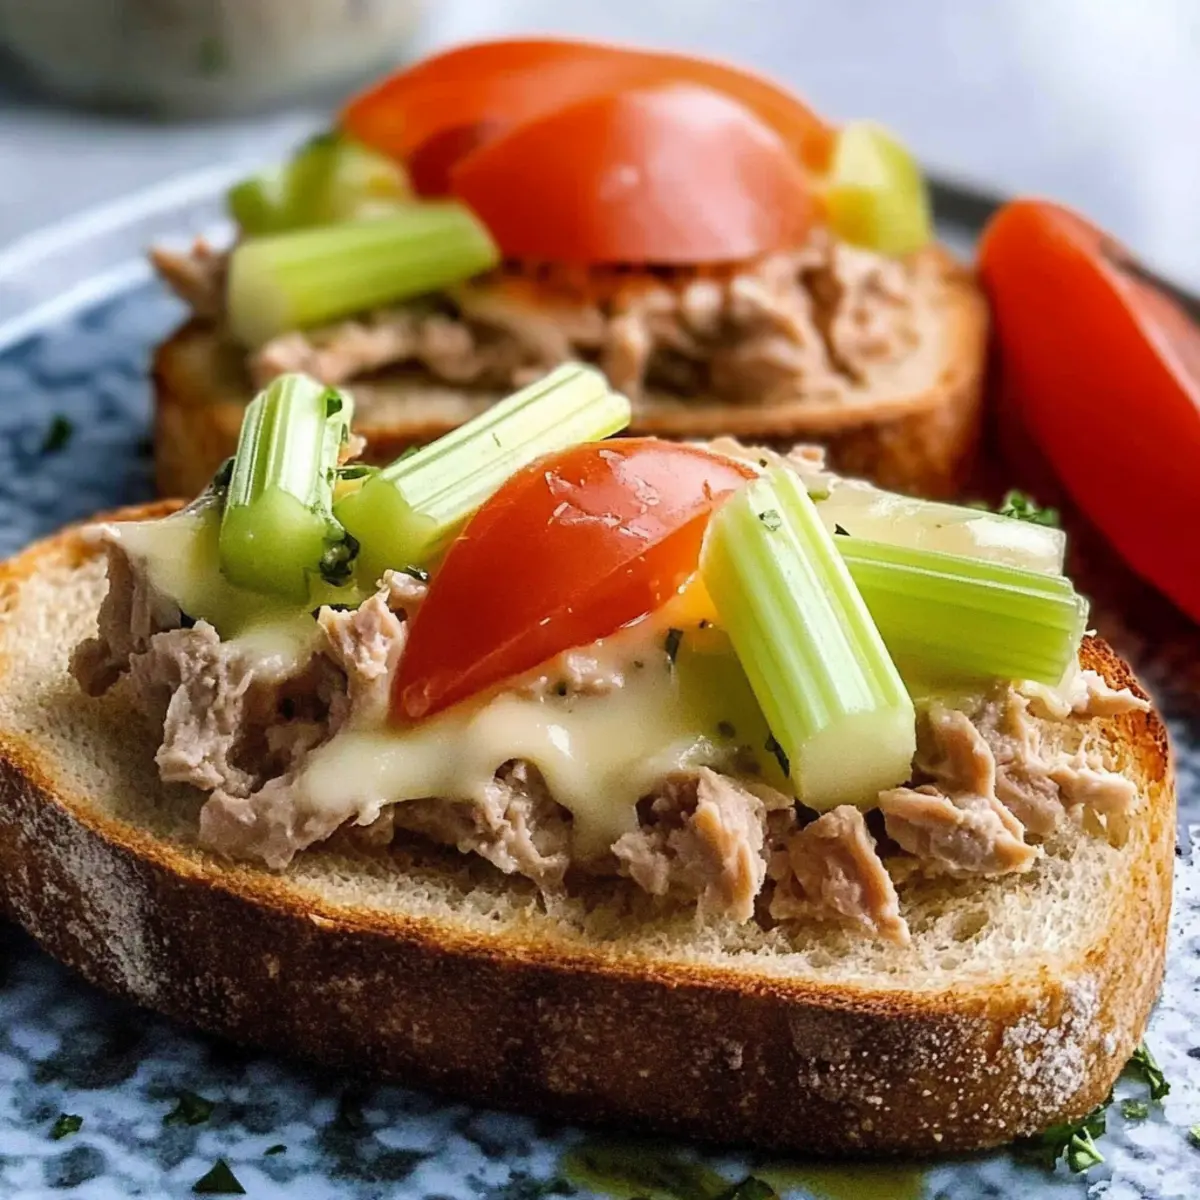
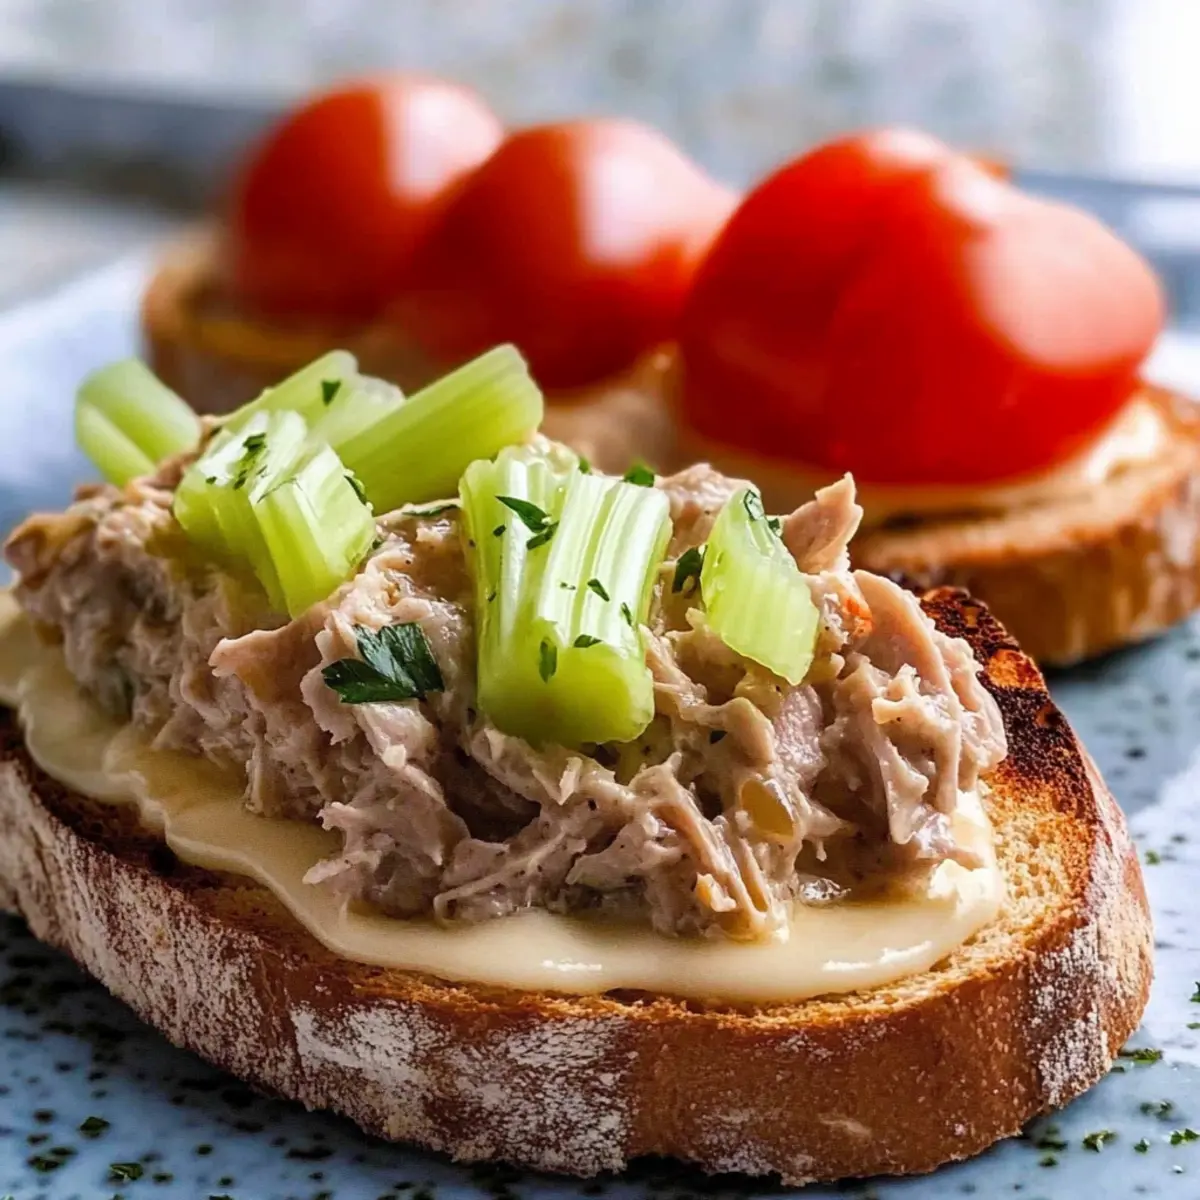
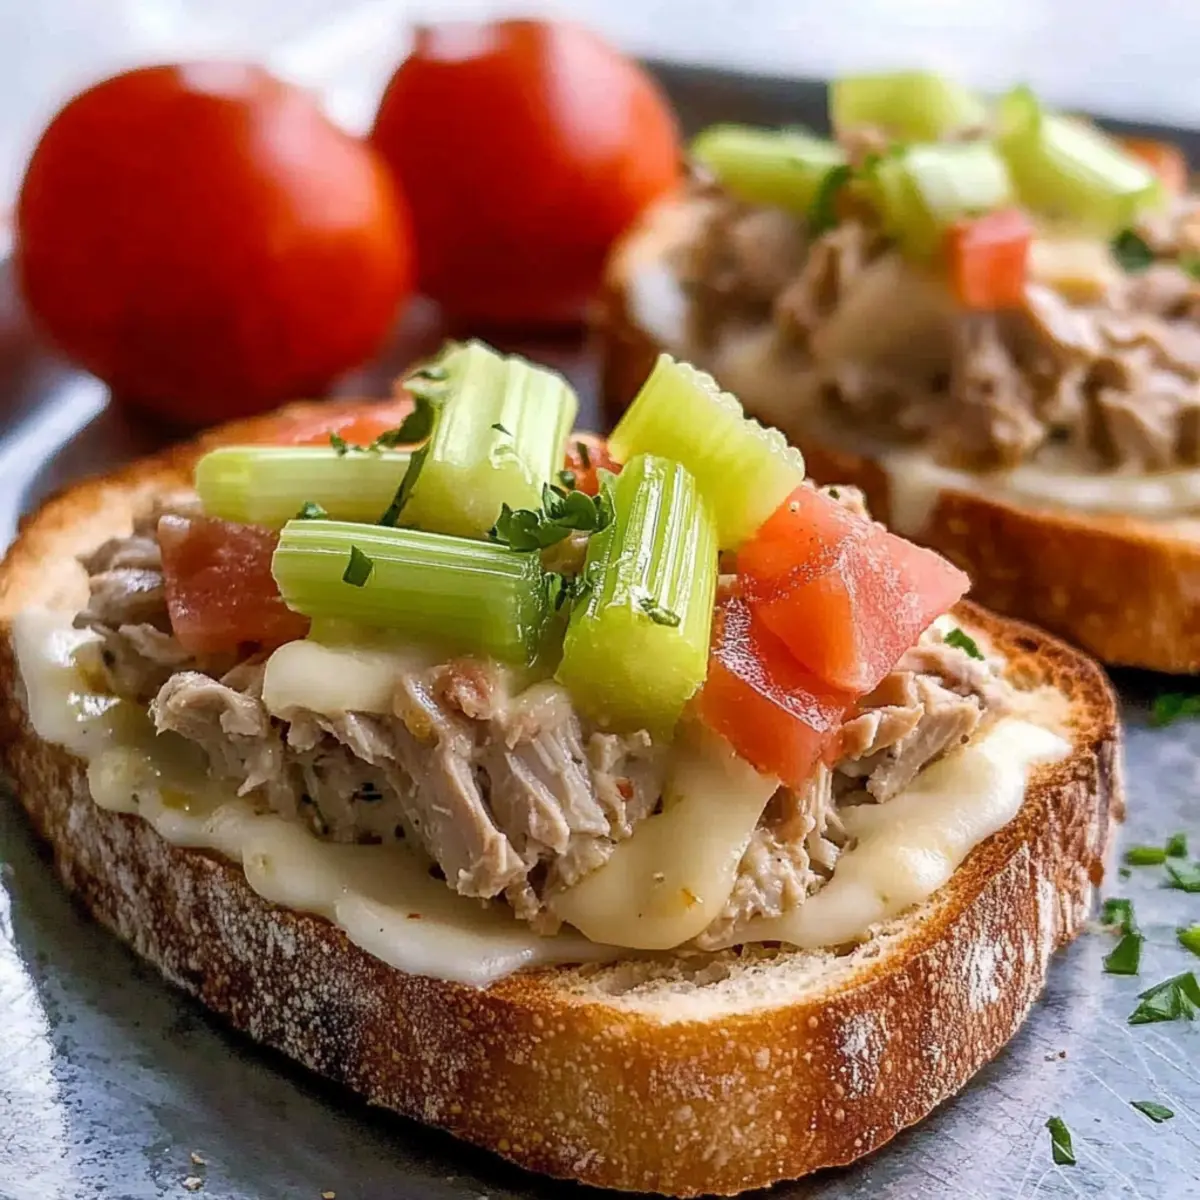
Once the bread is perfectly toasted, spread a generous layer of the tuna salad mixture over each slice. Feel free to heap it on for extra goodness! Top each open-faced tuna melt with slices of your preferred cheese, such as Havarti or cheddar, ensuring they’re evenly distributed for maximum melty effect.
Step 4: Cook the Melts
If broiling, place the assembled tuna melts under the broiler for 3-5 minutes, watching closely as the cheese melts and starts to bubble—this happens quickly! For the baking method, place them in the oven and bake for 8-10 minutes, or until the cheese is perfectly melted and slightly golden.
Step 5: Serve
Remove the Open Faced Tuna Melts from the oven or broiler, allowing them to cool for a minute or two. Optional: sprinkle with additional seasoning, like cracked pepper or fresh herbs, before serving. These delicious melts are best enjoyed immediately alongside your favorite sides!

Open Faced Tuna Melts Variations
Feel free to get creative with these variations that can elevate your Open Faced Tuna Melts experience!
-
Spicy Twist: Add Sriracha to the tuna salad for a delicious kick that dances on your taste buds. Spice lovers will rejoice with this extra heat!
-
Mediterranean Flair: Incorporate kalamata olives or sun-dried tomatoes into the salad for a taste of the Mediterranean. Each bite brings a burst of rich, tangy flavor and adds a lovely texture.
-
Herbed Cheese: Use herbed cream cheese instead of regular cheese on top for a creamy, flavorful surprise. This will not only enhance the flavor profile but also add a lush creaminess.
-
Avocado Delight: Layer sliced avocados atop the tuna salad before adding the cheese. The creamy avocado works beautifully with the richness of the tuna and cheese, creating an even more satisfying melt.
-
Smoky Flavor: Include smoked paprika in the tuna salad for a subtle smoky flavor that adds depth to your melts. This simple addition can transform your dish into something truly memorable.
-
Cheese Variety: Switch to Pepper Jack cheese for an extra spicy kick, or Swiss cheese for a milder, nuttier flavor that melts perfectly. Don’t hesitate to mix and match for a cheesy adventure!
-
Crunchy Toppings: Top your melts with crispy fried onions or puffy panko breadcrumbs before broiling for added texture. It’ll give each bite a delightful crunch that contrasts nicely with the gooey center.
-
Lively Greens: Add baby spinach or arugula to the top of your tuna salad before adding cheese for a fresh and vibrant twist. This will not only increase your vegetable intake but also provide a lovely pop of color.
Feel free to explore these suggestions, and remember, there’s no wrong way to enjoy a delicious Open Faced Tuna Melt! As you make these adaptations, consider pairing your dish with tasty sides like homemade potato chips or a fresh garden salad for a balanced meal. Enjoy your culinary creativity!
Expert Tips for Open Faced Tuna Melts
-
Monitor the Cooking: Keep a close eye on your melts while broiling to prevent burning; broilers can vary in strength and may cook unevenly.
-
Choose the Right Bread: Opt for sturdy bread like ciabatta or sourdough to handle the toppings. Avoid soft breads, as they may become soggy.
-
Customize Your Cheese: Try different cheeses like Pepper Jack for a spicy twist or blend multiple types for deeper flavors, perfect for your Open Faced Tuna Melts.
-
Add Texture: Incorporate extra layers of crunch by adding sliced cucumbers or pickles to your melts, elevating the flavor and making each bite exciting.
-
Serve Fresh: For the best experience, enjoy the melts immediately after cooking to savor the warm, gooey cheese and crispy bread.
What to Serve with Open Faced Tuna Melts?
An array of delicious sides can elevate your Open Faced Tuna Melts into a memorable meal that will leave everyone satisfied.
-
Crispy Potato Chips: The crunch of homemade potato chips contrasts beautifully with the creamy tuna melt, making every bite a delight.
-
Simple Side Salad: A fresh mix of greens with a light vinaigrette refreshes the palate, providing a burst of color and flavor alongside the hearty melts.
-
Pickle Spear: A tangy pickle adds a delightful zing that balances the richness of the tuna melt, making each bite even more enjoyable.
-
Coleslaw: Creamy coleslaw adds crispness and a touch of sweetness that complements the savory flavors of the melt, creating a well-rounded meal.
-
Sweet Potato Fries: Slightly sweet and crispy, these fries offer a delicious twist and a different texture to accompany the savory dish.
-
Roasted Vegetables: A medley of colorful roasted veggies can enhance your meal’s nutrition while their caramelized sweetness pairs wonderfully with each tuna melt bite.
-
Iced Tea or Lemonade: A refreshing drink like iced tea or lemonade can cleanse the palate and offer a sweet contrast to the savory flavors of your Open Faced Tuna Melts.
Serve any combination of these sides to create a delightful dining experience that you and your family will adore!
How to Store and Freeze Open Faced Tuna Melts
Fridge: Store any leftovers in an airtight container for up to 3 days. This helps retain the flavor and prevents the bread from getting soggy.
Freezer: If you wish to freeze, wrap each assembled melt tightly in plastic wrap and place in a freezer bag for up to 2 months. Thaw overnight in the fridge before reheating.
Reheating: For the best texture, reheat in the oven or air fryer until the cheese is melted again and bread is crispy, about 10-15 minutes at 350°F.
Make-Ahead Tips: Consider prepping the tuna salad in advance; it can be stored in the fridge for up to 3 days, ready for quick assembly when hunger strikes!
Make Ahead Options
These Open Faced Tuna Melts are perfect for meal prep, saving you time during busy weeknights! You can prepare the tuna salad up to 3 days in advance and store it in an airtight container in the refrigerator. For optimal freshness, mix all salad ingredients except the mayonnaise; add this just before serving to maintain the creamy texture. You can also toast the bread and assemble the sandwiches up to 24 hours ahead, keeping the assembled melts in the fridge until you’re ready to broil or bake. Simply pop them into the oven or under the broiler when you’re ready to enjoy, and you’ll have delicious, comfort in no time!
Open Faced Tuna Melt Recipe FAQs
What type of tuna is best for Open Faced Tuna Melts?
Absolutely! For a lighter option, I recommend using tuna packed in water. It provides a nice flavor without being too oily. If you prefer a richer taste, tuna packed in oil can work as well, just be mindful of the added calories.
How should I store leftover Open Faced Tuna Melts?
Leftovers can be stored in an airtight container in the fridge for up to 3 days. To maintain the bread’s texture, it’s best to keep the tuna salad and bread separate until you are ready to enjoy them again.
Can I freeze Open Faced Tuna Melts?
Yes, you can! Start by wrapping each assembled tuna melt tightly in plastic wrap, then place them in a freezer bag. They will keep well for up to 2 months. When you’re ready to enjoy them, thaw overnight in the fridge and reheat in the oven until the cheese is melted and the bread is crispy, usually about 10-15 minutes at 350°F.
How can I prevent the bread from becoming soggy?
To keep your bread crisp, it’s essential to toast it well before adding the tuna salad and cheese. For broiling, as soon as the bread is golden and crunchy, load it with the tuna mixture and cheese. If you’re not serving right away, store the salad separately and assemble just before cooking.
Are there any dietary concerns with Open Faced Tuna Melts?
While tuna is generally safe for most diets, be cautious if you’re serving them to pets, as tuna can be harmful to cats and dogs in large amounts. Additionally, if you have seafood allergies, it’s best to avoid this recipe altogether or consider substituting with a safe alternative, like chickpea salad or shredded chicken.
What can I use instead of mayonnaise in the tuna salad?
Great question! If you’re looking for a lighter option, I often swap mayonnaise for Greek yogurt. It provides creaminess while boosting your protein intake. You can also use avocado for a creamy texture with added healthy fats.
Open Faced Tuna Melts: Quick Comfort Food for Any Day
Ingredients
Equipment
Method
- In a medium bowl, combine the drained tuna with finely chopped celery, red onion, and fresh parsley. Add mayonnaise, Dijon mustard, and lemon juice, seasoning with salt and pepper to taste. Mix well until all ingredients are fully integrated.
- For broiled version, preheat your broiler to high. If baking, set the oven to 400°F. Toast each side of the bread slices on a baking sheet until golden brown, about 2-3 minutes per side, or spread butter on one side of each slice and bake for 5-7 minutes butter-side up.
- Spread a generous layer of the tuna salad mixture over each slice of toasted bread. Top each open-faced tuna melt with slices of cheese.
- If broiling, place the assembled tuna melts under the broiler for 3-5 minutes until the cheese melts and bubbles. For the baking method, place them in the oven and bake for 8-10 minutes.
- Remove the tuna melts from the oven or broiler and let cool briefly. Optionally sprinkle with additional seasoning before serving.
Leave a Reply