
You won’t believe how easy it is to whip up a delightful No-Bake Easter Dirt Cake that’s as fun to make as it is to eat! This vibrant dessert combines creamy chocolate pudding with crunchy Oreo “dirt,” creating a playful homage to springtime gardening. Whether you’re juggling holiday festivities or just looking for a quick treat to involve the kids in the kitchen, this recipe shines. It’s not only a charming centerpiece for your Easter table but also a fantastic opportunity to make lasting memories with your little sous chefs. Who wouldn’t love indulging in layers of deliciousness that resemble a whimsical garden? Ready to get started and impress your family with this delightful twist on a classic dessert? Let’s dig in!

Why Is This Cake So Fun?
Easy to Make: This No-Bake Easter Dirt Cake requires minimal effort, making it perfect for busy families. Even little hands can help in the fun assembly process!
Kid-Friendly Involvement: Get the kids involved in the kitchen – crushing Oreos and layering the dessert is a delightful way to bond and create memories.
Delightful Layers: The playful contrast between creamy pudding and crunchy Oreo “dirt” not only pleases the palate but also sparks joy as it resembles a charming garden.
Customization Galore: Feel free to experiment! Swap chocolate pudding for vanilla or add fresh fruits like strawberries for a vibrant twist.
Perfect for Celebrations: This cake isn’t just a treat; it’s a festive centerpiece that will delight guests and relatives alike!
Make-Ahead Option: Prepare this dessert a day in advance and free up your time for other holiday tasks – it’s a real lifesaver!
Easter Dirt Cake Ingredients
For the Crust
• Oreo Cookies – Provides the essential “dirt” layer; consider using chocolate-flavored Oreos for added richness.
For the Filling
• Cream Cheese – Adds a creamy richness to the pudding; ensure it’s at room temperature for easy mixing.
• Chocolate Pudding Mix – The star flavor of the cake; you can substitute it with vanilla pudding for a lighter alternative.
• Milk – Necessary for preparing the pudding and blending the cream cheese smoothly.
• Whipped Topping (Cool Whip) – Gives the filling a light, airy texture; homemade whipped cream works beautifully here, too.
For the Topping
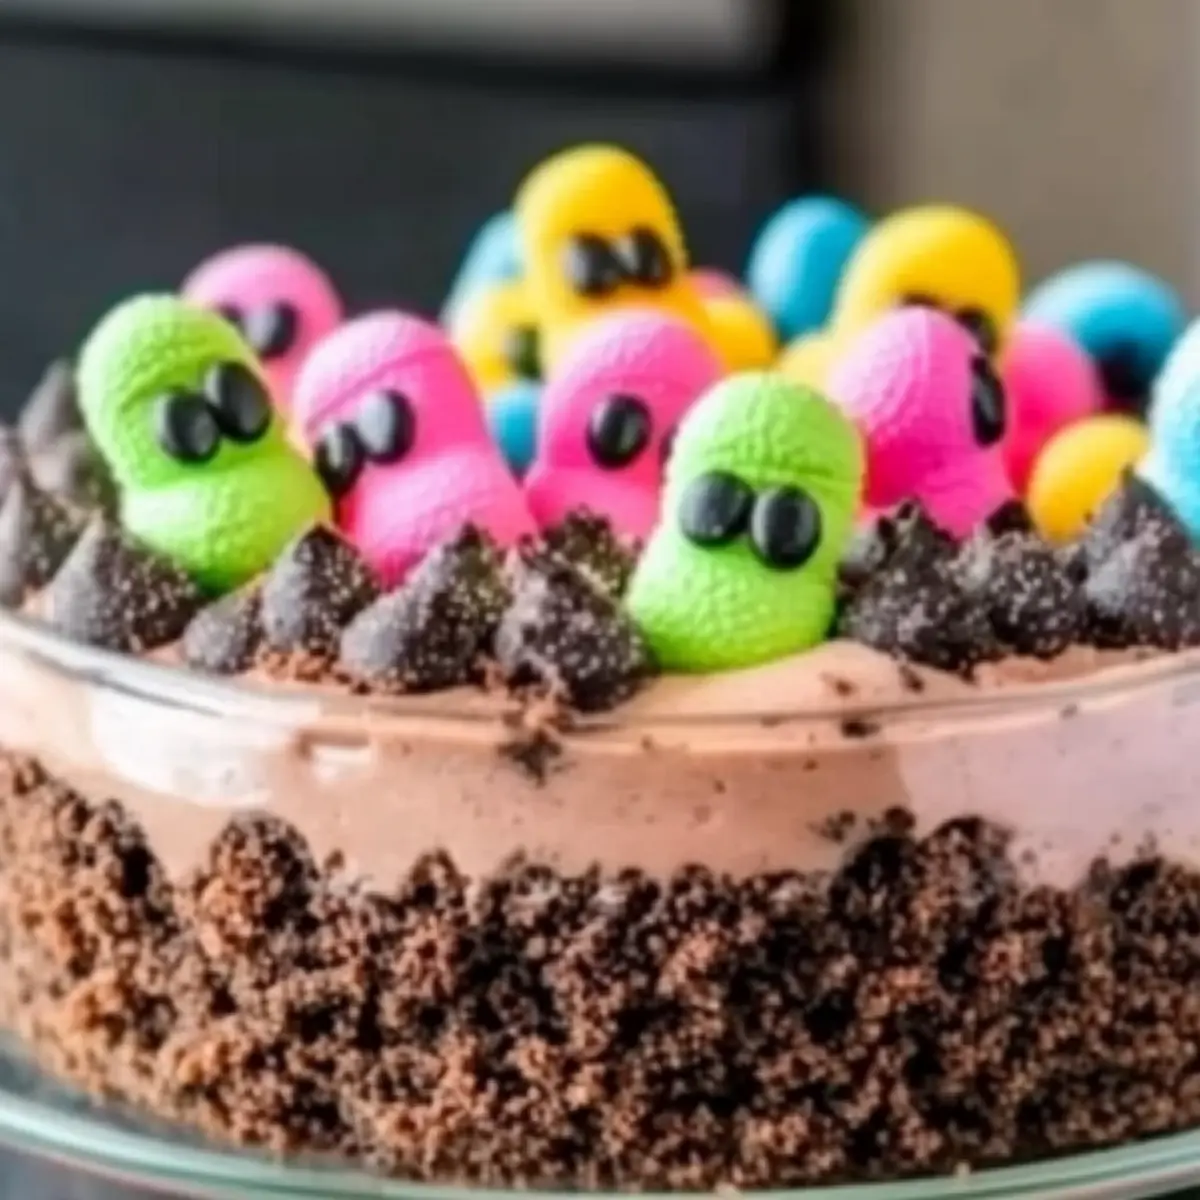
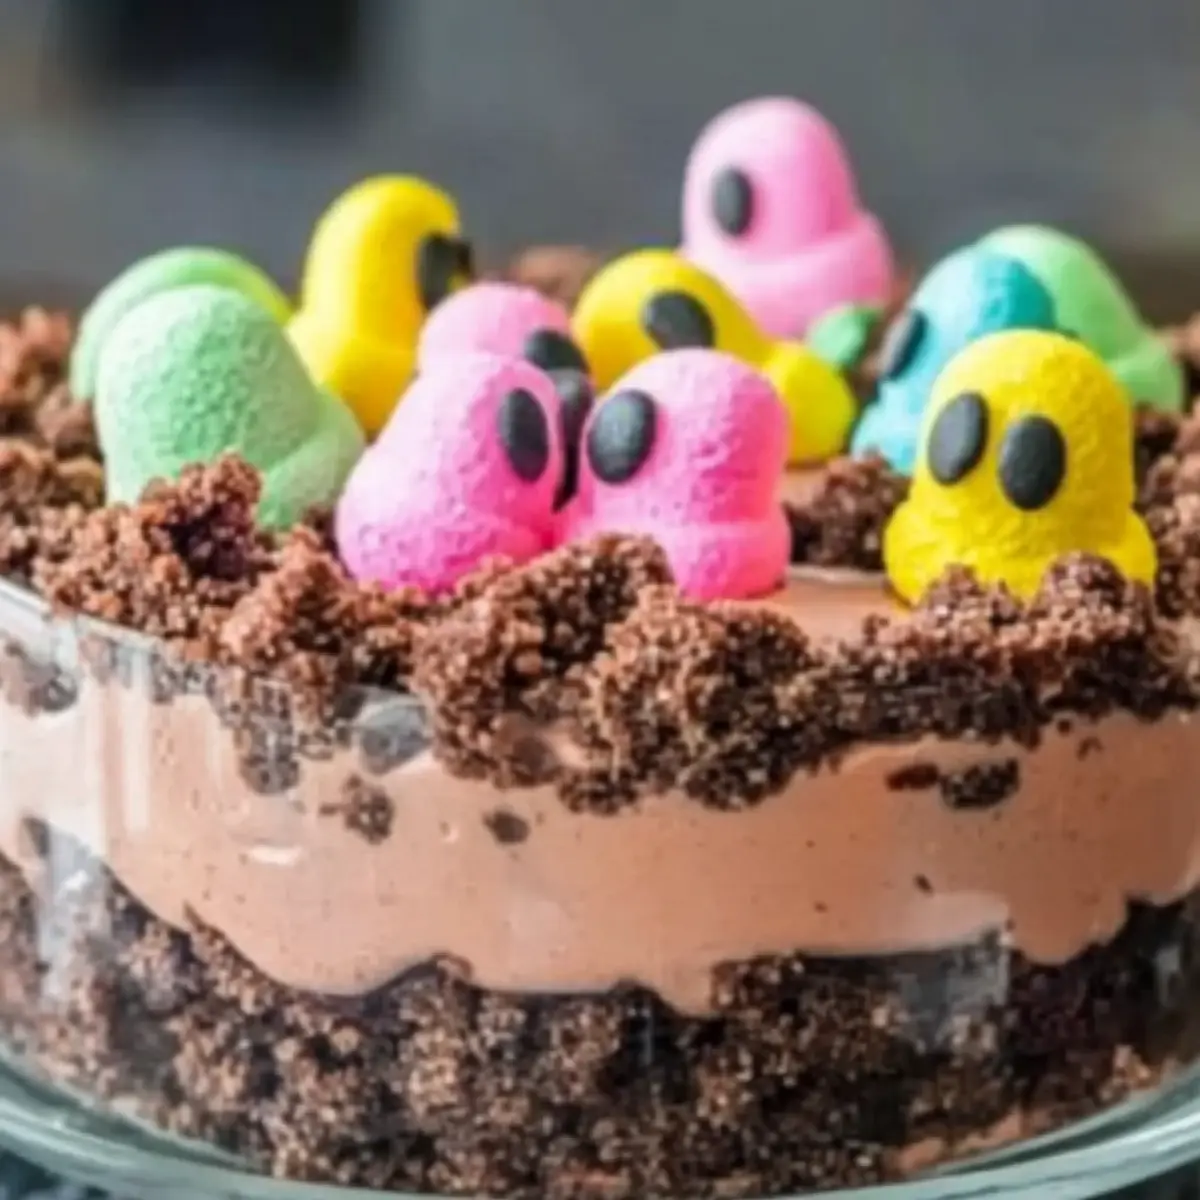
• Marshmallow Peeps – Bright and whimsical decorations; add them just before serving to keep their texture intact.
• Pastel Candies (like M&M’s) – Brightens up the dessert; feel free to use any colorful candies that spark joy!
This ingredients list will have you well on your way to crafting the sweetest Easter Dirt Cake that makes holiday celebrations even more special!
Step‑by‑Step Instructions for Easter Dirt Cake
Step 1: Prepare Crust
Using a food processor, crush the Oreo cookies into fine crumbs until they resemble moist sand. This step should take about 1–2 minutes. You want a crumbly yet cohesive mixture that will act as the “dirt” layer in your Easter Dirt Cake. Once done, set aside a couple of tablespoons for later use.
Step 2: Mix Filling
In a mixing bowl, combine the room-temperature cream cheese and milk using an electric mixer on medium speed. Mix for about 2 minutes until smooth and creamy, ensuring there are no lumps. Gradually add the chocolate pudding mix, continuing to blend for another minute until everything is well incorporated and thickened.
Step 3: Fold in Whipped Topping
Gently fold in the whipped topping (Cool Whip) into the pudding mixture using a spatula. This should take about 1 minute. Be careful not to overmix, as you want the mixture to remain light and airy, producing that delightful texture in your Easter Dirt Cake.
Step 4: Layer Cake
In a trifle dish or large glass bowl, start by adding a layer of the crushed Oreo crumbs to the bottom. Spoon a layer of the pudding mixture on top, spreading it evenly. Repeat this layering process until you’ve used up all the filling and cookies. End with a generous layer of Oreo crumbs on the top to create a beautiful “dirt” effect.
Step 5: Chill
Cover the assembled Easter Dirt Cake with plastic wrap or a lid to keep it fresh. Place it in the refrigerator to chill for at least 2 hours. This chilling time allows the flavors to meld beautifully and the layers to set properly, resulting in a delectable treat.
Step 6: Decorate and Serve
Just before serving, add festive marshmallow Peeps and colorful pastel candies on top of the cake for that vibrant Easter touch. This will not only enhance the visual appeal but also give a playful, whimsical finish to your Easter Dirt Cake. Enjoy this delightful dessert with family and friends!

Make Ahead Options
These Easter Dirt Cakes are perfect for busy home cooks looking to streamline their holiday preparations! You can mix the filling (cream cheese, chocolate pudding, and whipped topping) up to 24 hours in advance and store it in the refrigerator, just be sure to cover it tightly to maintain its creamy texture. Additionally, you can crush the Oreo cookies and keep them in an airtight container for the same duration. When you’re ready to serve, simply layer the prepped components in a trifle dish and allow it to chill for a couple of hours to set. Add your marshmallow Peeps and pastel candies just before serving for a vibrant touch. This way, you’ll have a show-stopping dessert with minimal fuss!
Easter Dirt Cake Variations
Let’s add some personal flair to your Easter Dirt Cake!
-
Vanilla Pudding: Swap chocolate pudding for vanilla for a lighter taste. The vanilla flavor offers a beautiful contrast to the Oreo crust.
-
Fruit Layers: Layer in some sliced strawberries or bananas for a fruity touch. They not only add flavor but also a nutritious element to this decadent treat.
-
Greek Yogurt Swap: For a healthier spin, replace some cream cheese with Greek yogurt. This swap will lighten the dessert while still keeping it rich and delicious.
-
Chocolate Oreos: Use chocolate-flavored Oreos instead of regular ones for double the chocolate flavor in your layers. This will deepen the taste and enhance the dessert’s richness.
-
Homemade Whipped Cream: Make your own whipped cream for an even fresher taste. It’s light and adds a beautiful homemade touch that your family will appreciate.
-
Mix-ins for Crunch: Add crushed nuts like walnuts or pecans to your layers for a delightful crunch. This variation introduces a new texture that pairs beautifully with the creaminess of the pudding.
-
Different Candies: Swap out pastel candies with your favorites like Reese’s Pieces or gummy candies. This change will let your kids customize it to their liking and add a burst of color!
Consider pairing this delightful dessert with a delightful scoop of homemade whipped cream from your next family gathering or for a quick yet delicious treat. No matter your choice, each variation will beautifully enhance your festive table. Embrace the creativity and enjoy every bite!
Expert Tips for Easter Dirt Cake
-
Perfect Crumb Size: Aim for fine Oreo crumbs to create a smooth layer of “dirt.” A food processor efficiently crushes them to the right consistency.
-
Mix Carefully: Be cautious not to overmix the pudding and cream cheese. Mixing just until combined keeps the filling thick and creamy for the ultimate Easter Dirt Cake.
-
Chill Time is Key: Don’t skip the chilling step! Allow the cake to refrigerate for at least 2 hours for the best texture—rushing this can lead to a runny dessert.
-
Timing for Decorations: Add marshmallow Peeps and pastel candies right before serving to prevent them from becoming soggy and losing their playful charm.
-
Experiment with Flavors: Feel free to swap chocolate pudding with vanilla for a lighter taste or add fresh fruit layers to jazz things up while maintaining the fun aspect.
How to Store and Freeze Easter Dirt Cake
Fridge: Keep your Easter Dirt Cake in the refrigerator, covered with plastic wrap or a lid. It will stay fresh for up to 3 days, maintaining its delightful layers.
Make-Ahead: You can prepare the Easter Dirt Cake up to 24 hours in advance. Just layer and chill it, adding toppings like marshmallow Peeps and pastel candies just before serving.
Freezer: While not typically recommended due to the texture, if you must freeze it, wrap it tightly and store for up to 1 month. Thaw in the fridge overnight before serving, but note that the toppings may not retain their original texture.
Reheating: No reheating is needed for this dessert! Serve chilled for the best flavor and presentation.
What to Serve with Easter Dirt Cake
To complete your festive celebration, consider these delightful options that elevate your Easter Dirt Cake into a memorable meal experience.
-
Spring Salad: A fresh green salad with crisp lettuce, radishes, and lightly dressed with lemon vinaigrette brightens up your dessert perfectly. The crisp textures and tangy flavors act as a refreshing contrast to the sweetness of the cake.
-
Grilled Vegetables: Smoky grilled zucchini, bell peppers, and asparagus on the side lend a savory note to the table. Their charred flavors balance the dessert’s sweetness and bring vibrant colors to your Easter spread.
-
Roasted Ham: A glazed honey-baked ham provides a savory and succulent centerpiece. The sweet glaze pairs wonderfully with the rich chocolate flavors of the cake, creating a delightful harmony on the palate.
-
Cheesy Garlic Bread: Crispy, cheesy garlic bread is always a crowd-pleaser. Its warm, buttery flavor offers a comforting companion to balance the playful sweetness of the Easter Dirt Cake.
-
Fruit Skewers: Assemble colorful fruit skewers with strawberries, pineapple, and blueberries. Their fresh, juicy pop serves as a light contrast, providing a refreshing interlude between bites of the rich dessert.
-
Sparkling Lemonade: A tangy sparkling lemonade will keep your celebration refreshing. The bubbly fizz and zesty notes cleanse the palate, making it a perfect drink to accompany the dessert’s layered textures.
Mix and match these ideas to create a fun and colorful Easter celebration that your family will cherish!
Easter Dirt Cake Recipe FAQs
What kind of Oreos are best for the crust?
I recommend using regular Oreos for that classic chocolate flavor, but chocolate-flavored Oreos can add an extra richness. The key is to ensure they are finely crushed for the best textural experience!
How should I store the Easter Dirt Cake?
Store your Easter Dirt Cake in the refrigerator, covered with plastic wrap or a lid. It can last for up to 3 days without losing that delightful layering. If making ahead, try to prepare it no more than 24 hours in advance to ensure freshness.
Can I freeze Easter Dirt Cake?
You can freeze the Easter Dirt Cake, but it’s important to wrap it tightly! Store it in the freezer for up to 1 month. Thaw it in the fridge overnight before serving, but keep in mind that the texture of the toppings, like the marshmallow Peeps, may not be the same.
What if the filling seems too runny?
If your filling turns out runny, it may be due to overmixing the pudding and cream cheese or not chilling long enough. To fix this, you can gently fold in more whipped topping to thicken it or allow it to chill longer to help it set.
Are there any dietary considerations for this dessert?
Absolutely! This Easter Dirt Cake can be customized. For lighter options, use light cream cheese or sugar-free pudding. If allergies are a concern, consider gluten-free Oreo cookies or alternative toppings that suit your dietary needs. Always check labels to avoid any allergens.
Why is chilling the Easter Dirt Cake so important?
Chilling is crucial as it allows the flavors to meld beautifully and the layers to set properly, resulting in a deliciously structured dessert. Skipping this step can lead to a runny, less appealing dessert. Be patient—it’s worth the wait!
Easter Dirt Cake: Fun No-Bake Treat for Family Celebrations
Ingredients
Equipment
Method
- Using a food processor, crush the Oreo cookies into fine crumbs until they resemble moist sand. Set aside a couple of tablespoons for later use.
- In a mixing bowl, combine the room-temperature cream cheese and milk using an electric mixer on medium speed. Mix until smooth and creamy.
- Gradually add the chocolate pudding mix, continuing to blend until everything is well incorporated and thickened.
- Gently fold in the whipped topping into the pudding mixture using a spatula.
- In a trifle dish, start by adding a layer of crushed Oreo crumbs, then spoon a layer of the pudding mixture on top. Repeat layering until all filling and cookies are used.
- Cover the assembled cake with plastic wrap and refrigerate for at least 2 hours.
- Just before serving, add festive marshmallow Peeps and colorful pastel candies on top.
Leave a Reply