
As I pulled the warm wraps from the skillet, the aroma of sizzling garlic danced through my kitchen, wrapping me in a comforting embrace. These Cheesy Garlic Chicken Wraps are my go-to solution for those hectic weeknights when I crave something delicious yet easy. The perfect union of savory chicken, creamy cheese, and a hint of garlic is enveloped in a golden tortilla that adds a satisfying crunch. Not only are these wraps quick to prepare, but they are also endlessly customizable, making them a hit with everyone in the family—even the picky eaters! So, whether you choose to load them with your favorite cheese or add a spicy twist, get ready to delight your taste buds. Curious to discover the secrets behind these wraps? Let’s dive in!
Why Are Cheesy Garlic Chicken Wraps Amazing?
Endless Customization: These wraps are incredibly versatile, allowing you to adjust the fillings based on your family’s preferences. Whether you prefer rotisserie chicken or want to throw in some veggies like spinach or bell peppers, the options are limitless!
Quick and Easy: Perfect for busy weeknights, preparing these wraps takes just minutes, making them an ideal solution when time is short.
Mouthwatering Flavor: The combination of melted cheese and sautéed garlic creates a rich, mouthwatering flavor that’s sure to impress.
Crowd-Pleaser: Kids and adults alike will love the gooey goodness of these wraps, making them a fantastic choice for family dinners or casual gatherings.
A Comfort Food Classic: These wraps embody the heart of comfort food, reminiscent of cheesy quesadillas, but with a unique garlic twist. Serve them alongside a fresh salad or seasoned potato wedges for a complete meal, just like with these Garlic Chicken Wraps.
You’re about to fall in love with this simple yet delicious recipe!
Cheesy Garlic Chicken Wraps Ingredients
For the Chicken
• Chicken – Use boneless, skinless chicken breast for a lean protein option; rotisserie chicken works great for a time-saving shortcut.
For the Flavor
• Garlic – Freshly minced for the best flavor intensity; feel free to adjust the amount for your desired garlic punch.
• Olive Oil – Perfect for sautéing; switch to butter if you prefer a richer taste.
For the Wraps
• Cheese (cheddar, mozzarella) – Choose your favorite for a creamy melt; pepper jack adds a nice kick if you’re feeling adventurous!
• Tortillas – The wrap base; swap with gluten-free or whole wheat for a healthier twist.
• Butter – Essential for toasting the wraps to a golden crisp; can substitute with a flavored butter spread if desired.
For Serving
• Parsley – A nice touch for fresh flavor and color; optional but highly recommended for presentation.
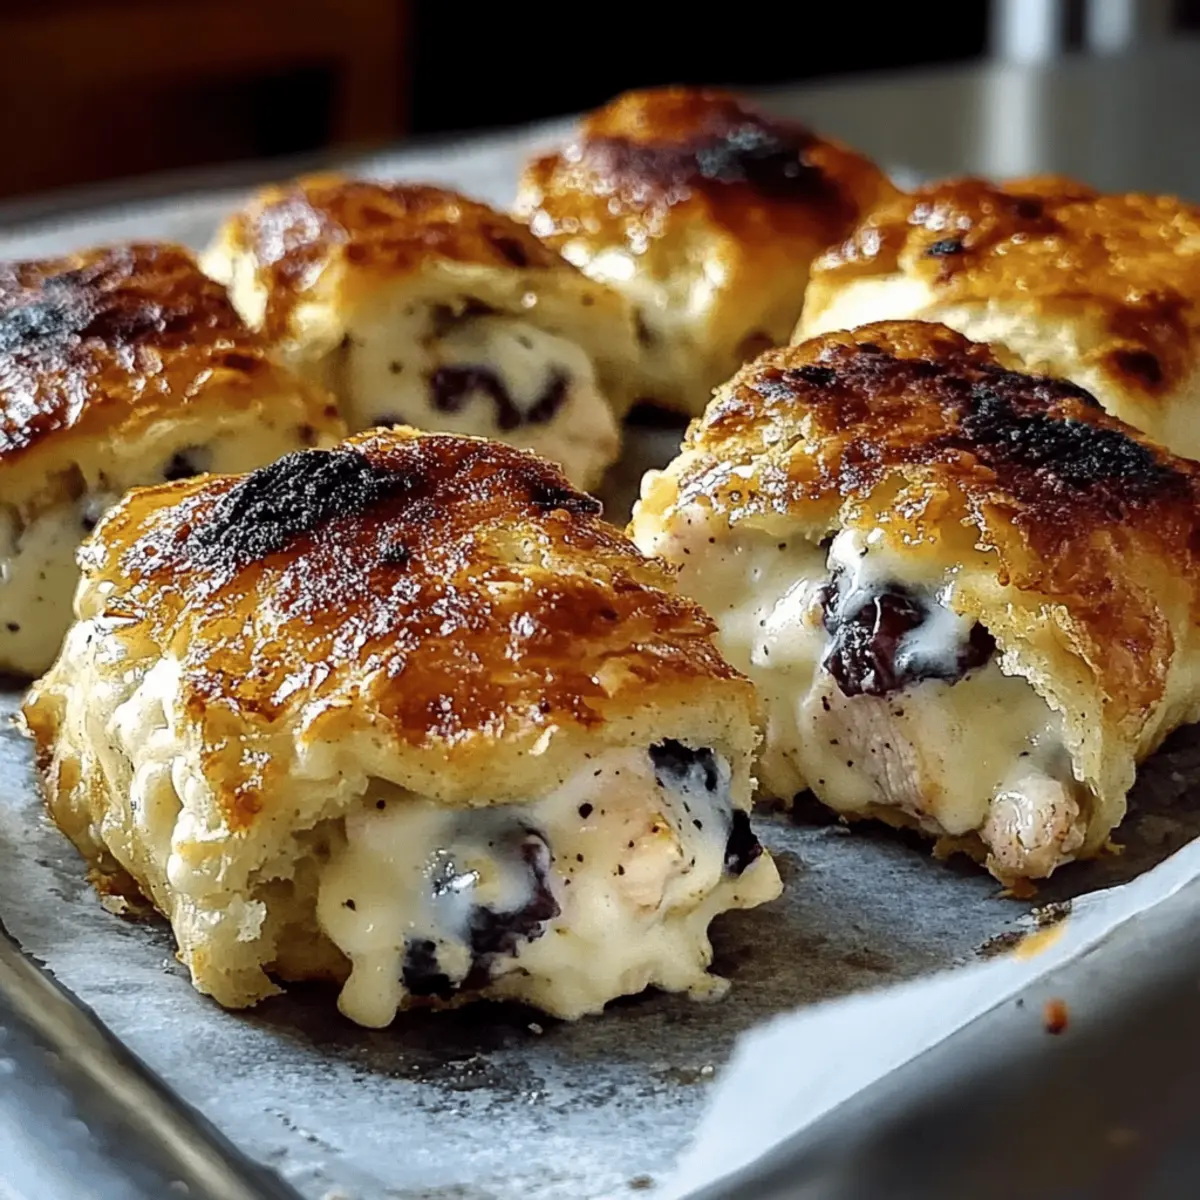
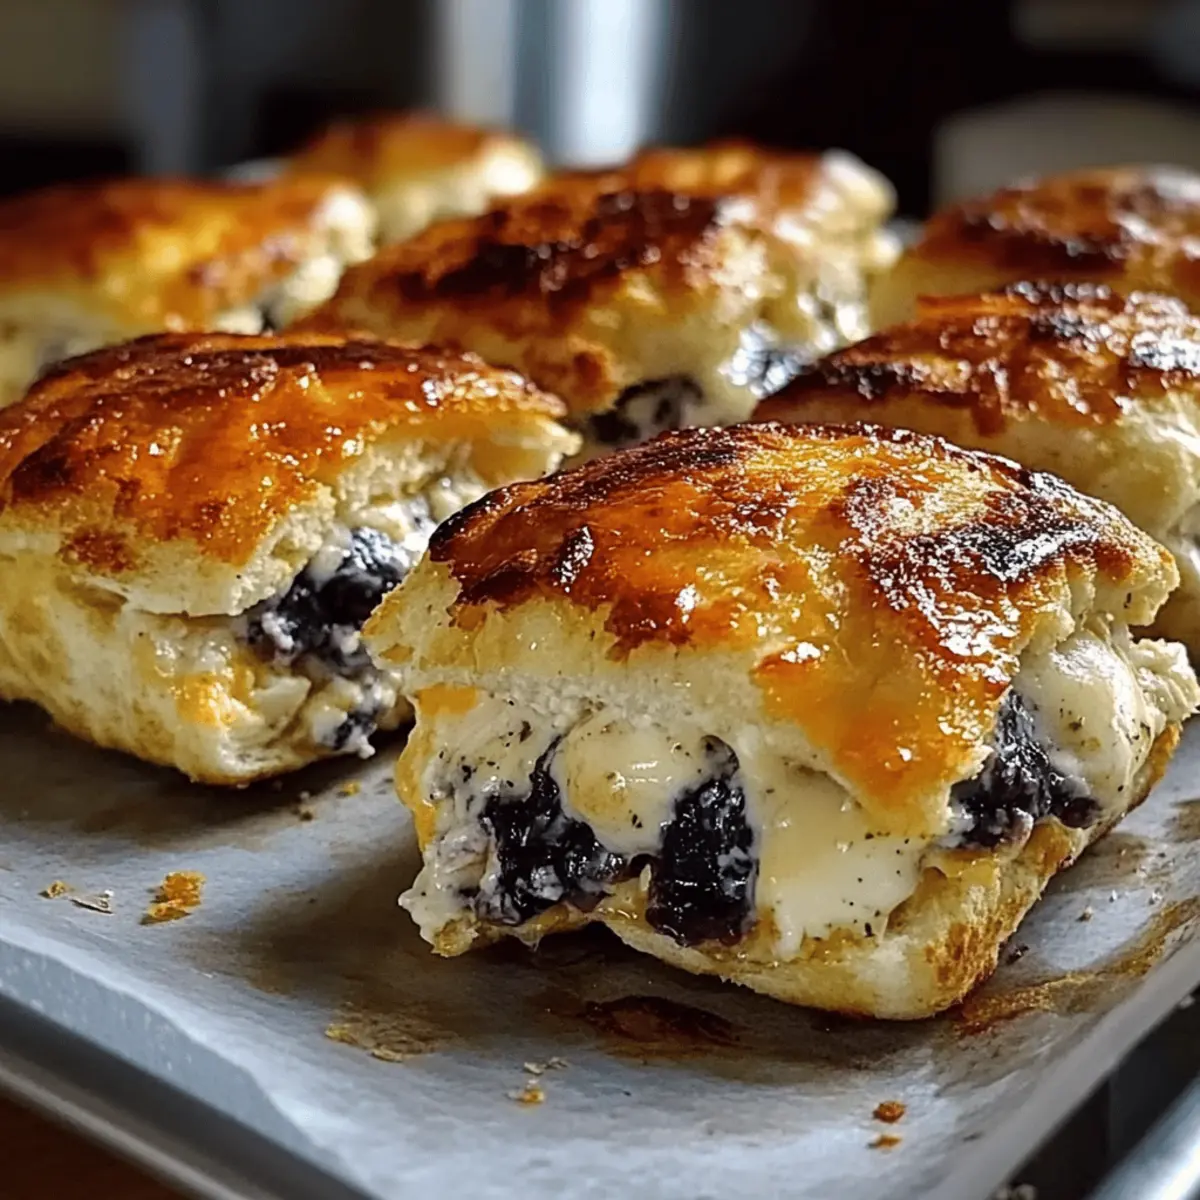
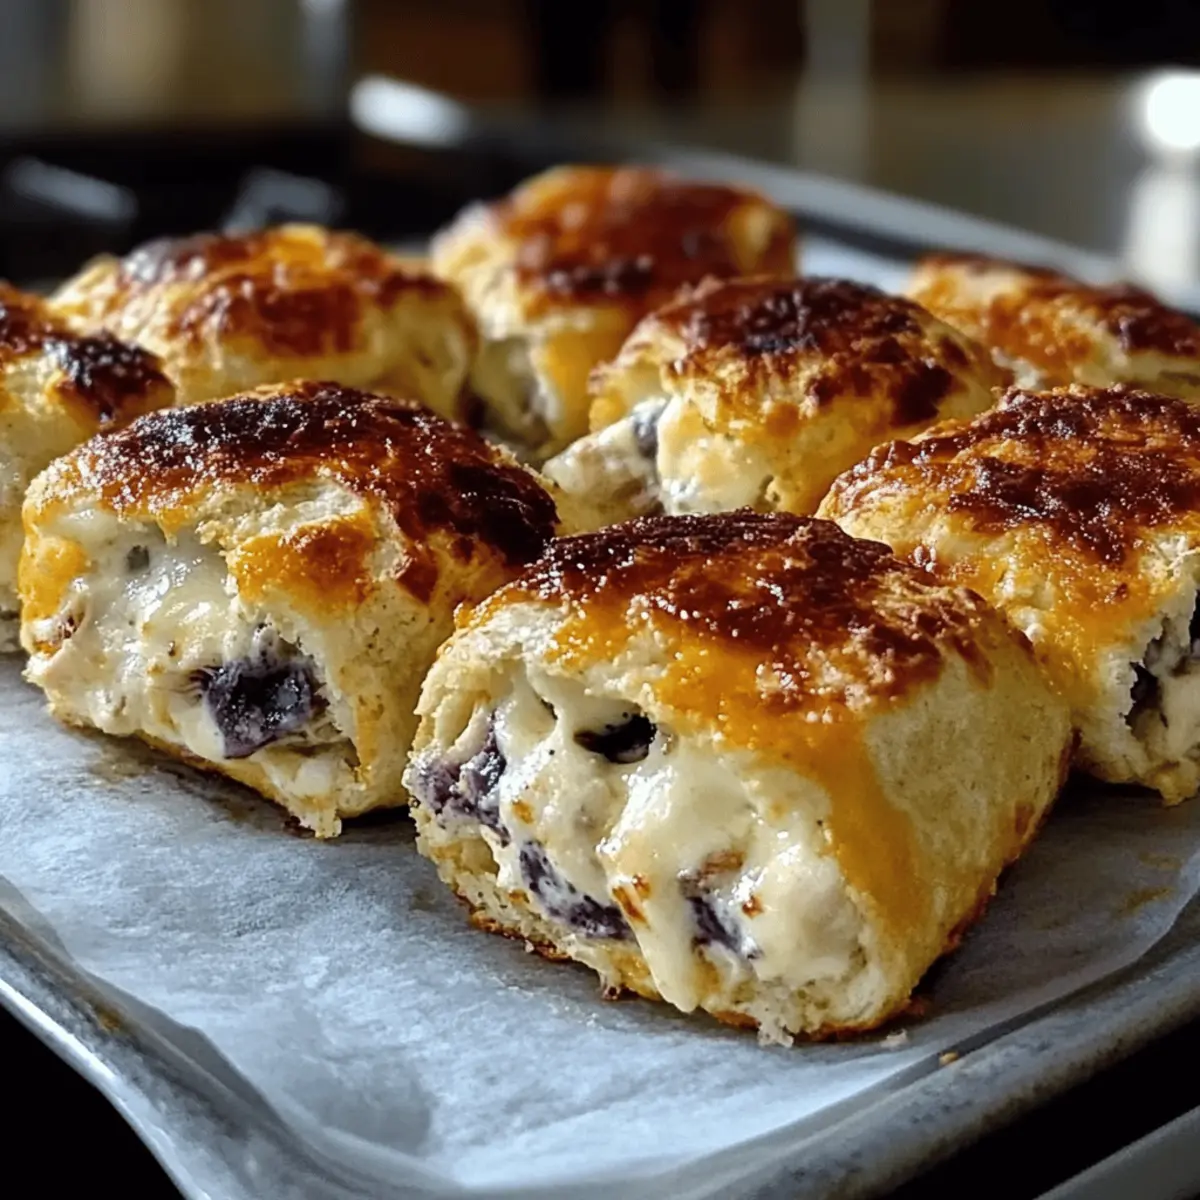
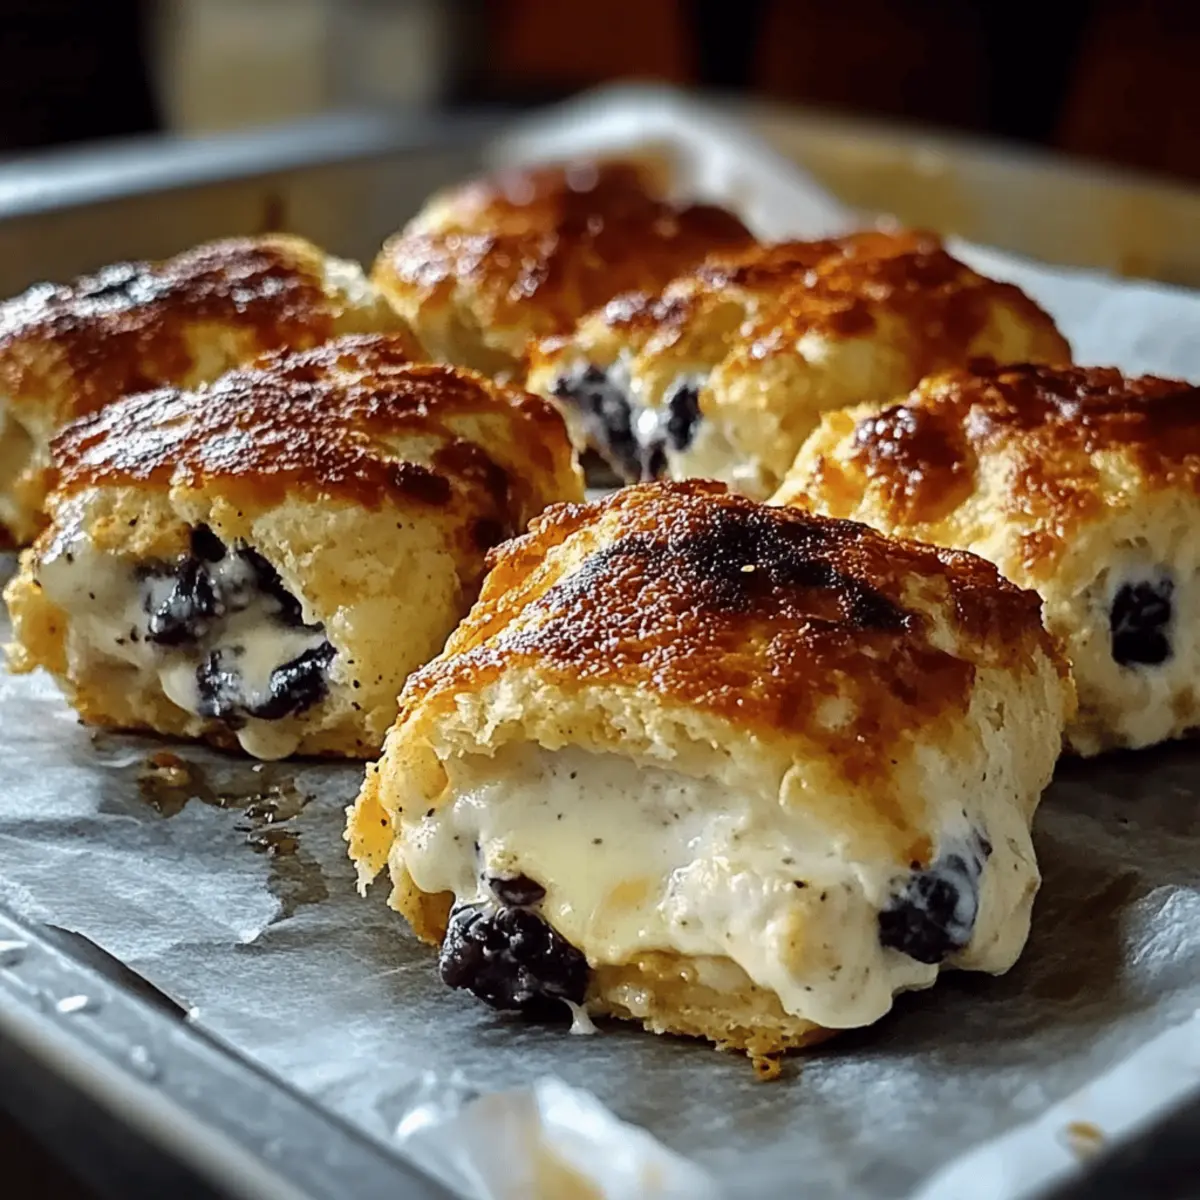
Step‑by‑Step Instructions for Blueberry Biscuits
Step 1: Preheat and Prepare
Begin by preheating your oven to 425°F (220°C). While it warms, line a baking sheet with parchment paper for easy cleanup. In a large mixing bowl, whisk together 2 cups of all-purpose flour, 1 tablespoon of baking powder, 2 tablespoons of sugar, and ½ teaspoon of salt until evenly combined. This base will create a fluffy texture for your delightful Blueberry Biscuits.
Step 2: Cut in the Butter
Add ½ cup of unsalted butter, chilled and cubed, into the flour mixture. Using a pastry cutter or your hands, blend the butter into the flour until it resembles coarse crumbs. The goal is to create a flaky texture, so don’t overwork it. This step sets the foundation for the tender layers in your biscuits.
Step 3: Mix in the Wet Ingredients
Next, pour in ¾ cup of milk and gently fold in 1 cup of fresh blueberries. If using frozen blueberries, do not thaw them to prevent excess moisture. Stir until just combined, making sure not to crush the berries. This mixture becomes the dough for your scrumptious Blueberry Biscuits.
Step 4: Shape the Dough
Turn the dough onto a floured surface and gently knead it 3-4 times until it comes together. Pat it into a ½-inch thick rectangle and cut out biscuits using a round cutter or a floured glass. Gather any excess dough, re-pat, and cut additional biscuits. This technique ensures maximized blueberry goodness in each biscuit.
Step 5: Bake to Perfection
Place the cut biscuits onto the prepared baking sheet, spacing them 1 inch apart. Bake in your preheated oven for about 12-15 minutes, or until they are golden brown on the top. Watch for that beautiful golden color to signify that your Blueberry Biscuits are ready to be enjoyed.
Step 6: Prepare the Lemon Glaze
While the biscuits bake, whisk together 1 cup of powdered sugar, 2 tablespoons of lemon juice, and 1 teaspoon of lemon zest in a small bowl. Adjust the consistency by adding a little more lemon juice or sugar to reach your desired smoothness. This zesty glaze will add a delightful finish to your warm biscuits.
Step 7: Glaze and Serve
Once the biscuits are done, remove them from the oven and let them cool on the baking sheet for a couple of minutes. Drizzle the lemon glaze over the warm biscuits for a sweet and tangy touch. Serve these irresistible Blueberry Biscuits warm for breakfast, brunch, or as a delightful snack, and enjoy the smiles they bring!
Expert Tips for Blueberry Biscuits
-
Quality Blueberries: Choose fresh, plump blueberries for the best flavor. Frozen berries work too, but avoid thawing them to prevent excess moisture.
-
Butter Temperature: Always use chilled butter for cutting into the flour. This ensures flakiness, creating those delicious layers we all love in biscuits.
-
Don’t Overmix: Mix the dough until just combined. Overworking can lead to tough biscuits, which aren’t as delightful as your fluffy Blueberry Biscuits should be!
-
Pat and Cut with Care: When shaping the dough, handle it gently. The goal is to maintain as many whole blueberries as possible for a burst of flavor in every bite.
-
Glaze Ratio: Adjust lemon glaze sweetness to your preference. Start with less sugar and add more if you’d like a sweeter finish to balance the tartness of the blueberries.
-
Storage Tips: Store any leftovers in an airtight container at room temperature for up to 2 days. Reheat gently to maintain that warm, fresh-baked taste!
Make Ahead Options
These Cheesy Garlic Chicken Wraps are a lifesaver for busy weeknights! You can prepare the cheesy chicken filling up to 3 days in advance by cooking the chicken and combining it with the sautéed garlic and cheese. Let it cool completely before transferring it to an airtight container in the refrigerator. When you’re ready to enjoy your wraps, simply warm the filling on the stovetop while you toast the tortillas. For best results, avoid assembling them too early to maintain freshness and crispiness. By prepping ahead, you’ll have a quick, satisfying meal at your fingertips, ensuring your family enjoys restaurant-quality wraps with minimal effort!
Blueberry Biscuits Customization Ideas
Feel free to get creative with your Blueberry Biscuits! Here are some delicious ways to mix things up and make this recipe your own.
-
Vegan Substitute: Replace butter with vegan butter and use almond or oat milk to create a delightful dairy-free treat.
Try incorporating a tablespoon of flaxseed meal mixed with water for added moisture and nutrition. -
Gluten-Free Option: Swap regular flour for a gluten-free all-purpose blend to cater to gluten-free diets while maintaining that fluffy biscuit texture.
With the right blend, your biscuits will still rise beautifully and taste just as scrumptious. -
Fruit Variations: Don’t limit yourself to blueberries! Experiment with other fruits like raspberries, chopped strawberries, or even apples for different flavor profiles.
Each fruit brings its unique sweetness and would pair wonderfully with the lemon glaze. -
Zesty Citrus Infusion: Add a teaspoon of orange or lime zest to the dough for an extra citrus kick.
This enhances the overall flavor and complements the blueberries perfectly! -
Herbal Twist: For a sophisticated flair, incorporate fresh herbs like rosemary or thyme directly into the biscuit mix.
The savory notes will create an exciting contrast against the sweet blueberries. -
Extra Crunch: Toss in some chopped nuts, like walnuts or pecans, for a delightful crunch and added nutrition.
They add a lovely texture and enhance the biscuit experience to new heights! -
Sweetener Swap: Replace granulated sugar with honey or maple syrup for a natural sweet alternative.
This can lend a subtle flavor twist while keeping your biscuits sweet and delightful. -
Serving Suggestion: Serve your Blueberry Biscuits with a side of whipped cream or vanilla yogurt for an even creamier delight!
For an elegant brunch spread, pair them with your favorite savory dish like the Garlic Chicken Wraps, and you’ll impress everyone!
How to Store and Freeze Blueberry Biscuits
Room Temperature: Store leftover Blueberry Biscuits in an airtight container for up to 2 days. This keeps them soft and fresh, ready for enjoying any time!
Fridge: For longer-lasting freshness, refrigerate the biscuits in an airtight container for up to 5 days. Reheat in a toaster oven or skillet to restore warmth and flakiness.
Freezer: Freeze unbaked biscuits on a parchment-lined baking sheet until solid, then transfer them to a freezer bag for rapid access. Enjoy within 2 months for the best taste!
Reheating: To reheat frozen or refrigerated biscuits, place them directly in a preheated oven at 350°F (175°C) for 5-8 minutes until warmed through. This ensures that delightful texture stays fresh!
What to Serve with Cheesy Garlic Chicken Wraps
As you bite into these crispy, cheesy delights, the possibilities for a delightful meal come rushing to mind.
- Fresh Green Salad: A light, crunchy salad with mixed greens and a tangy vinaigrette beautifully balances the warm, cheesy wraps.
- Seasoned Potato Wedges: Crispy and comforting, these golden wedges with herbs complement the rich flavors of your wraps, creating a satisfying duo.
- Tomato Soup: Silky and warm, a bowl of tomato soup provides a comforting dip for your wraps, especially on a cozy evening.
- Grilled Vegetables: Skewered, charred veggies add a smoky sweetness that enhances the flavors in the wraps, marrying textures and colors delightfully.
- Roasted Corn: Sweet, buttery roasted corn on the cob introduces a fun, summery element, brightening up each bite with its juicy pop.
- Chilled Sparkling Lemonade: This refreshing drink cuts through the richness of the wraps, providing a zesty and bubbly lift that quenches your thirst perfectly.
These pairings create a warm and inviting atmosphere, turning your meal into a delightful culinary experience that everyone will love!
Blueberry Biscuits Recipe FAQs
How can I choose the best blueberries for my biscuits?
Absolutely! Select fresh, plump blueberries that are firm and have a deep blue color. If you’re opting for frozen berries, choose ones without additives, and remember not to thaw them before mixing into the dough to prevent excess moisture.
How should I store my Blueberry Biscuits to keep them fresh?
For room temperature storage, keep the biscuits in an airtight container for up to 2 days. If you want them to last longer, refrigerate them in an airtight container for up to 5 days. Gently reheat them in a toaster oven or skillet to restore their delightful texture.
Can I freeze Blueberry Biscuits, and how?
Very! Freeze unbaked biscuits on a parchment-lined baking sheet until solid. After that, transfer them to a freezer bag. They can be stored in the freezer for up to 2 months. When you’re ready to bake them, there’s no need to thaw—just bake directly from the freezer and add a few extra minutes to the baking time!
What should I do if my biscuits turn out tough or dense?
If your Blueberry Biscuits turn out tough, it may be due to overmixing the dough or using too much flour. To prevent this, mix just until combined and avoid packing the flour when measuring. Using chilled butter will also help to achieve that desirable flaky texture.
Can I make these biscuits vegan, and if so, how?
The more the merrier! You can easily make these Blueberry Biscuits vegan by substituting the unsalted butter with vegan butter and the milk with almond, oat, or any plant-based milk you prefer. This way, everyone can indulge in these delicious treats without sacrificing taste!
Irresistible Blueberry Biscuits with a Zesty Lemon Glaze
Ingredients
Equipment
Method
- Preheat your oven to 425°F (220°C) and line a baking sheet with parchment paper.
- In a large mixing bowl, whisk together the flour, baking powder, sugar, and salt.
- Cut in the chilled, cubed butter until the mixture resembles coarse crumbs.
- Gently fold in the milk and blueberries until just combined.
- Knead the dough gently on a floured surface, pat into a ½-inch thick rectangle, and cut out biscuits.
- Bake for 12-15 minutes until golden brown.
- Prepare the lemon glaze by whisking together powdered sugar, lemon juice, and lemon zest.
- Drizzle the glaze over warm biscuits and serve.
Leave a Reply