
As I sift through my collection of beloved desserts, the vibrant memories of Italy flood my mind—warm summers filled with laughter, laughter mingling with the sweet aroma of freshly baked goods. Today, I want to introduce you to a delightful creation: the Italian Cannoli Cream Pie. This no-bake wonder combines the classic flavors of cannoli, featuring a velvety filling made with mascarpone and ricotta, enhanced with a splash of orange zest and a hint of cinnamon. The best part? Not only does this recipe come together quickly, but it also impresses everyone at gatherings with its stunning presentation and rich taste. Trust me, once you taste it, you’ll want to make it your new go-to dessert! Are you ready to bring a slice of Italy to your kitchen?
Why is this cannoli pie so irresistible?
Decadent Flavor: The luscious mascarpone and ricotta filling transports your taste buds straight to Italy, blending bright orange zest and warm cinnamon for an unforgettable dessert experience.
No-Bake Simplicity: This recipe eliminates the hassles of baking while still delivering a stunning pie that is perfect for impressing guests.
Crowd Favorite: Its unique sugar cone crust adds a fun twist, making it a hit at parties and family gatherings alike.
Versatile Options: Feel free to experiment with add-ins like mini chocolate chips or even transform it into a frozen version for a refreshing treat. For another delightful no-bake dessert, check out my Pumpkin Cream Cheese recipe!
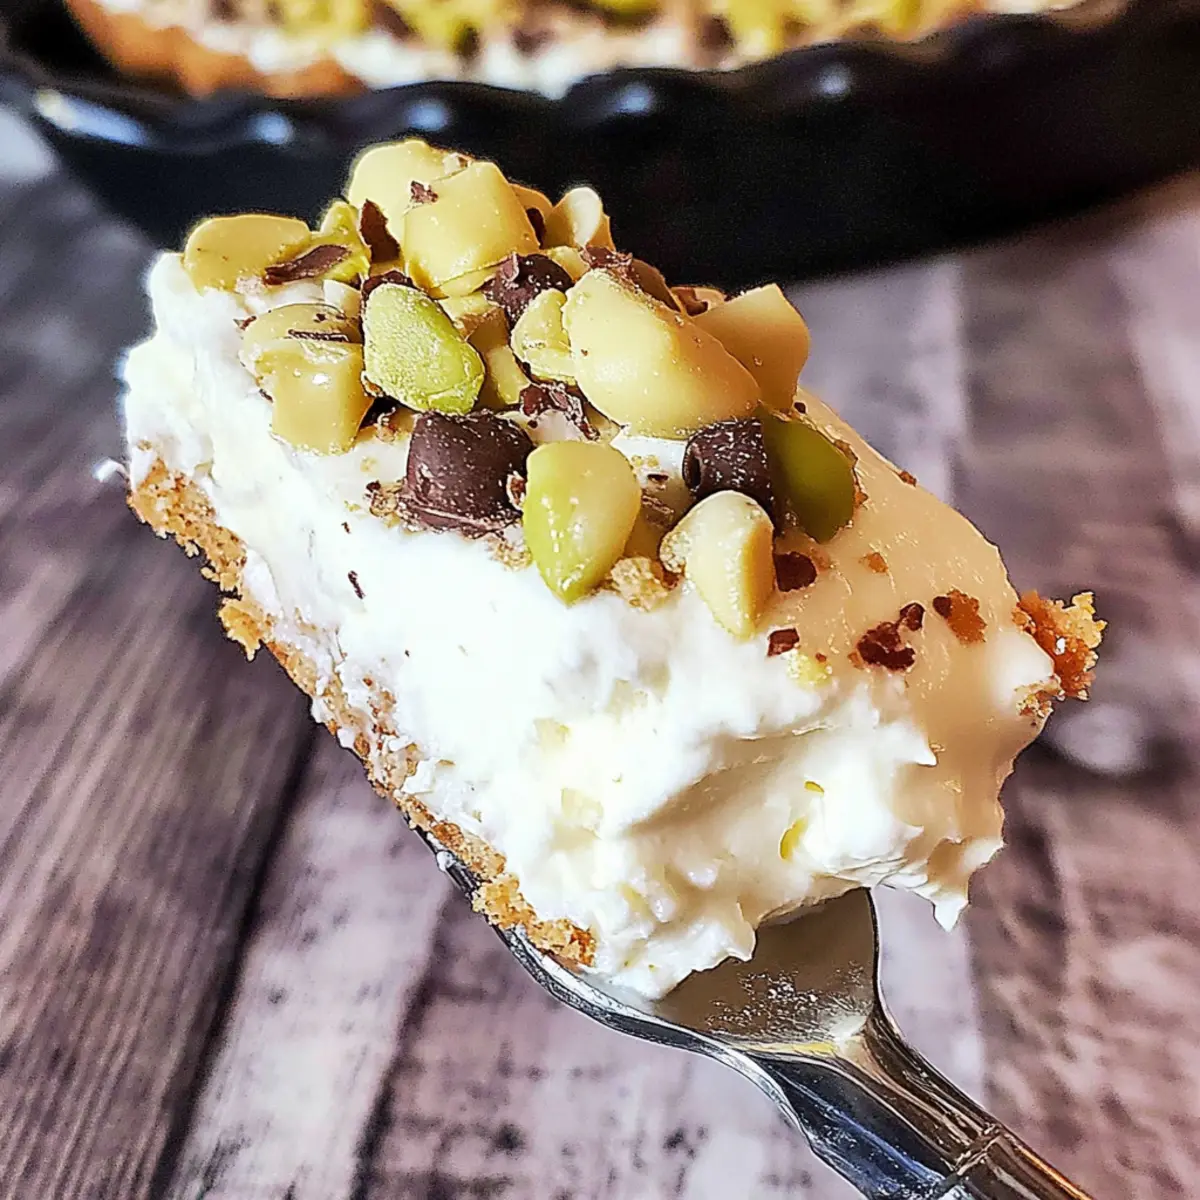
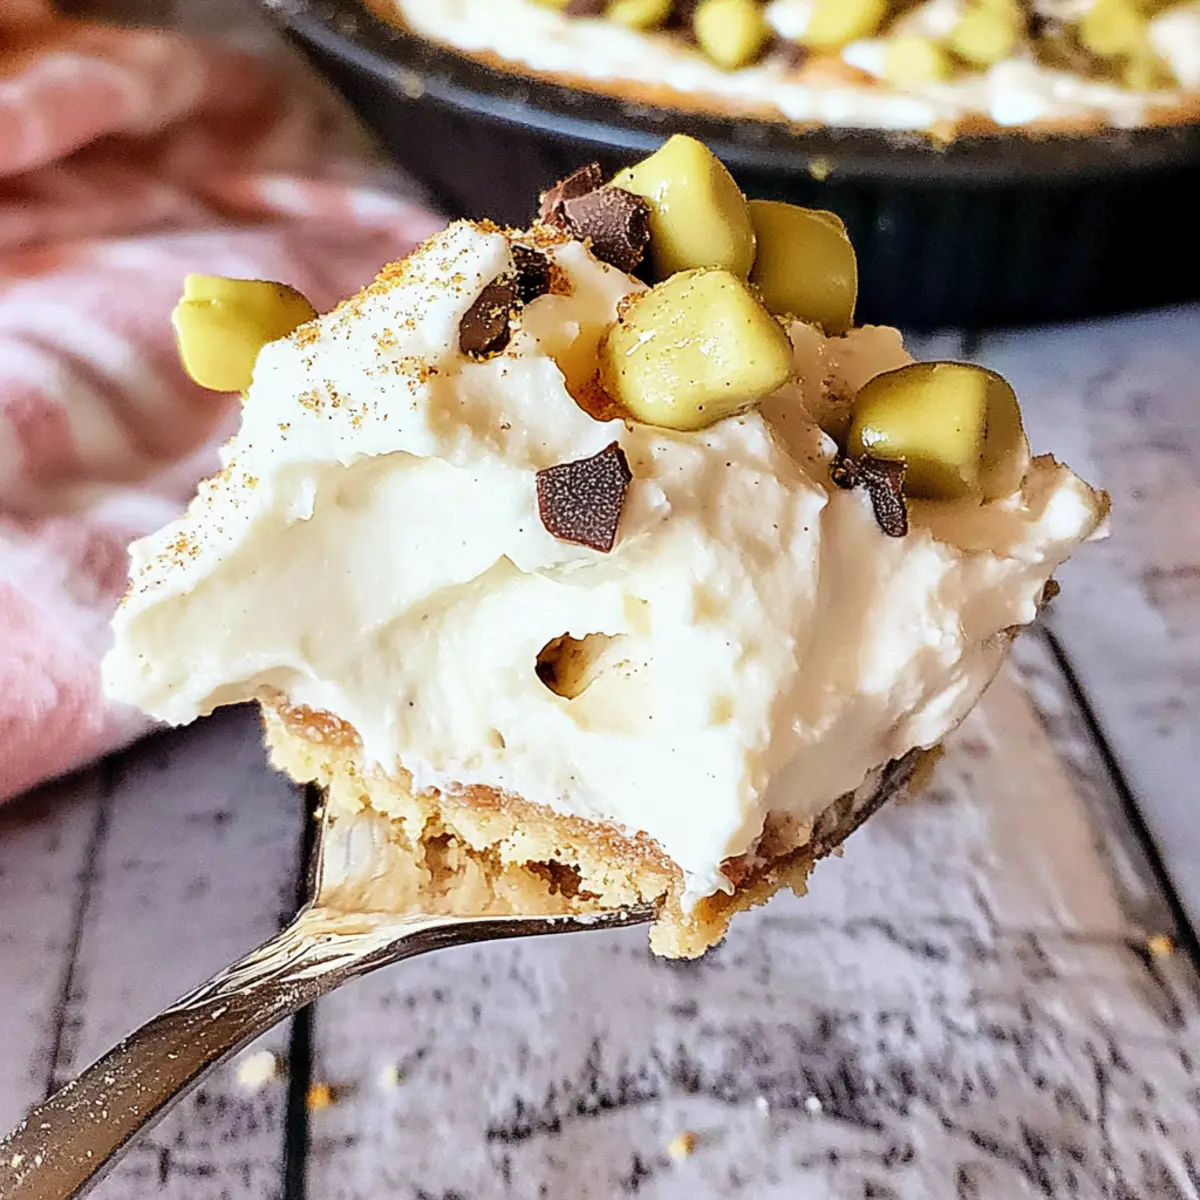
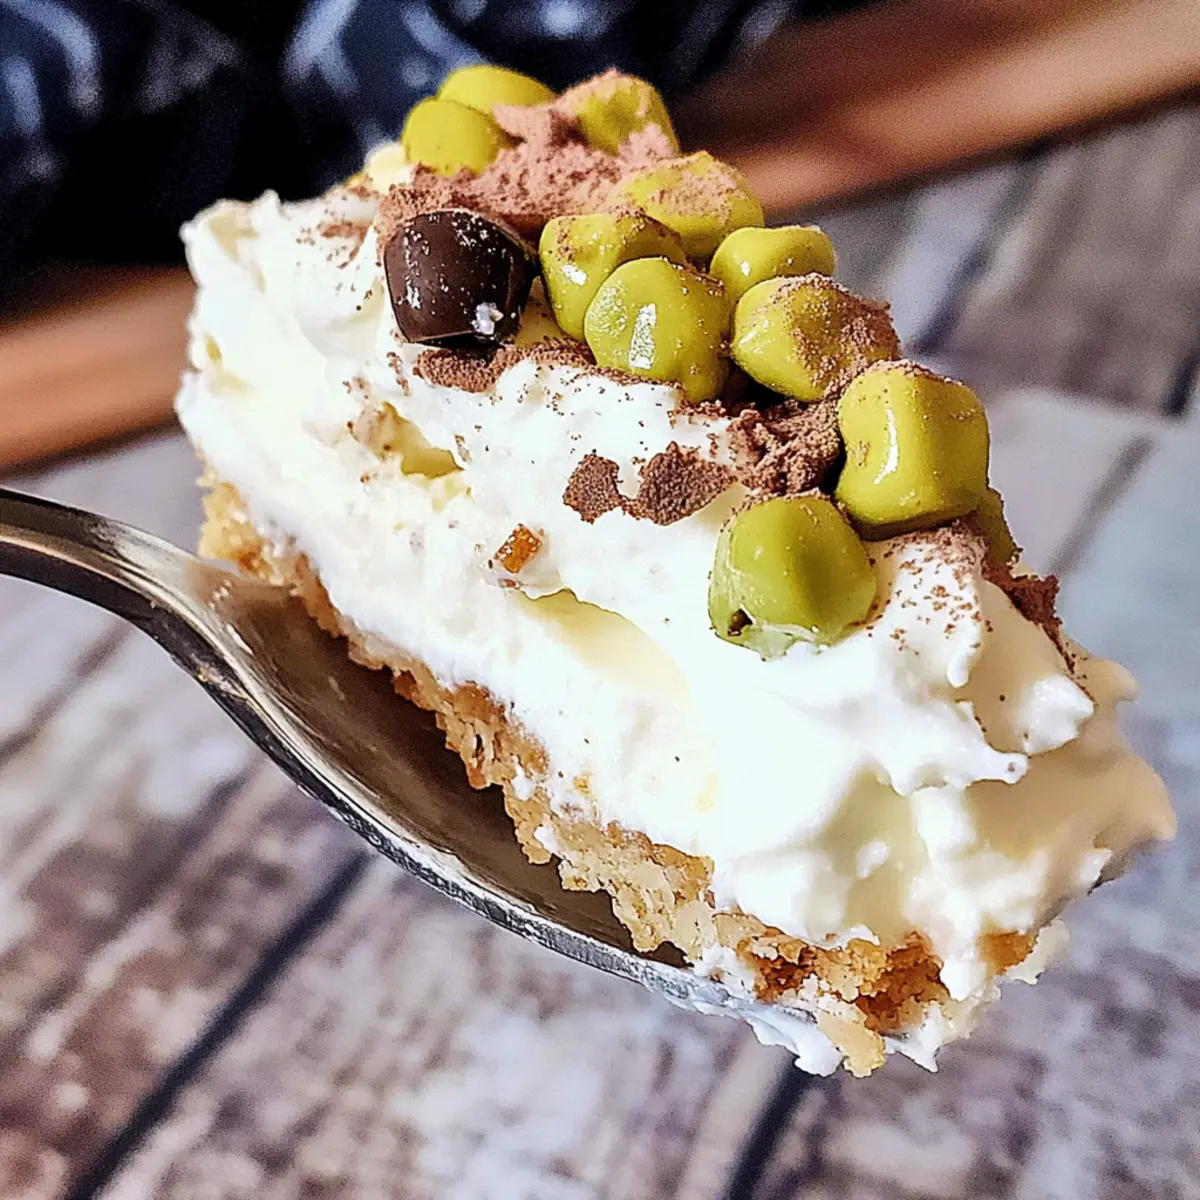
Stunning Presentation: The whipped cream topping and sprinkle of pistachios create an eye-catching dessert that looks as delightful as it tastes, making it a feast for both the eyes and the palate.
Italian Cannoli Cream Pie Ingredients
For the Crust
• Sugar Cones – The unique base for your pie, providing that classic cannoli crunch. Ensure they are finely crushed for better binding with butter.
• Butter – Helps to hold the sugar cones together; melted butter works best for mixing.
For the Filling
• Heavy Cream – Adds a luxurious, airy texture to the filling; feel free to substitute with double the mascarpone if needed.
• Mascarpone Cheese – A key player in achieving that creamy, rich Italian flavor; cream cheese can replace it in a pinch.
• Cream Cheese – Enhances the filling’s body and creaminess; always use it at room temperature for easier blending.
• Powdered Sugar – Sweetens the mixture while contributing to a smooth texture; use less for the freezer variation, substituting with sweetened condensed milk.
• Ricotta Cheese – The star ingredient that brings the traditional cannoli flavor; straining it overnight will improve its texture.
• Pure Vanilla – Boosts all the flavors in the filling; no substitutes necessary for this essential ingredient.
• Orange Zest – A burst of citrus that brightens the filling; use zest from approximately half an orange for best results.
• Cinnamon – Adds warmth and complexity; adjust according to your taste or omit it if you prefer.
For Topping
• Mini Chocolate Chips – A delightful way to enhance sweetness and texture; optional, but add them to the filling for a classic twist.
• Chopped Pistachios – Bring a nutty crunch to the presentation; swap with other nuts if desired.
• Remaining Whipped Cream – Whip with powdered sugar for a beautiful and light finish around the pie’s edge before adding the final toppings.
This Italian Cannoli Cream Pie is a delightful dessert that will tantalize your taste buds and impress all who indulge in it!
Step‑by‑Step Instructions for Italian Cannoli Cream Pie
Step 1: Prepare the Crust
Begin by preheating your oven to 350°F (175°C). In a food processor, crush the sugar cones until they reach a fine powder with some small pieces for texture. Combine these crumbs with melted butter until they’re evenly coated, then press this mixture firmly into a 9-inch pie plate, forming the crust. Bake for 5 minutes, then remove from the oven and allow it to cool completely.
Step 2: Whip the Cream
While the crust cools, take a large mixing bowl and whip the heavy cream with an electric mixer on medium-high speed until stiff peaks form. This should take about 4-5 minutes. Once whipped, gently set aside 2 cups of this fluffy cream for later use in the filling of your Italian Cannoli Cream Pie.
Step 3: Make the Cheese Filling
In a separate bowl, combine the mascarpone and cream cheese. Beat them together for about 3 minutes until smooth. Gradually add in the powdered sugar, continuing to mix until the mixture is well combined and creamy. This forms the rich base of your filling, essential for that luxurious cannoli flavor.
Step 4: Add Flavorings
Next, incorporate the strained ricotta cheese into the creamed mixture. Add the pure vanilla extract, orange zest, and cinnamon, mixing everything thoroughly for an additional 3 minutes. The resulting blend should be smooth, rich, and fragrant, capturing the delightful essence of traditional cannoli.
Step 5: Fold in the Whipped Cream
Gently fold the reserved whipped cream into the cheese mixture, using a spatula to maintain the airy texture. Be cautious not to deflate the cream, as this will help create a light and fluffy filling for your Italian Cannoli Cream Pie. Once combined, spoon this mixture into the cooled sugar cone crust, spreading it evenly.
Step 6: Top the Pie
For the finishing touch, whisk the remaining whipped cream with a little powdered sugar until light and fluffy. Pipe this whipped cream decoratively around the edge of the pie. Now, sprinkle with chopped pistachios and mini chocolate chips to add a delightful crunch and visual appeal to your Italian Cannoli Cream Pie.
Step 7: Chill the Pie
Finally, cover your pie with plastic wrap and refrigerate for at least 4 hours, allowing it to firm up. This chilling time is crucial for the flavors to meld beautifully and to achieve the perfect texture. Once ready, slice and serve your stunning Italian Cannoli Cream Pie to delighted friends and family!
Italian Cannoli Cream Pie Variations
Get creative in the kitchen by customizing this wonderful Italian Cannoli Cream Pie to suit your taste and dietary needs!
- Frozen Twist: Skip the powdered sugar and use sweetened condensed milk instead for a delightful Frozen Italian Cannoli Pie. This summer-ready treat is sure to impress on hot days!
- Chocolatey Delight: Fold mini chocolate chips directly into the filling for an extra sweet bite that perfectly complements the creamy textures.
- Nutty Alternatives: Swap out chopped pistachios for hazelnuts or almonds to give your pie different flavor notes and crunch. Each nut brings its own charm to the dessert!
- Caffeine Kick: Add a splash of espresso or coffee liqueur to the filling for a bold twist that coffee lovers will appreciate. It pairs beautifully with the rich flavors of the mascarpone and ricotta.
- Fruit Infusion: Incorporate diced fresh fruit, like strawberries or raspberries, into the filling for a refreshing burst of flavor. This adds a lovely color and tang to your pie!
- Sassy Citrus: Enhance the flavor with additional citrus zest, like lemon or lime, for a punchy twist that brightens every bite. It’s an unexpected twist that will delight your palate.
- Spiced Up: Level up the warmth by adding a pinch of nutmeg or cardamom if you want to explore deeper flavors in your classic cannoli-inspired dessert. These spices bring a lovely warmth that’s perfect for cozy gatherings.
- Dairy-Free Option: Replace all dairy ingredients with non-dairy alternatives—such as coconut cream and dairy-free cream cheese—making a delicious vegan version of this pie that everyone can enjoy!
Whether you decide to whip up a classic pie or venture into these delightful variations, I promise there’s no wrong way to make this pie shine. For those looking for more exciting dessert ideas, check out my recipe for Lemon Cream Cheese delights. Happy baking!
Storage Tips for Italian Cannoli Cream Pie
Fridge: Store the pie covered in the refrigerator for up to 4 days. This ensures it stays fresh and maintains its delightful flavor and texture.
Freezer: Individual slices can be wrapped tightly in plastic wrap and then stored in an airtight container in the freezer for 4-6 weeks if you wish to save some for later.
Thawing: When ready to enjoy a frozen slice, thaw it in the fridge for several hours or overnight to preserve its creamy consistency.
Serving Tip: For best results, enjoy your Italian Cannoli Cream Pie cold, as this enhances the rich flavors and smooth texture of the filling.
Expert Tips for Italian Cannoli Cream Pie
-
Strain Ricotta: Ensure the ricotta is strained overnight to avoid excess moisture, which can make the filling too watery.
-
Folding Technique: When combining whipped cream into the cheese mixture, fold gently. This keeps the filling light and fluffy for your Italian Cannoli Cream Pie.
-
Chill Time: Don’t rush the chilling process! Allow the pie to refrigerate for at least 4 hours, as this helps the flavors develop and textures set beautifully.
-
Crust Consistency: Make sure the sugar cone crust is finely crushed for better binding with the melted butter; this ensures a sturdy base for your pie.
-
Flavor Adjustments: Taste the filling before it sets. If you want bolder flavors, feel free to add more cinnamon or orange zest according to your preference.
-
Serving Tips: For a clean slice, use a warm knife to cut through the pie, which will help maintain its beautiful layers and prevent spilling of the filling.
What to Serve with Italian Cannoli Cream Pie
The perfect accompaniment can elevate your Italian Cannoli Cream Pie into a full-fledged celebration of flavors and textures.
- Rich Espresso: The deep, bold flavor of espresso cuts right through the creaminess, enhancing every layer of this delightful dessert.
- Fruity Sorbet: A scoop of lemon or raspberry sorbet provides a refreshing contrast, lightening the palate after each creamy bite.
- Chocolate Biscotti: Crunchy chocolate biscotti offer a delightful coffee pair and an added layer of texture to the indulgent pie.
- Whipped Cream with Orange Zest: A dollop of lightly sweetened whipped cream infused with orange zest complements the pie’s filling and mimics its flavors beautifully.
- Sweet Dessert Wine: Consider serving with a glass of Moscato or Vin Santo, as their sweetness pairs well without overwhelming the pie’s richness.
- Fruit Salad: A colorful medley of fresh berries or citrus fruits adds a vibrant, refreshing touch, balancing the pie’s creamy density.
- Mini Cannoli: For a fun and thematic touch, a few mini cannoli on the side keep the Italian spirit alive—and provide a delightful crunch!
- Chocolate Dipped Strawberries: The decadent strawberries offer a romantic touch and contrast the pie’s texture, making every bite a surprise.
Make Ahead Options
This Italian Cannoli Cream Pie is a fantastic choice for meal prep, as many components can be prepped in advance, saving you time during busy weeknights. You can make the sugar cone crust up to 3 days ahead; simply crush the cones, mix with melted butter, and bake. Additionally, the filling can be prepared up to 24 hours in advance—just whip the cream, mix the cheeses, and combine them without adding the whipped cream until you’re ready to assemble. To maintain quality, keep the pie covered in the refrigerator and wait to add the toppings until just before serving for the freshest presentation. Enjoy the ease of having this delightful dessert ready to impress!
Italian Cannoli Cream Pie Recipe FAQs
What should I look for when selecting ricotta cheese?
Always choose whole-milk ricotta for the best texture and flavor. Look for packaging indicating it has a creamy consistency without excess liquid. If possible, opt for a brand that offers fresh ricotta, as it will enhance the overall taste of your Italian Cannoli Cream Pie.
How do I store leftover Italian Cannoli Cream Pie?
Store your pie in the refrigerator, covered with plastic wrap or in an airtight container, for up to 4 days. Keeping it chilled helps maintain its creamy texture and prevents it from absorbing other odors from the fridge.
Can I freeze slices of the Italian Cannoli Cream Pie?
Absolutely! Wrap individual slices tightly in plastic wrap, then place them in an airtight container. They can be frozen for 4-6 weeks. When you’re ready to enjoy, simply thaw them in the fridge overnight to maintain that delightful creaminess!
What if my filling is too soft?
If your filling feels too soft, it might be due to the ricotta being too watery. To fix this, you can try mixing in a teaspoon of melted gelatin. Simply dissolve the gelatin in a bit of warm water, let it cool, then fold it into the filling gently. This should help stabilize the mixture without affecting the flavor.
Are there any allergy considerations for this recipe?
Yes! This dessert contains dairy products, so be cautious if serving to anyone with lactose intolerance or dairy allergies. You can substitute dairy ingredients with dairy-free alternatives, like coconut cream and dairy-free cream cheese, to make this a more inclusive dessert option.
How can I make this a frozen Italian Cannoli Pie?
To create a frozen version, skip the powdered sugar in the filling and replace it with sweetened condensed milk. Prepare your filling as usual, but then pour it directly into your crust and freeze it instead of chilling. Allow it to set in the freezer for at least 6 hours before serving for a delightful frozen treat!

Delicious Italian Cannoli Cream Pie That's No-Bake Bliss
Ingredients
Equipment
Method
- Preheat your oven to 350°F (175°C). Crush the sugar cones until fine and mix with melted butter. Press into a 9-inch pie plate and bake for 5 minutes. Cool completely.
- Whip heavy cream until stiff peaks form, about 4-5 minutes. Set aside 2 cups for later use.
- Combine mascarpone and cream cheese, beat until smooth. Gradually add powdered sugar and mix until creamy.
- Incorporate strained ricotta, vanilla, orange zest, and cinnamon. Mix until smooth and fragrant.
- Fold the reserved whipped cream into the cheese mixture gently to maintain texture. Spoon into the crust evenly.
- Whisk remaining whipped cream with powdered sugar and pipe decoratively around the pie. Sprinkle with pistachios and chocolate chips.
- Cover with plastic wrap and refrigerate for at least 4 hours before serving.
Leave a Reply