
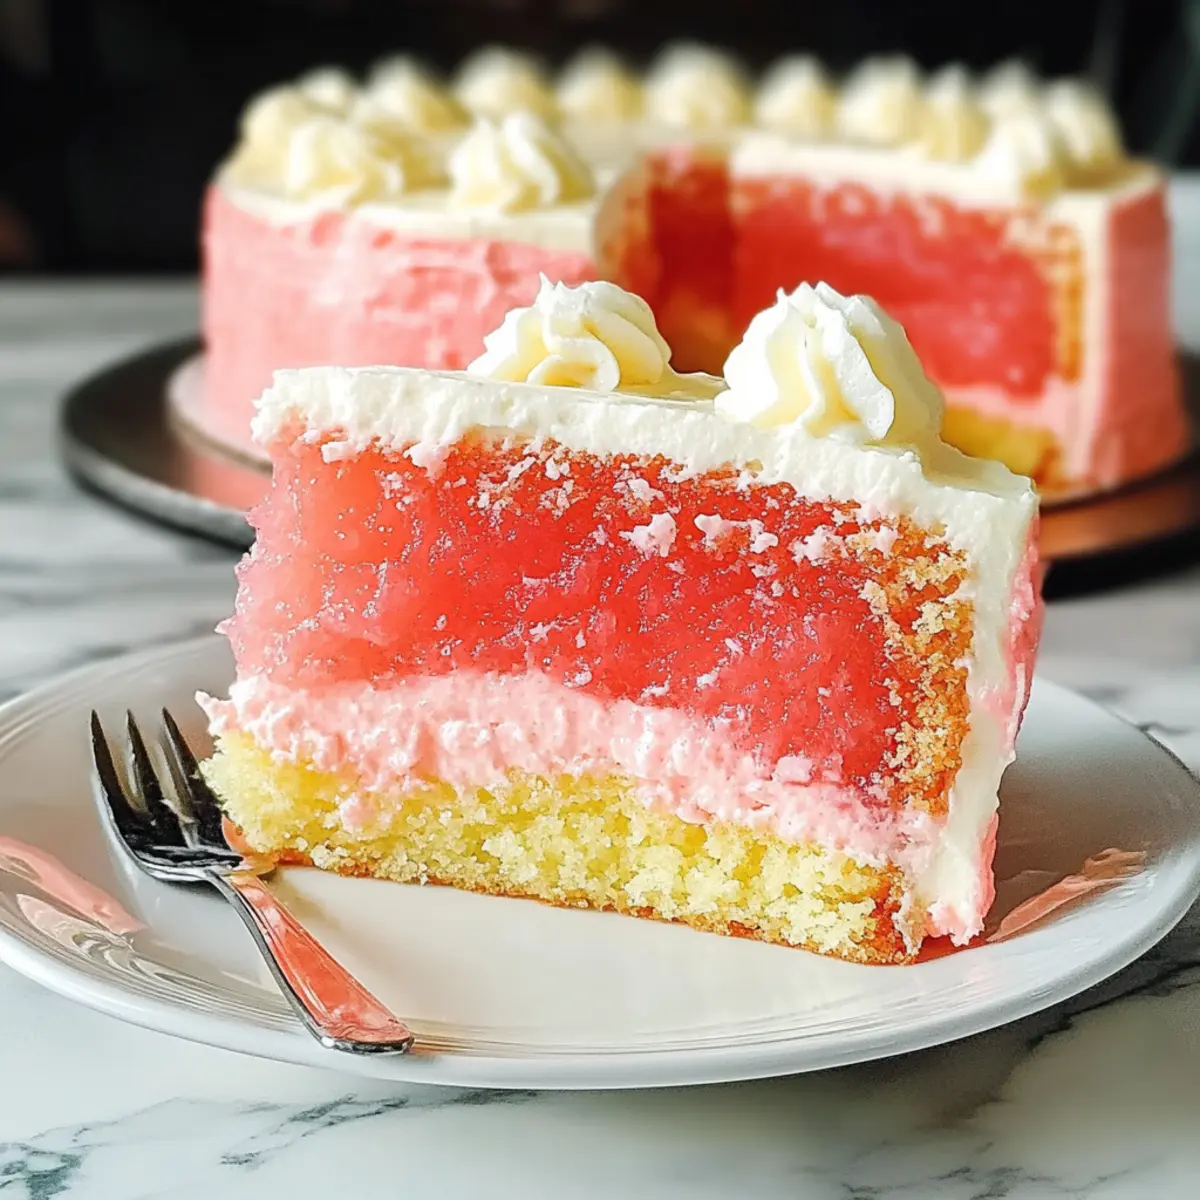
As I sifted through the sweet, fragrant memories of my last tropical vacation, I stumbled upon the perfect dessert to bring a taste of paradise home: Hawaiian Guava Cake. This cake is much more than just a dessert; it’s a delightful escape that captures the vibrant essence of guava and coconut, layered with a luxuriously fluffy cream cheese topping. What I love most about this cake is how effortlessly it comes together—perfect for both festive gatherings and a cozy weeknight treat. Plus, there’s even a gluten-free option, making it a crowd-pleaser for everyone! Are you ready to add a splash of the tropics to your dessert table? Let’s dive into this tropical flavor adventure!
Why Will You Love This Cake?
Tropical escape: Each bite of this Hawaiian Guava Cake transports you straight to a sun-soaked beach, mixing the delightful flavors of guava and coconut.
Effortless preparation: With simple ingredients and easy steps, you’ll have a stunning dessert in no time, perfect for both casual nights in or festive gatherings.
Gluten-free option: The recipe offers a gluten-free substitute, making it inclusive for all your friends and family. How about enjoying it alongside some creamy Caramel Brownie Cheesecake?
Appealing texture: The combination of a soft, moist cake and a fluffy cream cheese layer ensures that everyone will be coming back for seconds!
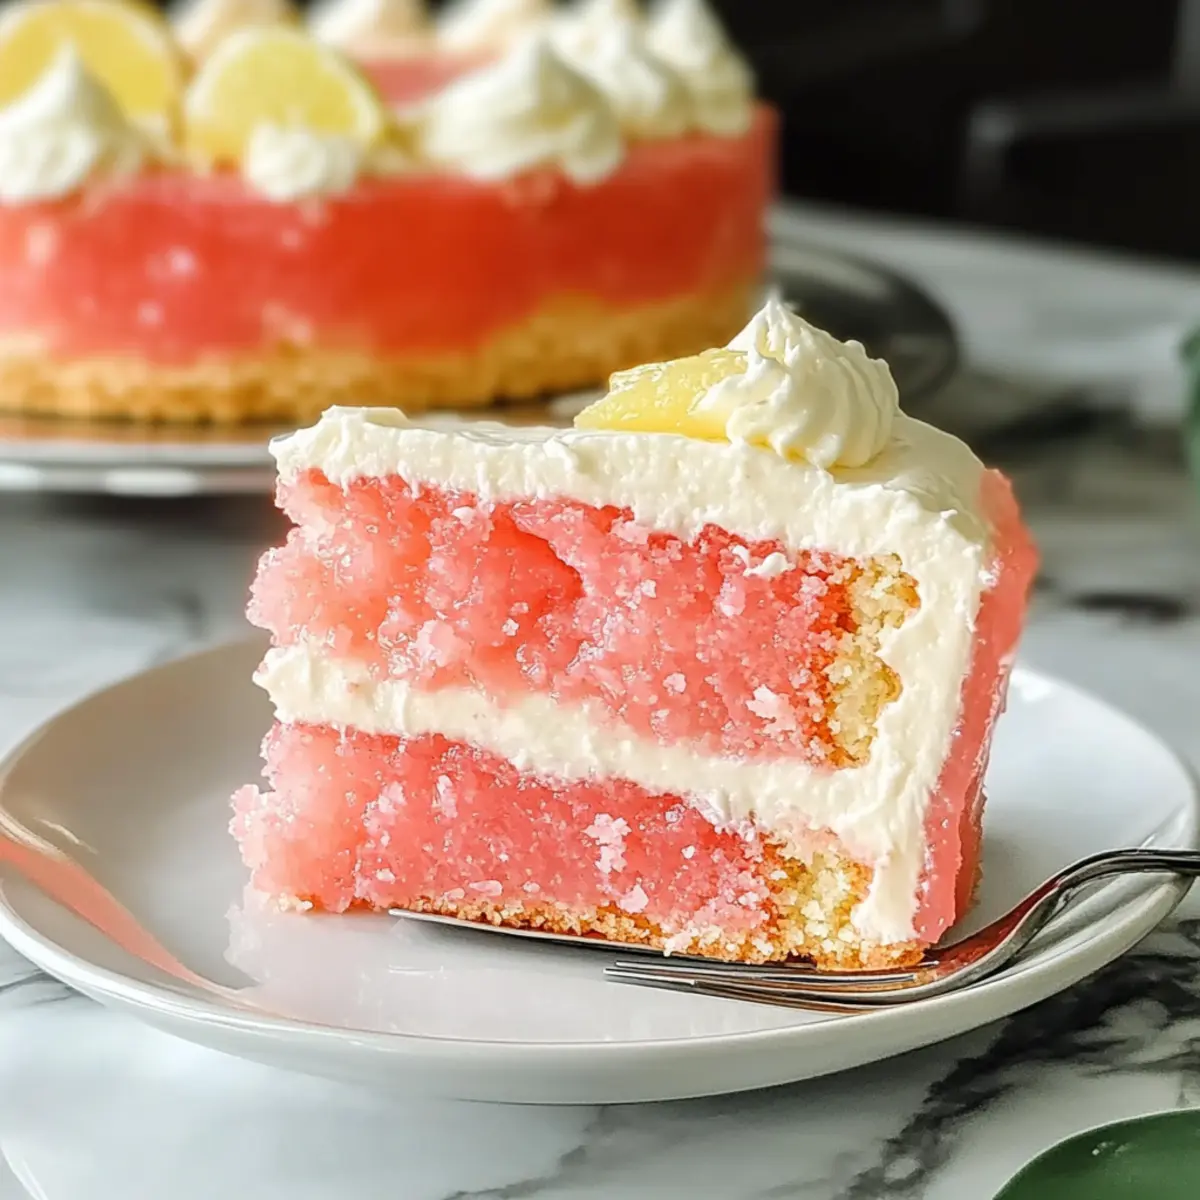
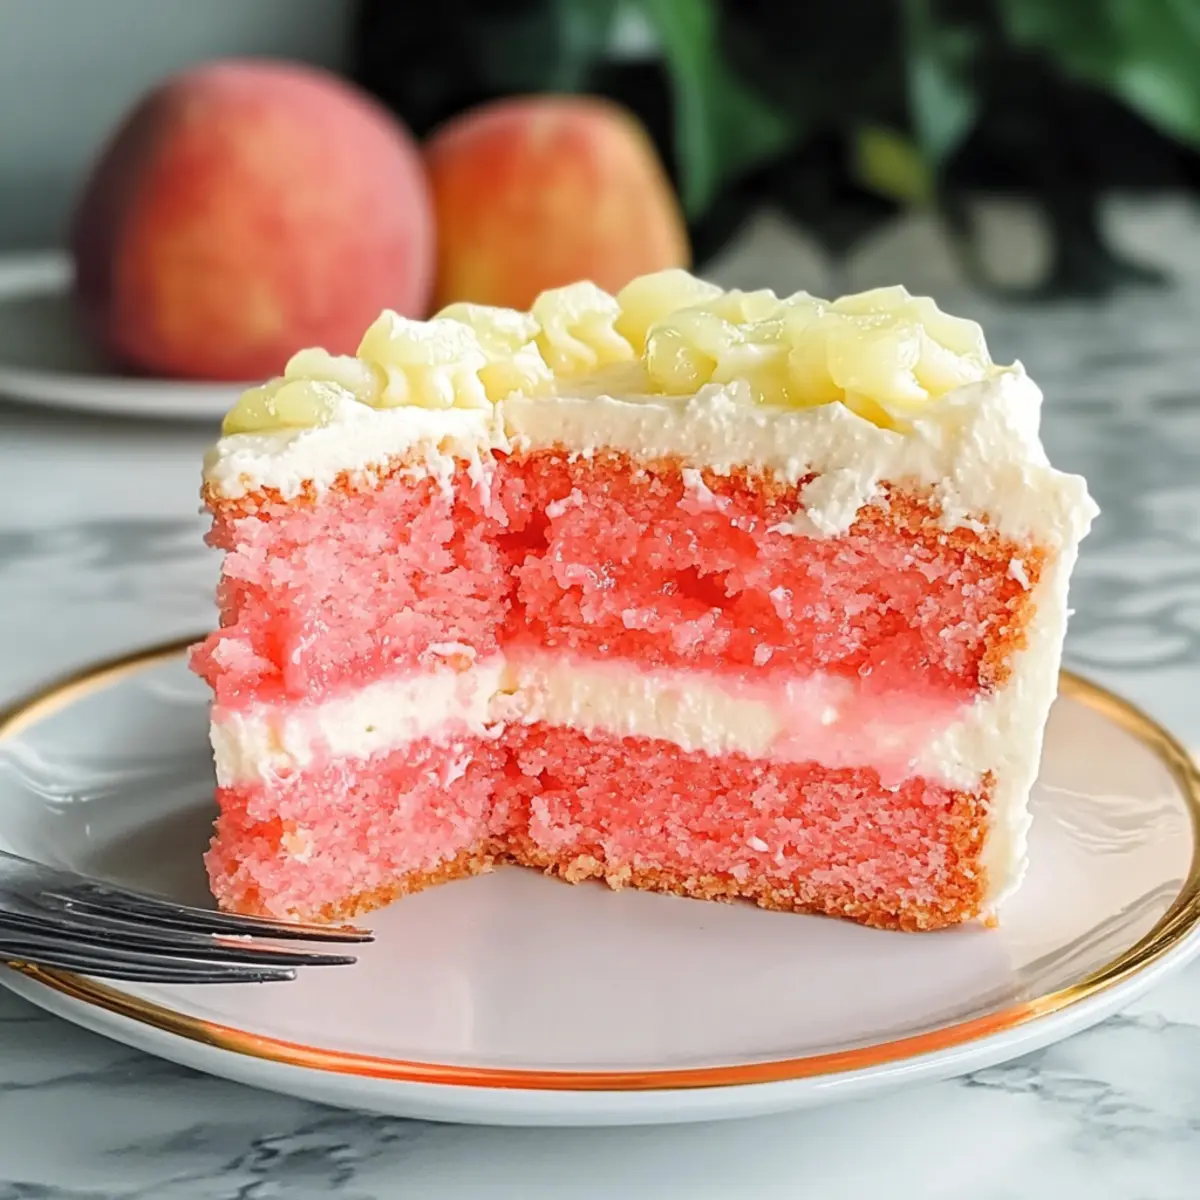
Visual delight: Topped with a glossy guava gel and adorned with coconut flakes, it’s not only delicious but also stunning enough to impress your guests.
Indulge in this slice of paradise and make moments memorable!
Hawaiian Guava Cake Ingredients
For the Cake
• Strawberry Cake Mix – A great base that provides sweetness and structure; for a gluten-free option, swap in a gluten-free cake mix.
• Guava Juice/Nectar – Adds a refreshing tropical flavor and moisture; fresh or frozen guava juice work beautifully if available.
• Eggs – Key for moisture and structure; use room temperature eggs for easy mixing, or substitute with unsweetened applesauce for an egg-free option.
• Coconut Oil – Enhances moisture and contributes a subtle coconut flavor; melt it for better incorporation, or use vegetable oil if needed.
For the Cream Cheese Layer
• Cream Cheese – The heart of this layer, offering richness and creaminess; soften it to room temperature for easier mixing, or opt for dairy-free cream cheese for vegan alternatives.
• Granulated Sugar – Sweetens the cream cheese mixture; feel free to adjust the amount according to your sweetness preference.
• Vanilla Extract – Elevates the flavor of the cream cheese; pure vanilla gives the best results.
• Cool Whip – Lightens the texture of the cream cheese layer for a billowy finish; swap it with whipped coconut cream for a dairy-free twist.
For the Guava Gel
• Cornstarch – Thickens the guava gel beautifully; make sure to mix it with water before adding to prevent lumps and ensure a smooth texture.
• Sweetened Coconut Flakes – Perfect for garnishing; they add a tropical touch and flavor; if you prefer, use unsweetened coconut flakes or omit for a cleaner look.
Create your Hawaiian Guava Cake masterpiece with these ingredients, and let the tropical adventure begin!
Step‑by‑Step Instructions for Hawaiian Guava Cake
Step 1: Preheat and Prepare
Preheat your oven to 350°F (175°C) and grab a 13 x 9 baking dish. Lightly coat the dish with vegetable spray to ensure the Hawaiian Guava Cake releases easily once baked. Having everything set up ahead of time will streamline the baking process, making it even more enjoyable.
Step 2: Mix the Batter
In a large mixing bowl, combine the Strawberry Cake Mix, Guava Juice, eggs, and melted Coconut Oil. Use a mixer to blend the ingredients first on low speed for about 30 seconds, then increase to medium-high for 2 minutes. This creates a smooth, well-incorporated batter, ready to transform into a cake that’s soft and fluffy.
Step 3: Bake the Cake
Pour the vibrant batter into your prepared baking pan, spreading it evenly. Place it in the preheated oven and bake for 24-26 minutes. Check doneness by inserting a toothpick; it should come out clean when the cake is perfectly baked. The aroma will fill your kitchen, teasing your senses with tropical goodness.
Step 4: Cool Completely
Once baked, remove the cake from the oven and let it cool in the pan for 10 minutes. Then, transfer the cake to a wire rack to cool completely. This step is vital to ensure the structure holds up for layering the cream cheese mixture on top, preventing any melting mishaps.
Step 5: Prepare the Cream Cheese Layer
In another mixing bowl, beat the Cream Cheese until smooth and fluffy. Gradually mix in Granulated Sugar and Vanilla Extract until well combined. Gently fold in the Cool Whip for a light, airy texture. Refrigerate this luscious cream cheese mixture while the cake cools, allowing the flavors to meld beautifully.
Step 6: Layer the Cream Cheese Mixture
Once the cake has cooled completely, spread the cream cheese mixture evenly over the top. Make sure to cover the surface entirely for a rich, creamy layer that adds a delightful contrast. Place the cake in the refrigerator for at least 30 minutes to help it set nicely before adding the guava gel topping.
Step 7: Make the Guava Gel
In a saucepan, combine Guava Juice and sugar, bringing it to a gentle boil. Prepare a cornstarch slurry by mixing cornstarch with a little water, then stir this into the simmering juice. Cook until the mixture thickens, about 2-3 minutes, then remove from heat and allow to cool in the refrigerator.
Step 8: Top with Guava Gel and Garnish
Once the guava gel has cooled, gently glaze it over the cream cheese layer, ensuring an even spread. For an inviting touch, sprinkle Sweetened Coconut Flakes on top. Return the Hawaiian Guava Cake to the refrigerator until serving, allowing the flavors to deepen and the gel to fully set for that perfect, creamy slice.
Hawaiian Guava Cake Variations & Substitutions
Feel free to play around with this recipe to make it your own; the tropical flavors can take on delightful twists!
- Gluten-Free: Substitute the Strawberry Cake Mix with a gluten-free cake mix for a delicious alternative without compromising on taste.
- Fruit Twist: Dice fresh fruits like pineapple or mango and fold them into the batter for added bursts of tropical flavor. Imagine each bite filled with juicy pineapple goodness!
- Egg-Free Option: Replace the eggs with unsweetened applesauce to create a moist, egg-free version without losing the cake’s fluffiness. Your friends won’t even notice the difference!
- Dairy-Free Delight: Use dairy-free cream cheese and whipped topping to keep it vegan-friendly while still achieving that rich, creamy layer. Nobody will miss the dairy!
- Coconut Boost: Incorporate shredded coconut into the batter for an extra layer of tropical flavor and texture. This small addition elevates the cake to a whole new level of yum!
- Citrus Zest: Mix a teaspoon of lemon zest into the cream cheese layer for a delightful citrus contrast that enhances the overall flavor profile. It adds a refreshing zing that makes each bite burst with brightness!
- Nutty Crunch: Sprinkle macadamia nuts or walnuts into the batter for added crunch and flavor. The combination of textures will make your Hawaiian Guava Cake truly unique!
- Cooling Companion: Serve it with a scoop of vanilla ice cream or a refreshing scoop of sorbet to balance out the sweetness. Your guests will adore the contrast of warm cake and cold ice cream!
Embrace your inner chef and let your creativity shine with these fun variations! If you’re looking for even more sweet adventures, why not try serving this cake alongside a delightful Pistachio Raspberry Cake or a luscious Pumpkin Cheesecake Cinnamon Roll? Happy baking!
How to Store and Freeze Hawaiian Guava Cake
Fridge: Store leftover Hawaiian Guava Cake in an airtight container in the refrigerator for up to 3 days. This keeps the cake moist and fresh, ready for a sweet treat anytime!
Freezer: If you want to preserve it longer, freeze the cake for up to 2 months. Wrap it tightly in plastic wrap and then in aluminum foil to prevent freezer burn.
Reheating: To enjoy your cake again, thaw it in the fridge overnight, then reheat individual slices in the microwave for 10-15 seconds, bringing back its delightful fluffiness and flavor.
Serving Tip: When serving, consider adding a dollop of whipped cream or a scoop of ice cream for an extra touch of tropical goodness!
What to Serve with Tropical Hawaiian Guava Cake?
Gather your friends and family for a tropical feast, where every dish complements that gorgeous slice of Hawaiian Guava Cake.
-
Creamy Vanilla Ice Cream: A scoop of vanilla ice cream brings a cool creaminess that balances the cake’s sweetness, enhancing its tropical flavors.
-
Zesty Lemonade: A tall glass of tart lemonade offers refreshing contrast, cutting through the richness of the cake for a perfect palate cleanser.
-
Tropical Fruit Salad: Juicy chunks of fresh pineapple, mango, and kiwi added to a tart lime dressing create a refreshing side to celebrate those tropical vibes.
-
Pineapple Coconut Pudding: Light and airy, this pudding echoes the flavors of the cake while providing a delightful, creamy texture that’s sure to please.
-
Coconut Macaroons: These sweet, chewy treats add a crunch that harmonizes beautifully with the soft and fluffy layers of the cake.
-
Caramel Brownie Cheesecake: An indulgent dessert like this offers a rich counterpart to the lightness of the Hawaiian Guava Cake, delightful for special occasions.
-
Iced Tea with Mint: A refreshing mint-infused iced tea enhances the tropical experience, making every bite of cake feel like a breath of fresh air.
Indulge in a delightful tropical meal that will make your gathering unforgettable!
Make Ahead Options
Preparing the Hawaiian Guava Cake in advance is a fantastic way to save time and ensure a delightful dessert awaits you! You can bake the cake up to 24 hours ahead of time; just allow it to cool completely before wrapping it tightly in plastic wrap to maintain its moisture. Additionally, the cream cheese layer can be mixed and refrigerated for up to 3 days, allowing the flavors to meld beautifully. When you’re ready to serve, simply spread the cream cheese mixture over the cooled cake and chill for a bit more before topping it with the guava gel. This approach not only streamlines your prep but guarantees each slice remains just as delicious as if made fresh!
Expert Tips for Hawaiian Guava Cake
-
Room Temperature Ingredients: Ensure all ingredients, especially cream cheese and eggs, are at room temperature for smoother mixing and better texture.
-
Watch the Baking Time: Keep an eye on the cake while baking; overbaking can lead to dryness. Start checking for doneness a few minutes early.
-
Cool Completely: Allow the cake to cool fully on a wire rack before spreading the cream cheese layer. This helps maintain its structure and prevents melting.
-
Chill Before Serving: Refrigerating the cake after layering with cream cheese allows flavors to meld beautifully and makes slicing easier.
-
Perfect Guava Gel: When making the guava gel, mix cornstarch with water beforehand to avoid lumps, ensuring a smooth glaze for your Hawaiian Guava Cake.
Hawaiian Guava Cake Recipe FAQs
What type of guava juice should I use?
Absolutely! For the best flavor, use either fresh or frozen guava juice. If you’re short on options, canned guava nectar is also a great alternative. Just make sure it’s 100% juice for a true tropical experience!
How should I store leftover Hawaiian Guava Cake?
Store leftover cake in an airtight container in the refrigerator for up to 3 days. This keeps it fresh and moist, so you can enjoy a slice of paradise whenever the craving strikes. If you prefer, you can also freeze it for up to 2 months, using plastic wrap and aluminum foil to protect it from freezer burn!
Can I freeze Hawaiian Guava Cake?
Yes, you can! To freeze, first wrap the completely cooled cake in plastic wrap, then cover it with aluminum foil for added protection. When you’re ready to enjoy, simply thaw it in the fridge overnight. For a quick treat, warm individual slices in the microwave for 10-15 seconds.
What if my guava gel doesn’t thicken properly?
Very! If your guava gel isn’t thickening as expected, ensure that you mixed the cornstarch with water before adding it to the boiling guava juice. This step is crucial as it helps prevent lumps. Cook the mixture for an additional minute or two until it reaches the desired consistency, and don’t forget to stir constantly!
Is there a gluten-free option for this recipe?
Absolutely! You can easily make this Hawaiian Guava Cake gluten-free by substituting the strawberry cake mix with a gluten-free equivalent. Just make sure to double-check the other ingredients, such as the guava juice and coconut flakes, to ensure they’re also gluten-free.
Can I use dairy-free alternatives in this recipe?
Very much so! You can definitely opt for dairy-free cream cheese and whipped coconut cream instead of regular cream cheese and Cool Whip to make this cake suitable for vegans or those with lactose intolerance. This way, everyone can join in the tropical delight!

Tropical Hawaiian Guava Cake: A Slice of Paradise Delight
Ingredients
Equipment
Method
- Preheat your oven to 350°F (175°C) and lightly coat a 13 x 9 baking dish with vegetable spray.
- In a large mixing bowl, combine the Strawberry Cake Mix, Guava Juice, eggs, and melted Coconut Oil. Mix on low speed for 30 seconds, then medium-high for 2 minutes until smooth.
- Pour the batter into the prepared baking pan and bake for 24-26 minutes. Check doneness with a toothpick; it should come out clean.
- Let the cake cool in the pan for 10 minutes, then transfer to a wire rack to cool completely.
- Beat the Cream Cheese until smooth. Gradually mix in Granulated Sugar and Vanilla Extract. Fold in Cool Whip and refrigerate the mixture.
- Once cooled, spread the cream cheese mixture evenly over the cake and refrigerate for at least 30 minutes.
- In a saucepan, combine Guava Juice and sugar, bring to a gentle boil. Mix cornstarch with water, stir into the juice and cook until thickened, about 2-3 minutes.
- Once cooled, glaze the guava gel over the cream cheese layer and sprinkle Sweetened Coconut Flakes on top. Refrigerate until serving.
Leave a Reply