
As I watched the cheese melt and the chicken sizzle in the pan, a wave of nostalgia washed over me, recalling countless weeknight dinners filled with laughter and deliciousness. These Cheesy Garlic Chicken Wraps are not just a meal; they’re an experience waiting to happen. Perfectly gooey and delightfully crisp, they’re the quick dinner solution that fits seamlessly into a busy life while also being completely customizable. Whether you’re feeding a family or whipping up a casual gathering, these wraps are a guaranteed crowd-pleaser. Plus, with options for gluten-free tortillas and a variety of cheese choices, you can easily cater to everyone’s tastes. What flavors will you add to make them your own?
Why are Cheesy Garlic Wraps a Must-Try?
Simplicity: Preparing these wraps is a breeze, making them perfect for even the busiest weeknights.
Customizable: You can easily swap out cheeses or throw in favorite vegetables, creating a dish that fits your unique palate.
Crowd-Pleaser: They’re a guaranteed hit at any gathering, evoking smiles and compliments from family and friends.
Time-Saving: Ready in just a few steps, these wraps allow you to enjoy a satisfying meal without fuss.
Versatile: Pair them with a fresh salad or serve as tasty pinwheels for appetizers, making them suitable for various occasions.
Add a twist: If you’re in the mood for a delicious dessert, try making Chocolate Chip Sourdough to complement your meal!
Cheesy Garlic Chicken Wrap Ingredients
• Perfect for your next family meal.
For the Filling
• Chicken – Provides protein; rotisserie chicken can be a great time-saver.
• Garlic – Adds bold flavor; use freshly minced garlic for the best taste.
• Cheese (e.g., cheddar, mozzarella) – Brings meltiness; feel free to mix and match for variety.
For the Wraps
• Tortillas – The foundation; try gluten-free or whole wheat for a healthier option.
• Olive Oil – Ideal for sautéing garlic; substitute with butter for added richness.
• Butter – Used for toasting wraps; gives that golden crispiness everyone loves.
For Garnish
• Parsley – Optional; a sprinkle adds a fresh touch before serving.
Step‑by‑Step Instructions for Cheesy Garlic Chicken Wraps
Step 1: Cook Chicken
Begin by preheating your grill or stovetop pan over medium-high heat. Season your chicken breasts lightly with salt and pepper, then cook for 6-7 minutes per side or until they reach an internal temperature of 165°F, ensuring they’re cooked through and juicy. Once ready, remove the chicken from the heat, let it rest for a couple of minutes, and then dice it into bite-sized pieces for your Cheesy Garlic Chicken Wraps.
Step 2: Sauté Garlic
Heat a tablespoon of olive oil in a skillet over medium heat. Once the oil is shimmering, add minced garlic and sauté it for about 30 seconds, or until it becomes fragrant and starts to turn golden but not browned. This step infuses the oil with delicious garlic flavor, which will enhance your chicken filling in the Cheesy Garlic Chicken Wraps.
Step 3: Combine Chicken and Cheese
Once the garlic is ready, add the diced chicken to the skillet, stirring to coat it evenly with the fragrant garlic oil. Gradually mix in your chosen cheese—such as mozzarella or cheddar—until it melts into gooey perfection, about 2-3 minutes. Keep stirring until the chicken is coated and the total mixture is warm and cheesy; this will be the delicious filling for your wraps.
Step 4: Assemble Wraps
Take a warm tortilla and place a generous spoonful of the cheesy chicken mixture at the center. Fold the sides of the tortilla over the filling, then roll it tightly from the bottom up, creating a secure wrap. This technique keeps all the gooey goodness from your Cheesy Garlic Chicken Wraps enclosed and ready for toasting.
Step 5: Toast Wraps
In the same skillet, add a little butter over medium heat until melted. Place the assembled wraps seam-side down in the skillet, cooking for 2-3 minutes until they turn golden brown and crisp on the outside. Carefully flip them and toast the other side for the same duration, ensuring that each wrap is perfectly crunchy for an enjoyable bite.
Step 6: Slice and Serve
Once the wraps are golden and crispy, take them out of the skillet and let them rest for a minute. This step helps the filling settle a bit. Slice each wrap diagonally into halves or quarters, as per your preference. Optionally, garnish with chopped parsley for a bright finishing touch before serving your Cheesy Garlic Chicken Wraps warm and inviting!
Make Ahead Options
These Cheesy Garlic Chicken Wraps are a fantastic option for busy home cooks looking to save time during the week! You can prepare the cheesy chicken filling up to 24 hours in advance by cooking the chicken and sautéing the garlic, then mixing in your choice of cheese. Store the mixture in an airtight container in the refrigerator to keep it fresh. On the day you plan to serve, simply assemble the wraps and toast them as instructed. This method not only saves time but ensures that each bite remains just as delicious, with crispy edges and a warm, gooey center. Enjoy the convenience of meal prep with these delicious wraps!
Expert Tips for Cheesy Garlic Chicken Wraps
-
Pre-cook Chicken: Ensure the chicken is fully cooked before adding it to the wraps to avoid any food safety issues.
-
Garlic Timing: Sauté garlic until golden but not burnt to maintain its flavor. Overcooking can make it bitter, ruining the cheesy goodness.
-
Don’t Overfill: Keep the filling to a reasonable amount to prevent spillage during cooking, ensuring perfectly wrapped Cheesy Garlic Chicken Wraps.
-
Customize Wisely: Feel free to experiment with different cheeses, but remember that high-moisture cheeses can make the filling soggy.
-
Crispy Finish: Toast the wraps in a skillet rather than baking them. This technique ensures they’re perfectly crunchy on the outside while remaining gooey inside.
What to Serve with Cheesy Garlic Chicken Wraps?
The perfect meal is just a few side dishes away, creating a delightful dining experience full of complementary flavors.
-
Fresh Green Salad: A light salad with mixed greens and a zesty vinaigrette adds a refreshing contrast to the rich wraps. The crisp veggies balance out the gooey filling, making every bite feel light and wholesome.
-
Seasoned Potato Wedges: Crispy potato wedges, seasoned to perfection, offer a hearty texture that pairs beautifully with the meltiness of the wraps. They provide a satisfying crunch that complements the cheesy goodness inside.
-
Tomato Soup: A warm bowl of tomato soup is a classic comfort that pairs beautifully with these wraps. The soup’s tangy flavor enhances the overall meal while the creamy texture invites you to dip, creating a delightful synergy of tastes.
-
Sautéed Vegetables: Colorful sautéed bell peppers, zucchini, and onions lend a burst of freshness to your plate. The vibrant veggies bring both nutrition and flavor, making the meal heartier without overshadowing the prominent garlic and cheese flavors.
-
Garlic Bread Sticks: A twist on a classic side, buttery garlic bread sticks provide another layer of that beloved garlic flavor. They offer an inviting aroma and a satisfying crunch, perfect for indulging in while enjoying your wraps.
-
Savory Quinoa Salad: Nutty quinoa tossed with cherry tomatoes, cucumbers, and feta is not only nutritious but also adds a uniqueness to the table. This salad’s delightful textures and flavors create an appealing contrast to the creamy cheesy wrap.
-
Roasted Corn on the Cob: Sweet, juicy corn on the cob, brushed with herb-infused butter, makes for a fun and interactive side. Its sweetness complements the savory chicken and cheese filling, adding a summer vibe to your meal.
-
Chilled Lemonade or Iced Tea: For a refreshing drink, serve chilled lemonade or iced tea, enhancing the flavors of your wraps. A light, citrusy drink helps cleanse the palate and complements the richness of the meal beautifully.
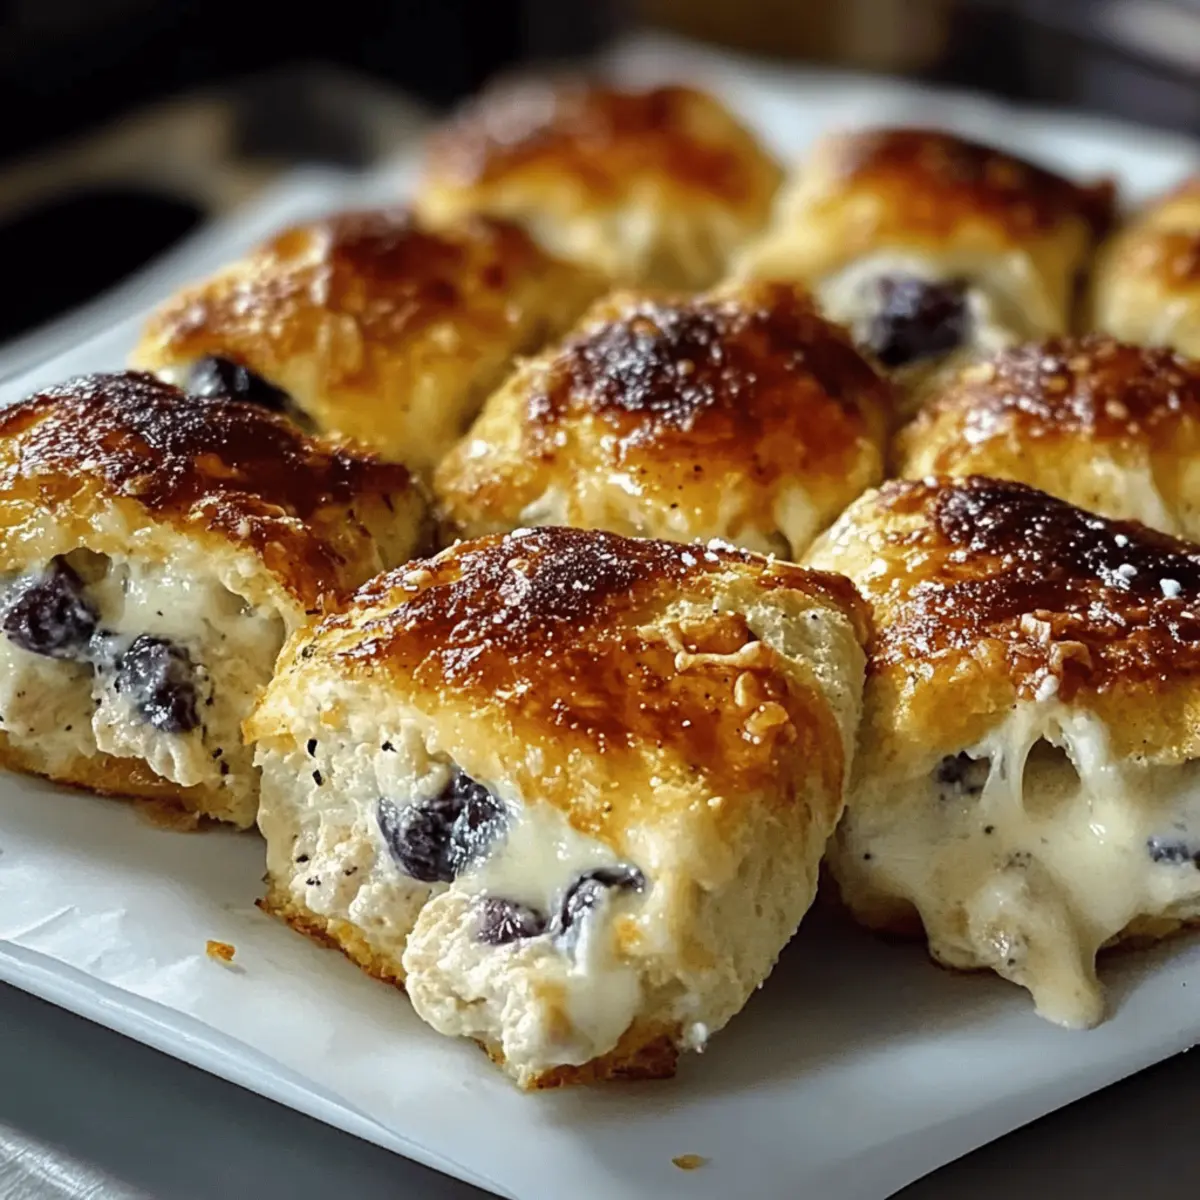
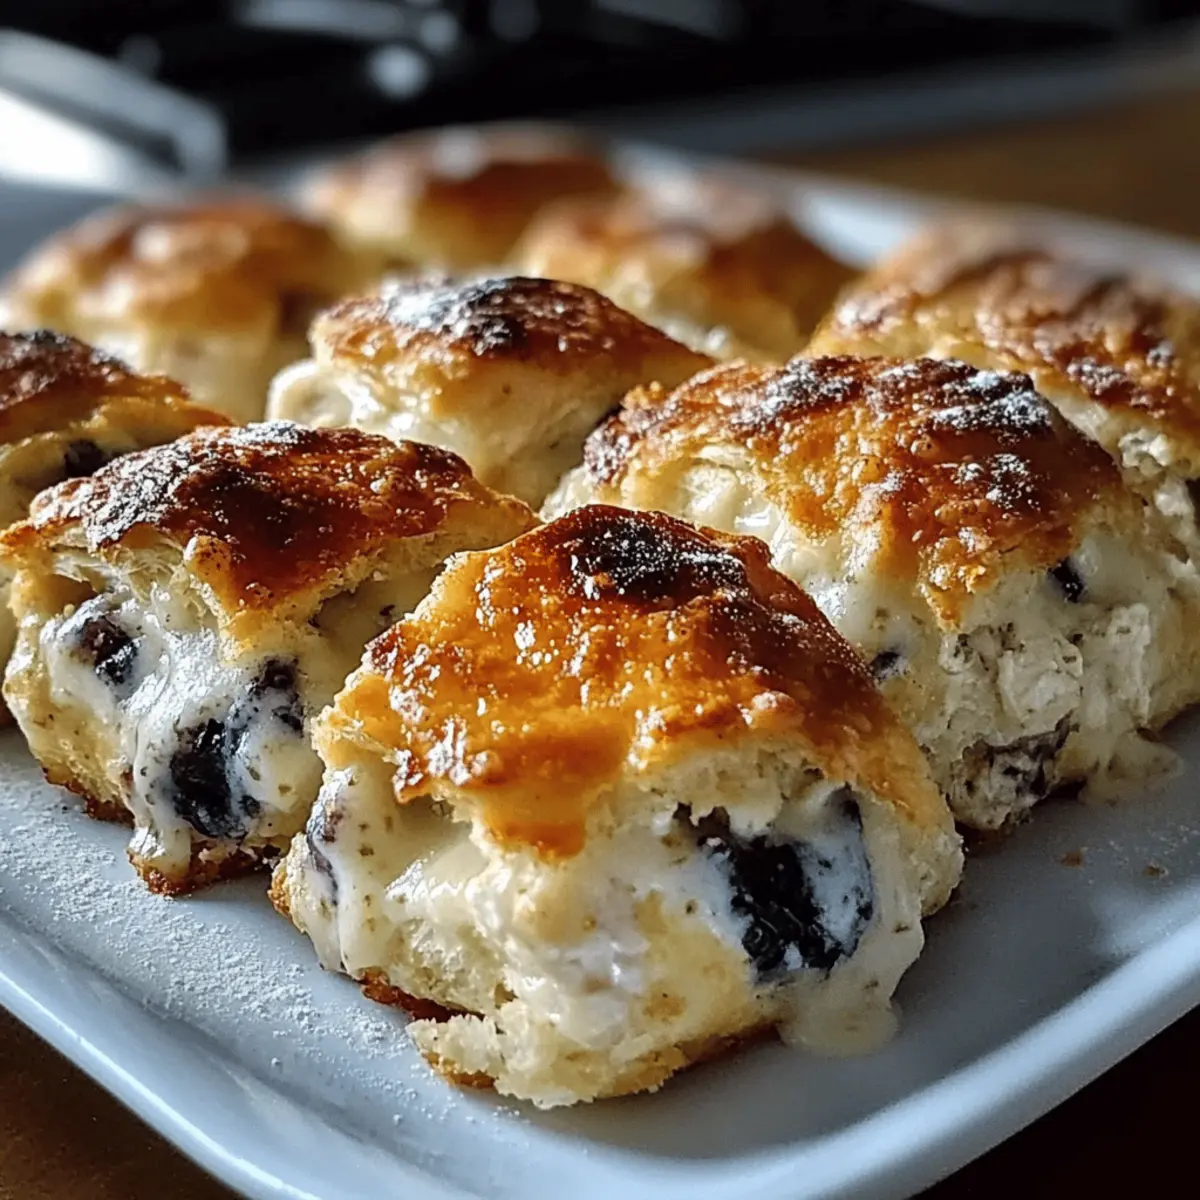
Blueberry Biscuits Variations & Substitutions
Feel free to personalize these blueberry biscuits, making them your own with delightful twists and alternatives that can brighten your mornings!
- Gluten-Free: Use a gluten-free flour blend to ensure everyone can enjoy these biscuits without compromise.
- Dairy-Free: Substitute milk with almond or oat milk and use coconut oil instead of butter for a delicious vegan option.
- Fruit Twist: Swap blueberries for raspberries or chopped strawberries for a vibrant burst of flavor—each fruit brings a unique taste!
- Herb Infusion: Add a teaspoon of fresh lemon zest or a sprinkle of lavender for an aromatic enhancement that’ll elevate your biscuits.
- Extra Sweetness: Stir in a handful of mini chocolate chips or a tablespoon of honey for a sweet treat that pairs beautifully with a morning cup of coffee.
- Texture Alteration: Experiment with buttermilk instead of regular milk for a lighter, fluffier consistency. Your biscuits will melt in your mouth!
- Cheesy Goodness: Add shredded cheese like cheddar or feta to the dough for a savory version—perfect as a breakfast side!
- Mini Biscuits: For bite-sized delights, scoop smaller portions of dough and bake as mini biscuits that are ideal for sharing or snacking.
With these variations, each batch of blueberry biscuits can become a brand-new cozy morning treat. Pair them with your favorite spreads, or enjoy them alongside a steaming cup of coffee—just like with these Chocolate Chip Sourdough for a special breakfast experience!
Storage Tips for Cheesy Garlic Chicken Wraps
Fridge: Store leftover wraps in an airtight container for up to 3 days to maintain freshness and prevent sogginess.
Freezer: For longer storage, freeze wrapped and tightly sealed in plastic wrap or a freezer-safe bag for up to 2 months.
Reheating: Reheat in a skillet over medium heat for 5-7 minutes, flipping halfway through to keep them crispy. Avoid microwaving, as it can make them rubbery.
Make-Ahead: You can assemble the Cheesy Garlic Chicken Wraps ahead of time and keep them in the fridge, ready to toast when needed for a quick meal.

Cheesy Garlic Chicken Wraps Recipe FAQs
How do I select the best chicken for my wraps?
Absolutely! Look for chicken that is firm and free of blemishes. If using whole pieces, choose those that are pink and moist. For a convenient option, rotisserie chicken works wonders—just shred it for easy mixing.
What’s the best way to store leftover Cheesy Garlic Chicken Wraps?
I recommend placing any leftover wraps in an airtight container in the fridge. They’ll last for about 3 days. Just make sure they cool completely before sealing to avoid moisture buildup, which can make them soggy.
Can I freeze Cheesy Garlic Chicken Wraps?
Very! To freeze, tightly wrap each individual wrap in plastic wrap, then place them in a freezer bag or aluminum foil. They can be frozen for up to 2 months. When you’re ready to enjoy them, simply thaw overnight in the fridge and reheat in a skillet to keep them crispy.
What should I do if my wraps are falling apart during meal prep?
That’s a common issue! If your wraps are spilling, try not to overfill them. Aim for about 1/3 cup of filling per tortilla. Additionally, rolling them tightly and securing with a toothpick can help keep everything neatly enclosed during cooking.
Are these wraps suitable for people with dietary restrictions?
Yes, these wraps can easily accommodate various dietary needs! Use gluten-free tortillas for those avoiding gluten and feel free to incorporate low-fat cheese or add more veggies. Always check ingredient labels to avoid allergens, especially if serving guests or family members with sensitivities.
How can I enhance the flavor of my wraps before toasting?
For an extra flavor boost, brush your tortillas with a mixture of melted garlic butter before toasting. This adds not only flavor but also a fragrant aroma that elevates the overall experience!
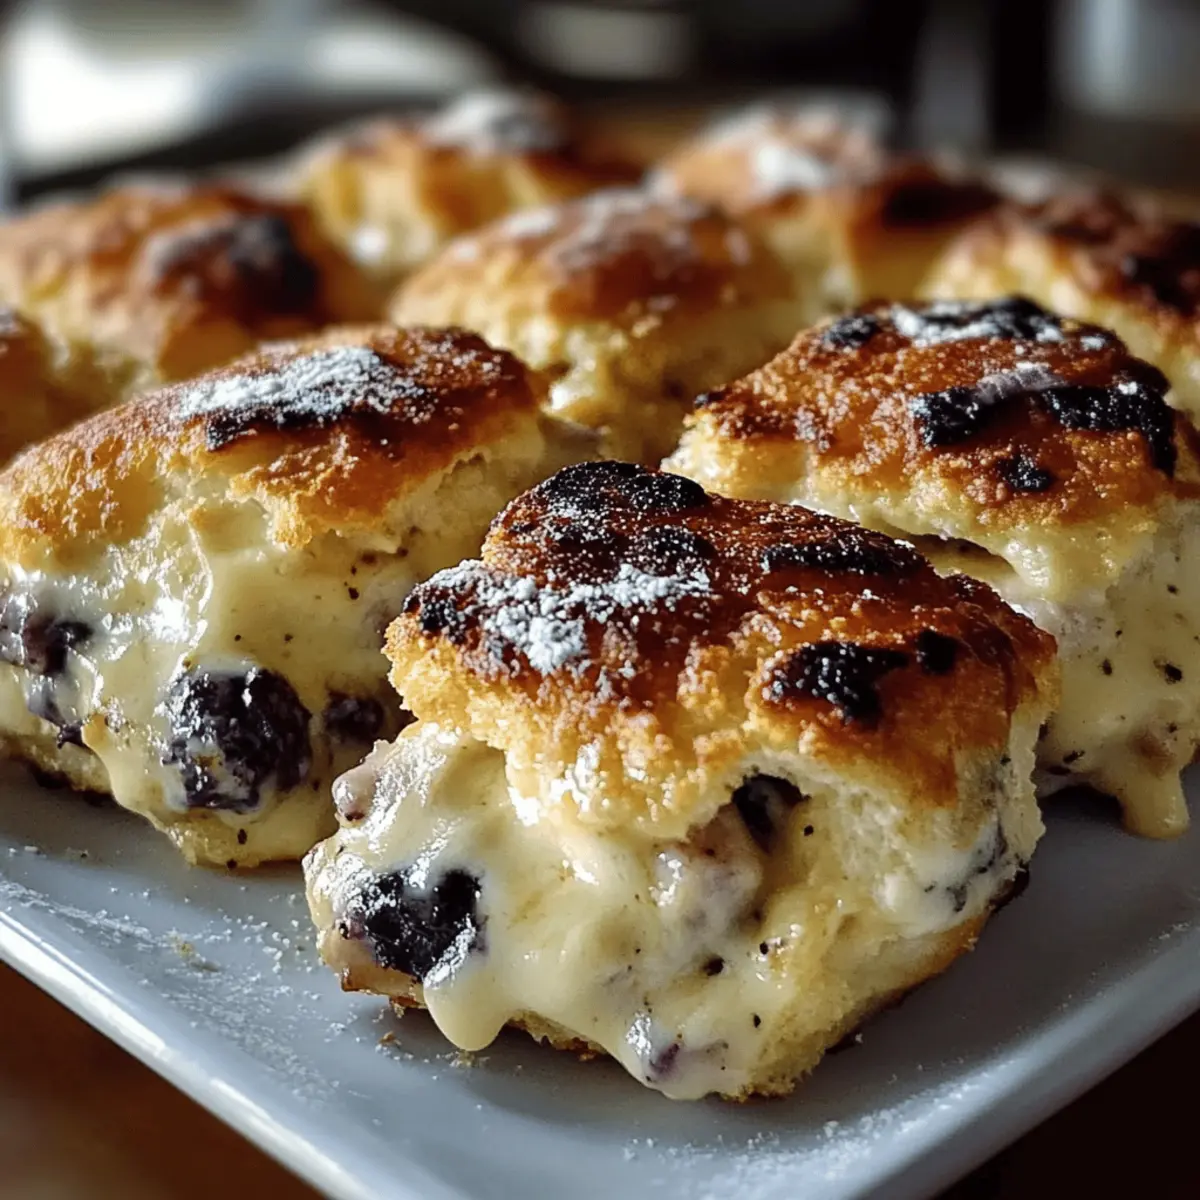
Fluffy Blueberry Biscuits That Melt in Your Mouth
Ingredients
Equipment
Method
- Preheat the oven to 425°F (220°C).
- In a mixing bowl, combine flour, baking powder, sugar, and salt.
- Cut in the cold butter until the mixture resembles coarse crumbs.
- Stir in the milk until just combined, then gently fold in blueberries.
- Drop spoonfuls of dough onto a baking sheet lined with parchment paper.
- Bake for 15-20 minutes until golden brown.
- Remove from oven and let cool slightly before serving.
Leave a Reply