
As I took my first bite of antojitos from a bustling street vendor in Mexico City, a symphony of textures and flavors danced on my palate. These delightful Mexican street food appetizers are all about comfort with their cheesy filling wrapped snugly in a warm tortilla. The best part? They come together in just under 30 minutes, making them the perfect option for when you’re craving something homemade yet quick. With a crispy outer layer and a gooey center, these antojitos are sure to be a hit at your next gathering, especially when paired with a vibrant pesto sour cream dipping sauce. Ready to elevate your appetizer game with a burst of flavor and customization? Let’s dive into this mouthwatering recipe!

Why Are Antojitos So Irresistible?
Uniqueness, Antojitos combine the essence of street food with homemade comfort, capturing nostalgia in every bite. Flexibility, you can easily swap ingredients to suit your tastes, making them perfect for your dietary preferences. Quick and Simple, ready in under 30 minutes, these appetizers are ideal for impromptu gatherings or late-night cravings. Add a flavor boost with the pesto sour cream, which takes them to the next level! Plus, they are a crowd-pleaser; everyone will be coming back for more! Want to explore other variations? Check out how to customize these delicious bites even further in our recipe variations.
Antojitos Ingredients
For the Filling
- Flour Tortillas – Provides the base for the filling; can substitute with corn tortillas for a gluten-free option.
- Cream Cheese – Adds a creamy, rich texture to the filling; ensure it’s softened for easier mixing.
- Diced Green Chilies – Adds a mild spicy kick and flavor; canned or fresh jalapeños/habaneros can also be used for increased heat.
- Cheddar Cheese – Gives a sharp, savory flavor and enhances the cheesiness; can substitute with mozzarella for a milder taste.
- Red Onion – Offers sweetness and crunch; yellow or white onions can also be used if red is unavailable.
- Bell Pepper – Adds color and texture; any bell pepper color works, but feel free to use other peppers for variability.
- Sour Cream – Contributes creaminess and balances flavors; may use Greek yogurt as a healthier alternative.
- Paprika – Enhances the flavor profile with smokiness; use smoked paprika for a deeper flavor.
- Garlic Powder – Provides savory depth; fresh minced garlic can be used but should be adjusted for intensity.
- Onion Powder – Complements the fresh onion flavors.
- Cayenne – Adds heat; adjust the quantity to taste for preferred spiciness.
For the Dipping Sauce
- Basil Pesto – Used to create the dipping sauce, adding freshness; any brand or homemade pesto works well.
Step‑by‑Step Instructions for Antojitos
Step 1: Preheat the Oven
Begin by preheating your oven to 350°F (175°C). While the oven is heating, take a baking sheet and line it with parchment paper to keep your antojitos from sticking. This setup ensures a smooth cooking process and makes cleanup a breeze, so you’re ready to enjoy these mouthwatering bites soon!
Step 2: Prepare the Filling
In a large mixing bowl, combine softened cream cheese, diced green chilies, and shredded cheddar cheese. Then, stir in finely chopped red onion, bell pepper, sour cream, paprika, garlic powder, onion powder, and a pinch of cayenne. Mix everything until smooth and well-combined, creating a rich and flavorful filling for your antojitos.
Step 3: Assemble the Antojitos
Take a tortilla and spread a generous tablespoon of the cheesy filling down the center. Roll the tortilla tightly to encase the filling, ensuring it remains intact. Once rolled, slice the tortilla into five pieces at a 45-degree angle. Lay the pieces cut-side up on the prepared baking sheet, making sure they are evenly spaced.
Step 4: Bake to Perfection
Slide the baking sheet into your preheated oven and bake the antojitos for 8 minutes. After that, switch your oven to broil and continue cooking for an additional 5 minutes. Keep a close eye on them, as they should turn golden brown and crispy while the cheese inside melts beautifully.
Step 5: Cool and Serve
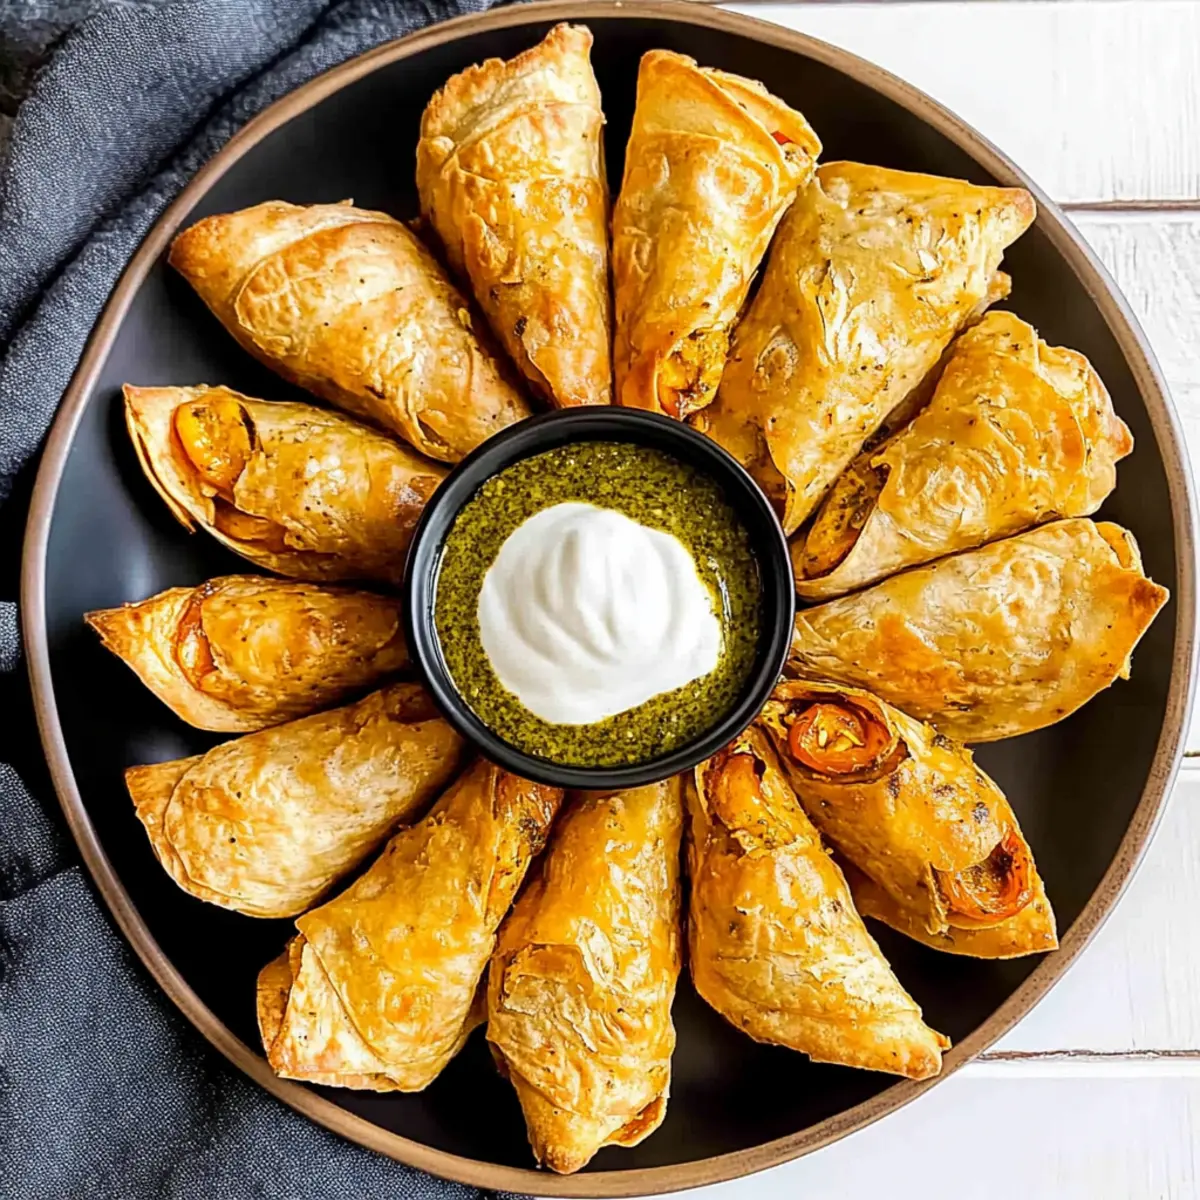
Once baked, remove the antojitos from the oven and let them cool slightly on the baking sheet for a few minutes. This helps them firm up a bit, making them easier to serve. Pair these irresistible antojitos with a bowl of basil pesto sour cream for dipping, and watch them disappear at your next gathering!

What to Serve with Cheesy Mexican Antojitos?
Create a vibrant and delicious meal by pairing these golden-brown delights with complementary sides and drinks that enhance every bite.
- Crispy Tortilla Chips: Perfect for adding extra crunch, serve these chips with salsa or guacamole for a fiesta-inspired snack.
- Fresh Guacamole: Cool and creamy, guacamole adds a refreshing contrast to the cheesy filling of the antojitos, making every bite harmonious.
- Zesty Mexican Street Corn: The grilled sweetness and lime kick of elote provide a burst of flavor that aligns beautifully with the rich antojitos.
Pair your antojitos with something sweet to round out the meal, such as Churros with Chocolate Sauce: These warm, sugary treats are the perfect way to end your Mexican feast on a delightful note.
- Classic Margarita: A refreshing, tangy drink complements the savory antojitos; its citrus notes balance out the richness of the cheese.
- Horchata: This sweet rice milk beverage adds a soothing, creamy flavor that contrasts nicely with the spices in the antojitos.
With these complementing dishes and beverages, you can create an unforgettable meal that showcases the vibrant flavors of Mexican cuisine.
How to Store and Freeze Antojitos
Fridge: Store leftover antojitos in an airtight container in the fridge for up to 4 days. This keeps them fresh and ready to reheat later.
Freezer: For longer storage, freeze assembled but unbaked antojitos. Place them in a single layer on a baking sheet until frozen, then transfer to a freezer bag for up to 2 months.
Reheating: To reheat, bake frozen antojitos straight from the freezer at 350°F (175°C) for 15-20 minutes, or until heated through and crispy. Enjoy the delightful flavors once again!
Make-Ahead Tip: You can prepare the filling a day in advance and refrigerate it. Assemble and bake the antojitos when you’re ready to serve for maximum freshness!
Antojitos Variations & Substitutions
Feel free to explore these delicious twists and turns for your antojitos, allowing your creativity to shine through in every bite.
-
Gluten-Free: Swap flour tortillas for corn tortillas to make the dish gluten-free without sacrificing taste.
-
Spicy Upgrade: Substitute diced green chilies with fresh jalapeños or serranos for a fiery kick that will awaken your taste buds.
-
Cheese Swap: Try using pepper jack cheese instead of cheddar for an extra layer of flavor and heat in your filling.
-
Protein Boost: Add cooked, shredded chicken or ground beef for a heartier appetizer that still keeps the spirit of antojitos.
-
Vegetarian Delight: Replace the meat with sautéed mushrooms or spinach, providing a lovely earthy flavor and great texture.
-
Creamy Twist: Use cream cheese mixed with Greek yogurt for a tangy filling that lightens the dish without losing its rich feel.
-
Flavorful Freshness: Incorporate fresh herbs like cilantro or chives into the filling for a vibrant taste that brings a burst of freshness.
-
Texture Variation: For a crunch, top your antojitos with breadcrumbs before baking, adding a delightful, crispy layer on the outside.
Dive deeper into enhancing your appetizers with our storage tips and explore an array of serving suggestions to make your antojitos the star of the table!
Make Ahead Options
These antojitos are a fantastic option for meal prepping, saving you time on busy weeknights! You can prepare the filling up to 24 hours in advance by mixing together the cream cheese, diced green chilies, cheddar cheese, red onion, bell pepper, sour cream, and spices, then refrigerating it in an airtight container. To maintain their quality, roll the tortillas and fill them just before baking to avoid sogginess. When you’re ready to serve, simply slice and bake the antojitos directly from the fridge, following the original baking instructions. With these make-ahead tips, you’ll have delicious, homemade antojitos with minimal effort!
Tips for the Best Antojitos
-
Watch the Broiling: Keep a close eye while broiling; antojitos can burn quickly if left unattended.
-
Soften Cream Cheese: Ensure your cream cheese is softened for easier mixing; this helps achieve a smooth filling that blends well.
-
Customize Fillings: Feel free to swap in your favorite ingredients, like adding shredded chicken or spinach to the filling for a delightful twist.
-
Avoid Sogginess: Avoid overfilling; a generous tablespoon of filling per tortilla is ideal to prevent sogginess and ensure a crispy exterior.
-
Pre-Make for Convenience: Consider preparing the filling a day ahead and refrigerating it. Assemble and bake when you’re ready to serve!
Antojitos Recipe FAQs
What type of tortillas should I use for antojitos?
You can absolutely use flour tortillas, which provide a soft and pliable wrap for the cheesy filling. If you’re looking for a gluten-free option, corn tortillas are a fantastic alternative! Just ensure they are warmed slightly before using to prevent cracking.
How should I store leftover antojitos?
Leftover antojitos can be stored in an airtight container in the refrigerator for up to 4 days. This keeps them fresh and ready to reheat! Just remember to allow them to cool completely before storing to maintain their crispy texture.
Can I freeze antojitos, and how should I do it?
Definitely! To freeze antojitos, assemble them but don’t bake just yet. Place the unbaked antojitos in a single layer on a baking sheet until frozen solid, then transfer them to a freezer bag. They will keep well for up to 2 months. When ready to eat, preheat your oven to 350°F (175°C) and bake them straight from the freezer for about 15-20 minutes, or until heated through and crispy.
What can I do if my antojitos are soggy?
To avoid sogginess, ensure you’re not overfilling your tortillas; a generous tablespoon of filling should suffice. If you find them soggy after baking, try broiling them for a couple of extra minutes to crisp up the edges. Also, consider pre-baking the tortillas for about 3-4 minutes before adding the filling to help firm them up.
Are there any dietary considerations I should be aware of?
Yes! If you’re cooking for anyone with allergies, be sure to check for any sensitivities to dairy, as the recipe includes cream cheese and cheddar cheese. To accommodate those who are lactose intolerant, you might choose to use dairy-free cheese alternatives, and for a healthier option, Greek yogurt can replace sour cream.
How can I enhance the flavor of my antojitos?
For an extra flavor boost, try adding spices like cumin or fresh herbs like cilantro to the filling. You can also experiment with different types of cheeses, such as pepper jack for added heat, or even mix in other vegetables like spinach or mushrooms to customize your antojitos to your tastes!

Mouthwatering Antojitos Perfect for Any Home Cook
Ingredients
Equipment
Method
- Preheat your oven to 350°F (175°C) and line a baking sheet with parchment paper.
- In a large mixing bowl, combine softened cream cheese, diced green chilies, and shredded cheddar cheese. Stir in red onion, bell pepper, sour cream, paprika, garlic powder, onion powder, and a pinch of cayenne.
- Spread a generous tablespoon of the cheesy filling down the center of a tortilla. Roll it tightly, slice into five pieces at a 45-degree angle, and place cut-side up on the baking sheet.
- Bake for 8 minutes, then broil for an additional 5 minutes until golden brown and crispy.
- Let them cool slightly then serve with basil pesto sour cream for dipping.
Leave a Reply